Build and Deploy an opensource project with Visual Studio Team Services without sharing secrets
When working with an opensource project it is important to not keep the keys in your source control, otherwise this happens. We all know we need to keep the secrects out of public source code but how do have a Continuous Integration/Continuous Deployment setup in the case of an open source project? One solution to keep secrets out of the source code is to use envirornment varibables. At runtime you read the enviroment variables that have been set up for the given environment.
This works great for server side applications, but in the case of mobile applications where environment variables are not avalible, another strategy is to have a file that contains all of the configuration values/secrets with placeholders and then at build time either load a different file or replace the placeholders in the file for a given envirornment. Many times you might still store the envirment specific information in a environment variable and use a pre-processor to replace the placeholder with the value.
I have been working on a project with Xamarin Forms that will be released as opensource and had to figure out how to set all of this up using Visual Studio Team Services (VSTS). I have been using VSTS for the build process with a final deployment to the Hockey App. This process has been great becuase I can trigger a build using a commit into the master branch or I can trigger it manually on demand. It greatly simplifies the build process and enables me to have a repeatble process.
Step By Step Process for loading secrets in Visual Studio Team Services
This step by step does not cover how to setup your build process for Xamarin VSTS but instead covers how to setup your build process so that you can dynamically load your secrets with out having to keep them in your source. Another benifit is this can also help you provide different values for your different environments (Dev, QA, Prod, etc.).
Initial Xamarin VSTS Configuration
If you are looking for how to setup your VSTS to build Xamarin applications check out:
0. Pre-Requisits
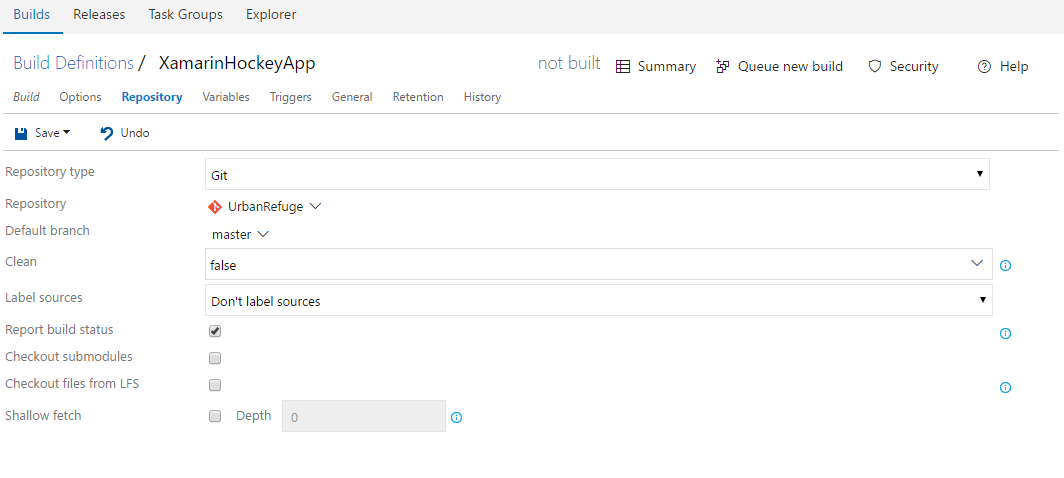
In post I assume your VSTS configuration will already have been configured with a Repository (VSTS/Github/etc.):
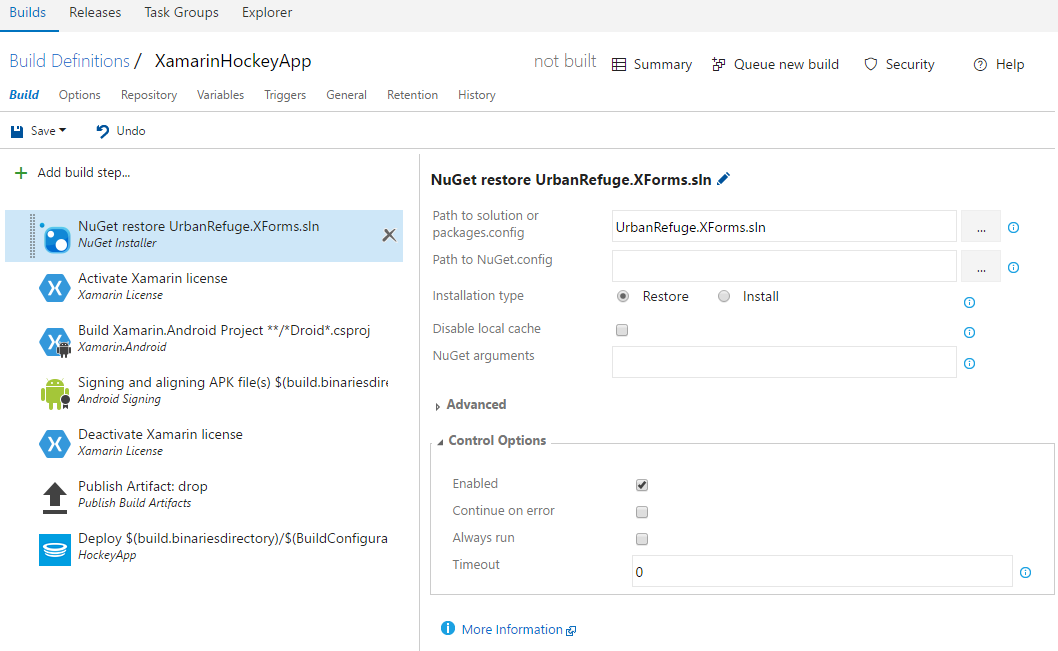
And the following steps (you can refer to the links above if not):
- NuGet Restore
- Activate Xamarin License
- Build Xamarin.Andriod/Xamarin.iOS
- Signing and Provisioning Step (Andriod/iOS specific)
- Deactivate Xamarin License
- Publish Artifact: drop
- Deploy to HockeyApp
1. Find a Replace Token Task for your VSTS instance
VSTS is an extensible task based build system. VSTS has a large selection of tasks that you can use out of the box but VSTS doesn’t currently have any tasks for replacing tokens in your source control.
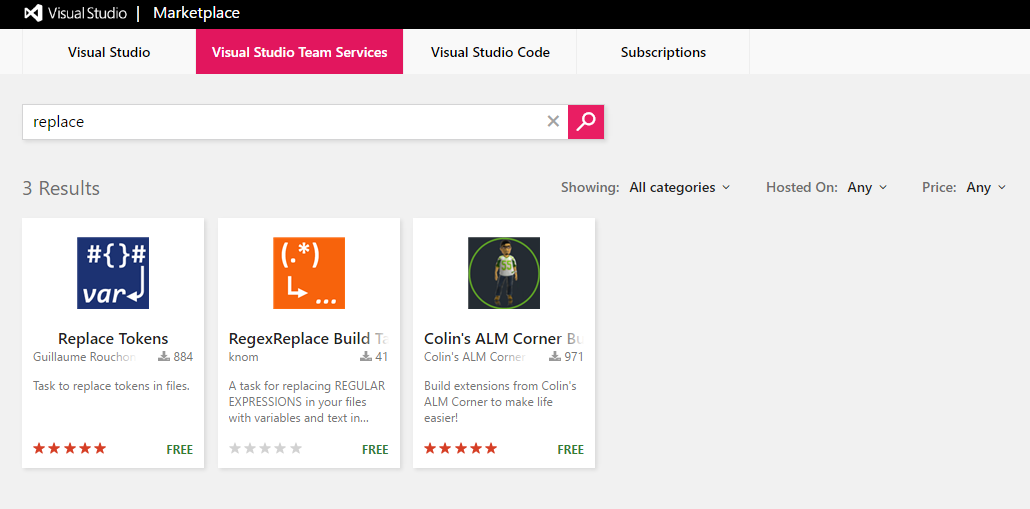
You could build your own custom extension, but there is also a ton of extensions on the Visual Studio Market Place contributed by community.
Searching on the Market Place for replace and you will get a few different options:
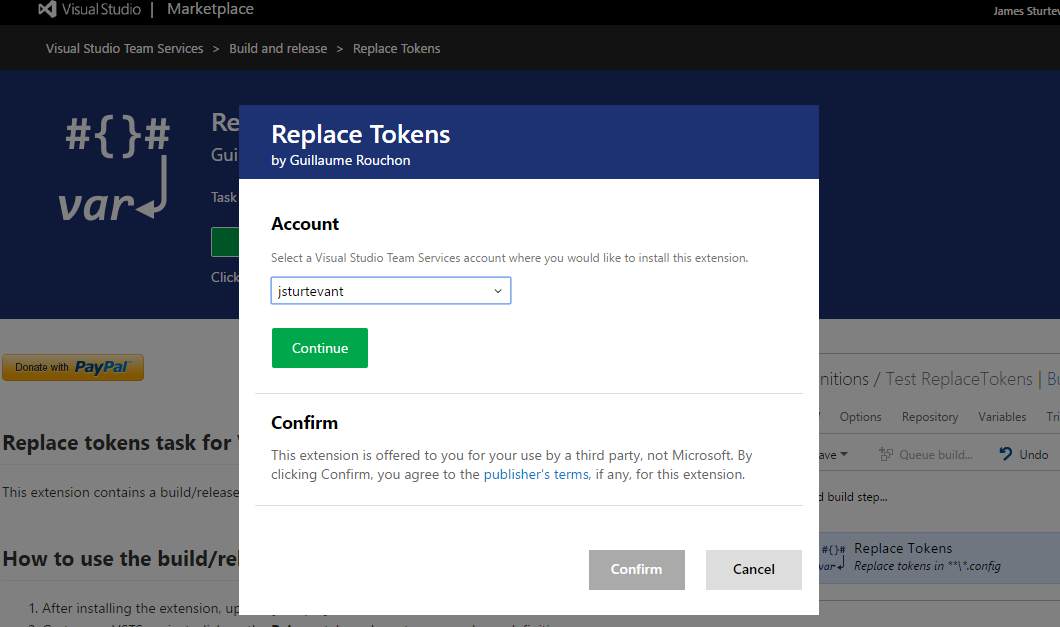
2. Install a Replace Token Task for your VSTS instance
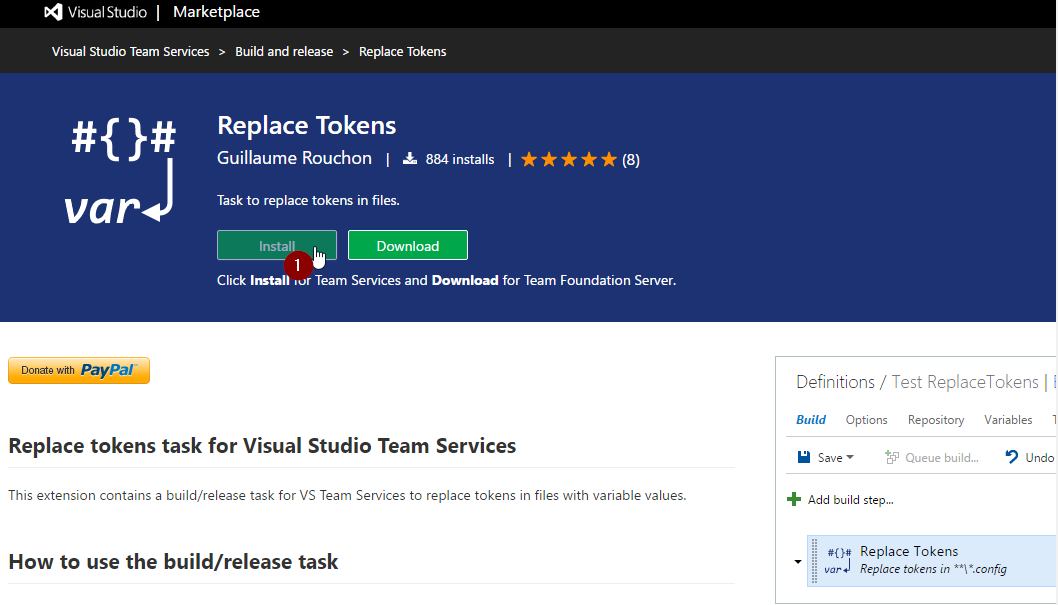
In this case I will use Replace Tokens task but Collins ALM Build and Release Tools has a replace token task and several other useful tasks for the build process. They function in a similiar way so it is up to you if you need a few other tasks as well.
Click Install to install the task. You will be asked to login into you VSTS account.
If you belong to multiple teams you will be given the option to install the task to a particular Team Instance of VSTS.
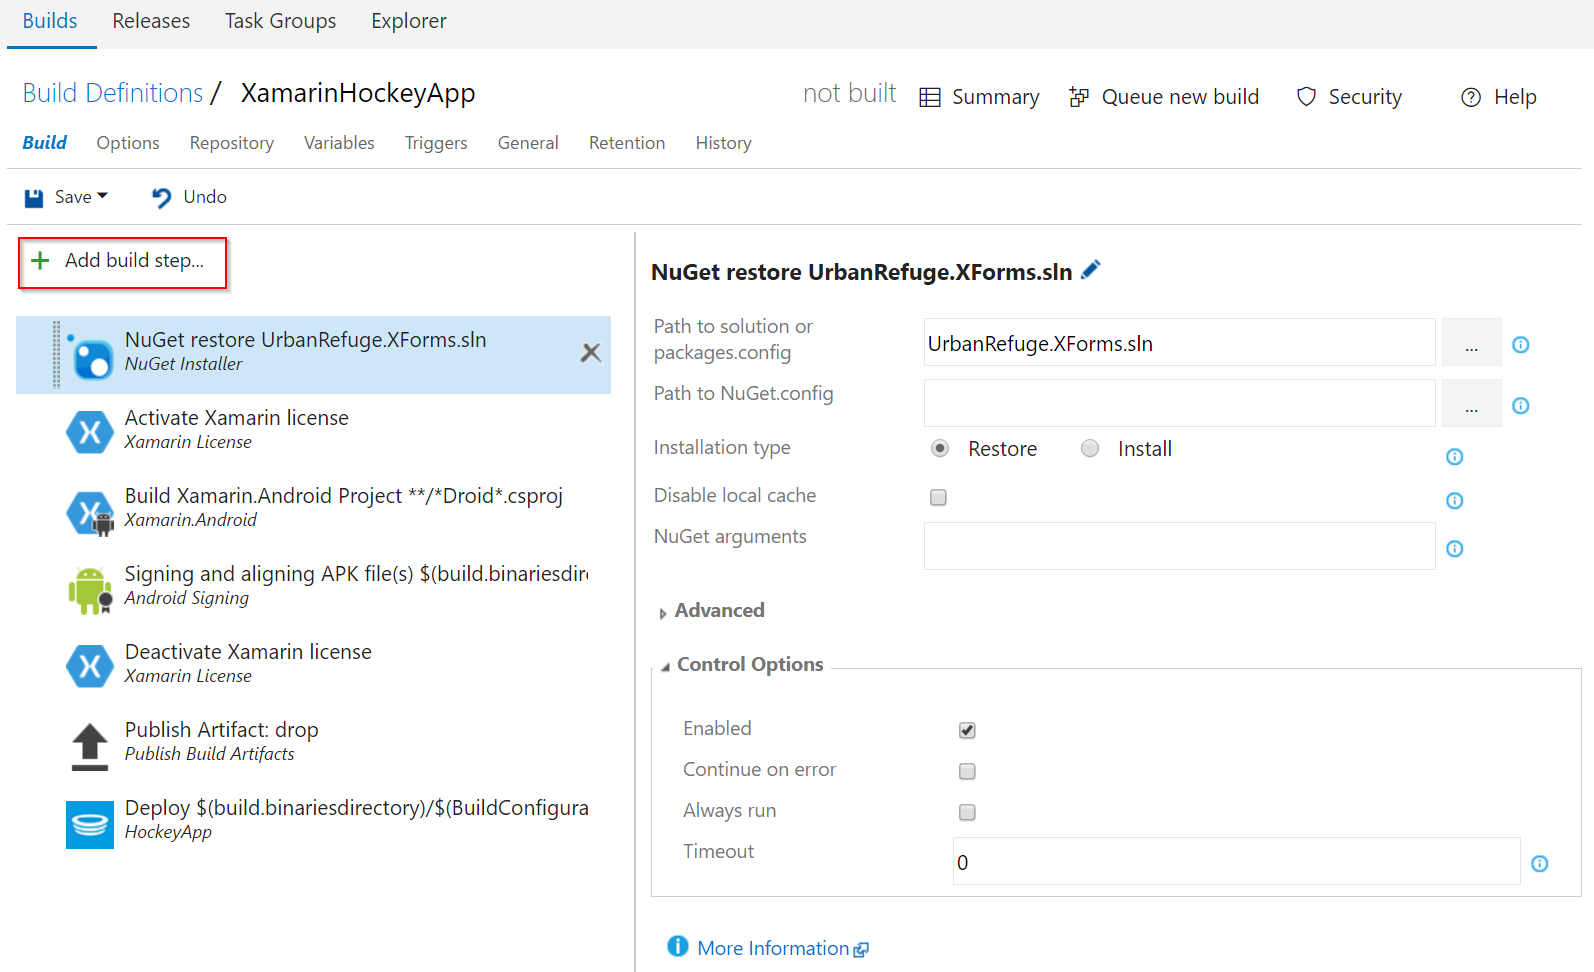
3. Add Replace Token Task to Build
Next we will add the new Replace Token task to our build pipeline.
Click Add Build Step.
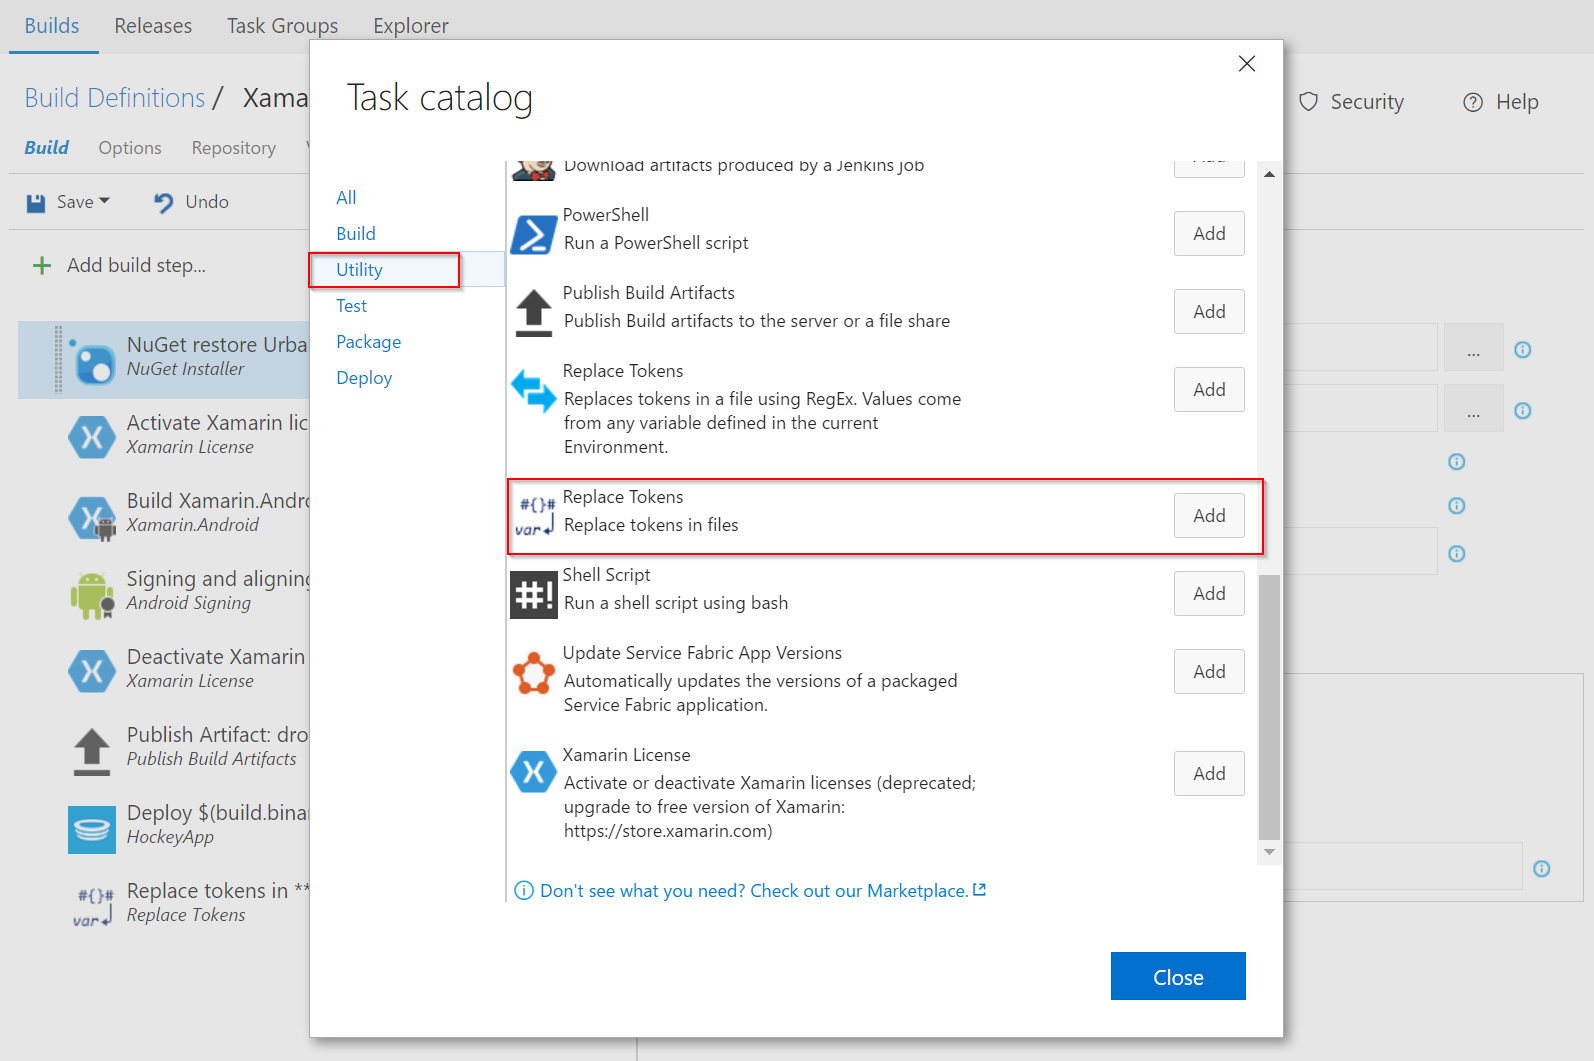
When the dialog opens, under the Utility tab, click Add on the Replace Tokens task.
Finally re-arrange the task so that it is before it is before the Build.Andriod/iOS step. Since we are modifying the source code that is pulled out of the repository, we need it to be before the build step. In this case I have chosen to put it before the nuget restore so that my build fails quickly if I do not have the replace token task configured properly.
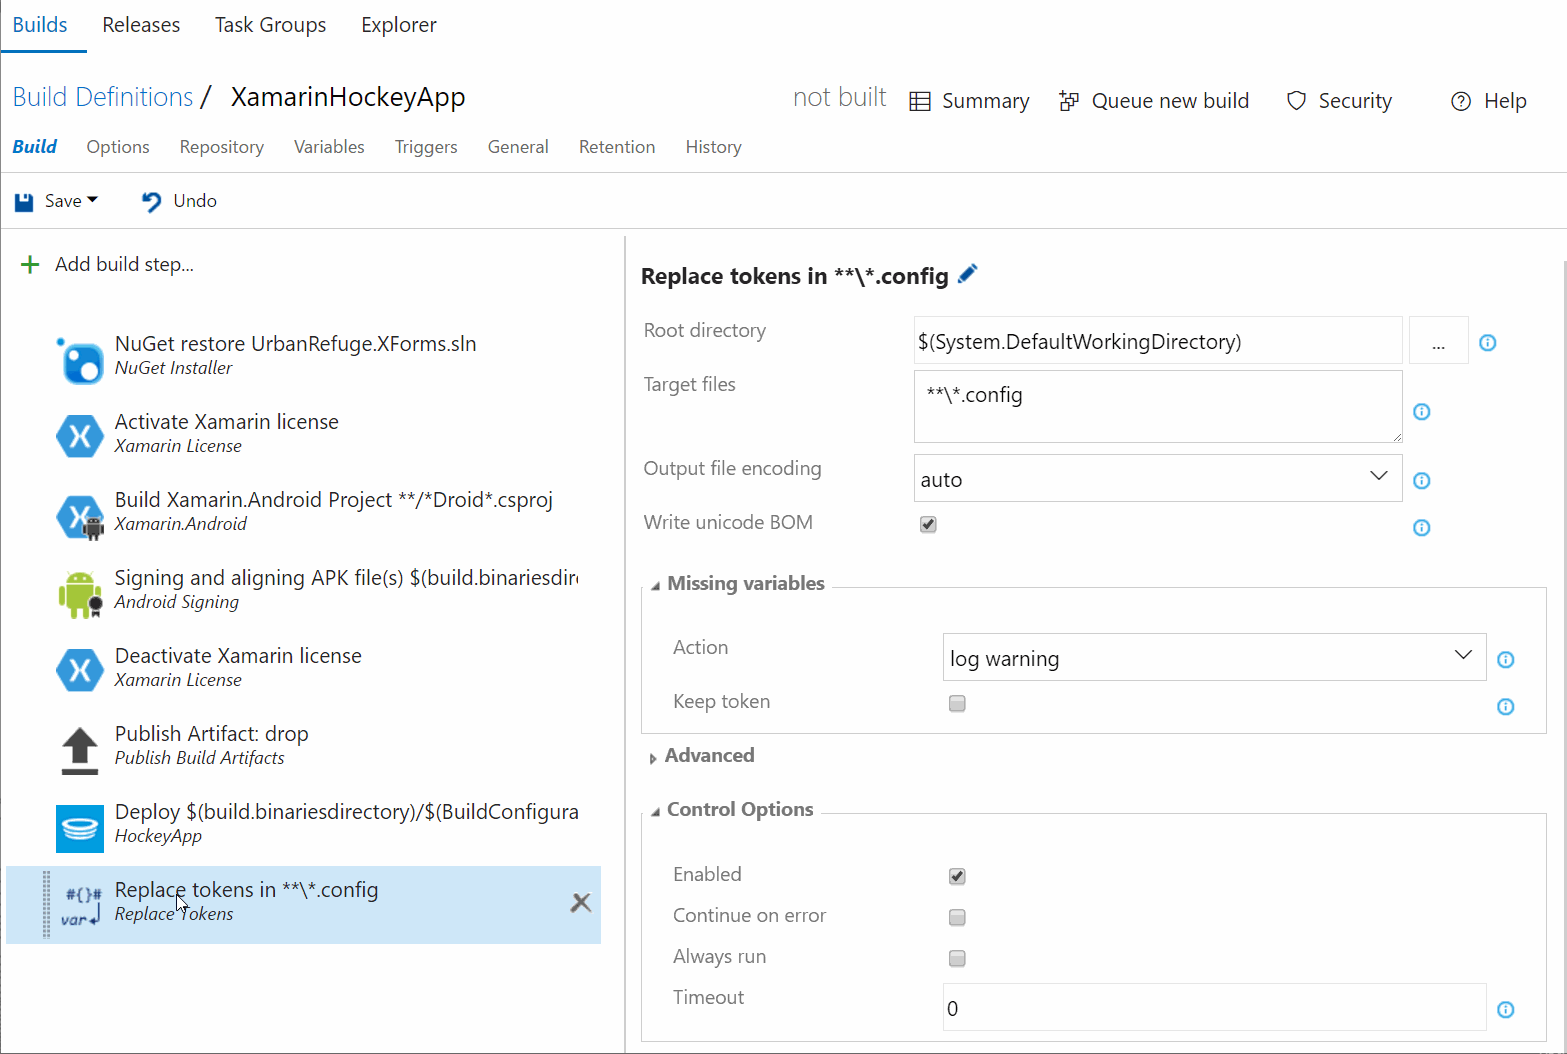
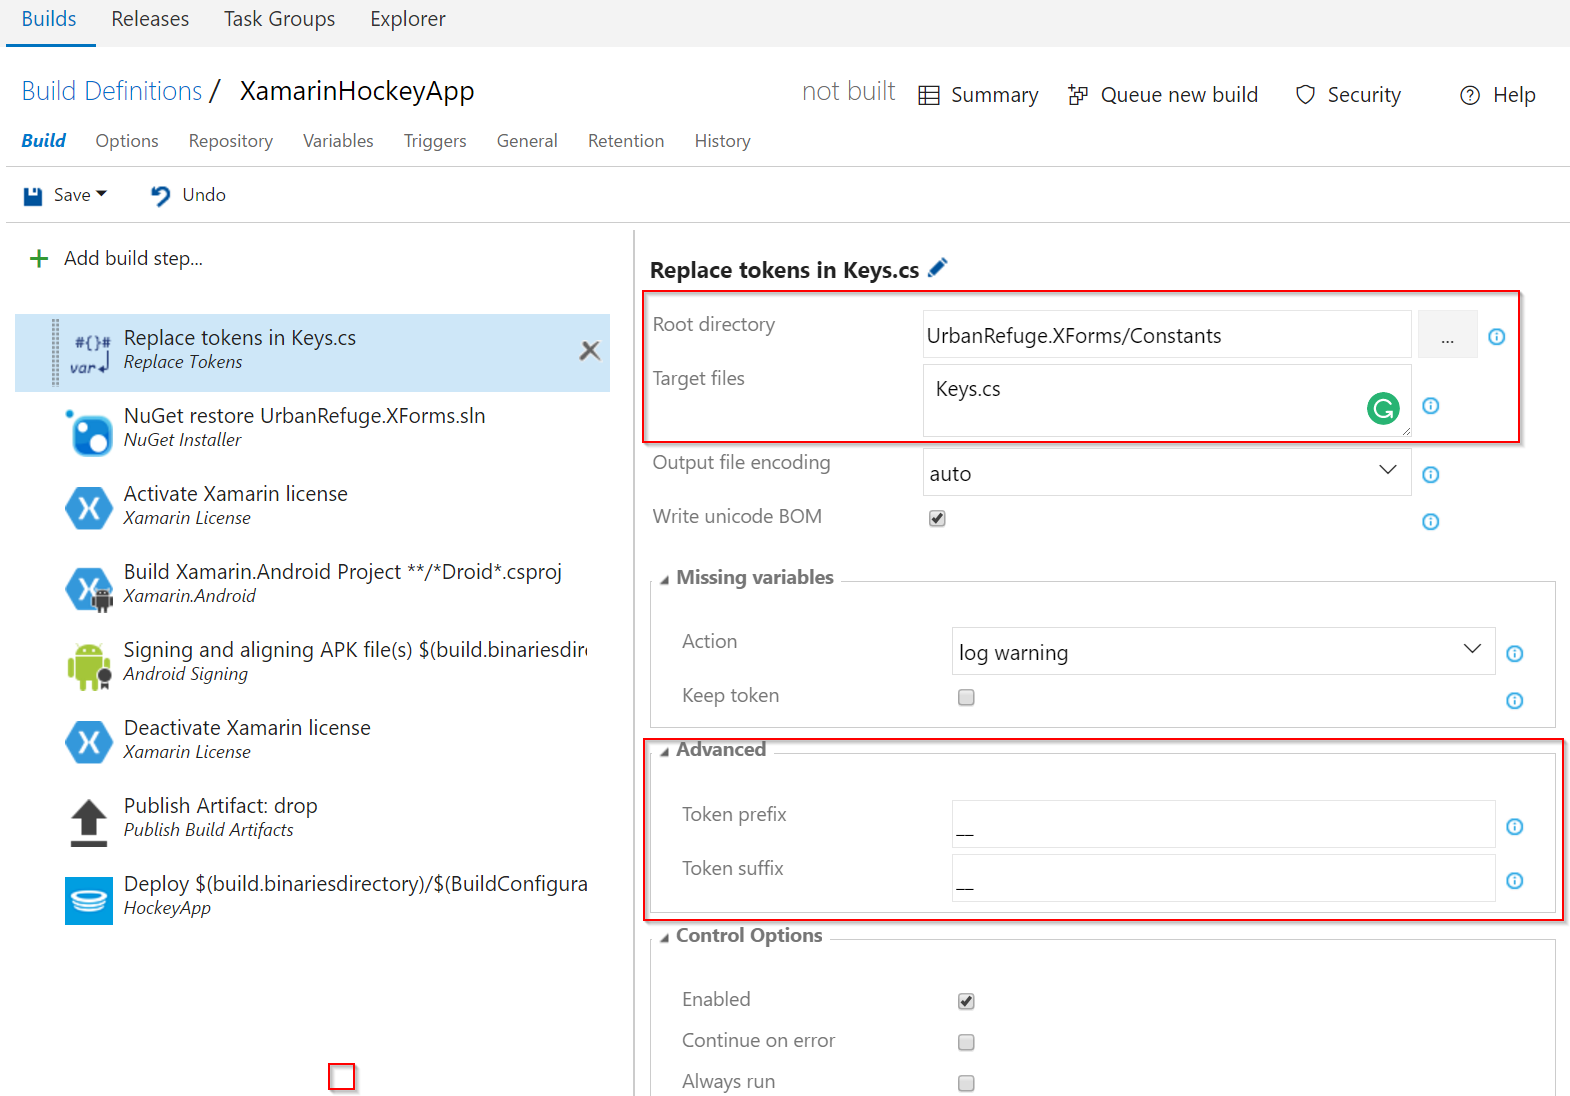
4. Configure Replace Token Task
After the task is in the correct place, we need to configure it to read the correct file and set the token prefix/suffix. The Root directory can be configured to to look at the entire solution or a specific folder. I perfer to keep all the configuration varaibles in a single file, so I have scoped the Root directory to a specifc folder called Constants in the UrbanRefuge.XForms project.
In the Target files option I have specified Keys.cs. You can also use wild cards when specifing the Target files option but becuase all the values are in one file I only specify the file ```Keys.cs``. You will see an example of what this file looks like in the next step.
Next up I changed the settings for Token prefix and Token suffix under the Advanced section to use a double underscore (__). This was a personal preference and can be anything you decide.
The configuration is the following:
Note: Make sure you click
Saveunder the build tab to save configuration and the new task.
5. Setup Source Code File
Now that we have VSTS Replace Token task added to our build pipeline inside VSTS, it is time to make sure we have configured the Keys.cs file properly in our source code. This file will hold all of the placeholder tokens that the Replace Token task is going to work with. In this file each setting is a constant and uses the format __VariableName__.
namespace UrbanRefuge.XForms.Constants
{
    public class Keys
    {
        public const string AndriodHockeyAppKey = "__AndriodHockeyAppKey__";

        //Azure B2C
        public static string ClientID = "__AzureB2CClientID__";
        public static string[] Scopes = {ClientID};
        public static string SignUpSignInpolicy = "__AzureB2CSignupPolicy__";
        public static string Authority = "__AzureB2CAuthority__";
        public static string ApiUrl = "__AzureB2CApiUrl__";

        //Certs
        public static string URBAN_PUBLIC_KEY = "__UrbanRefugePublicKey__";
        public static string B2C_PUBLIC_KEY = "__B2CPublicKey__";
    }
}
This is the code that anyone browsing the opensource project on GitHub would see. There is obviously no secrets here but the place holders will be replaced when the Replace Token task runs in VSTS as part of the build and deploy to HockeyApp.
You will also notice that I have items like ApiUrl which enables me to change the URL of my API that I will be calling; Enabling me to have different versions of my app running against my Dev, QA and production environments. So this techinique is not limited to just secrets but also configuration values.
6. Add Variables in VSTS
The final step before kicking off a build is to add all the variables to VSTS. This is pretty straight forward with the option of making the variables secrets inside VSTS. By clicking the lock icon next the varaible, other team members will be able to see the varaible names but not the values. In this case, we are using the variables with the Replace Token task but this is also where you would set environment variables for applications that would need them.
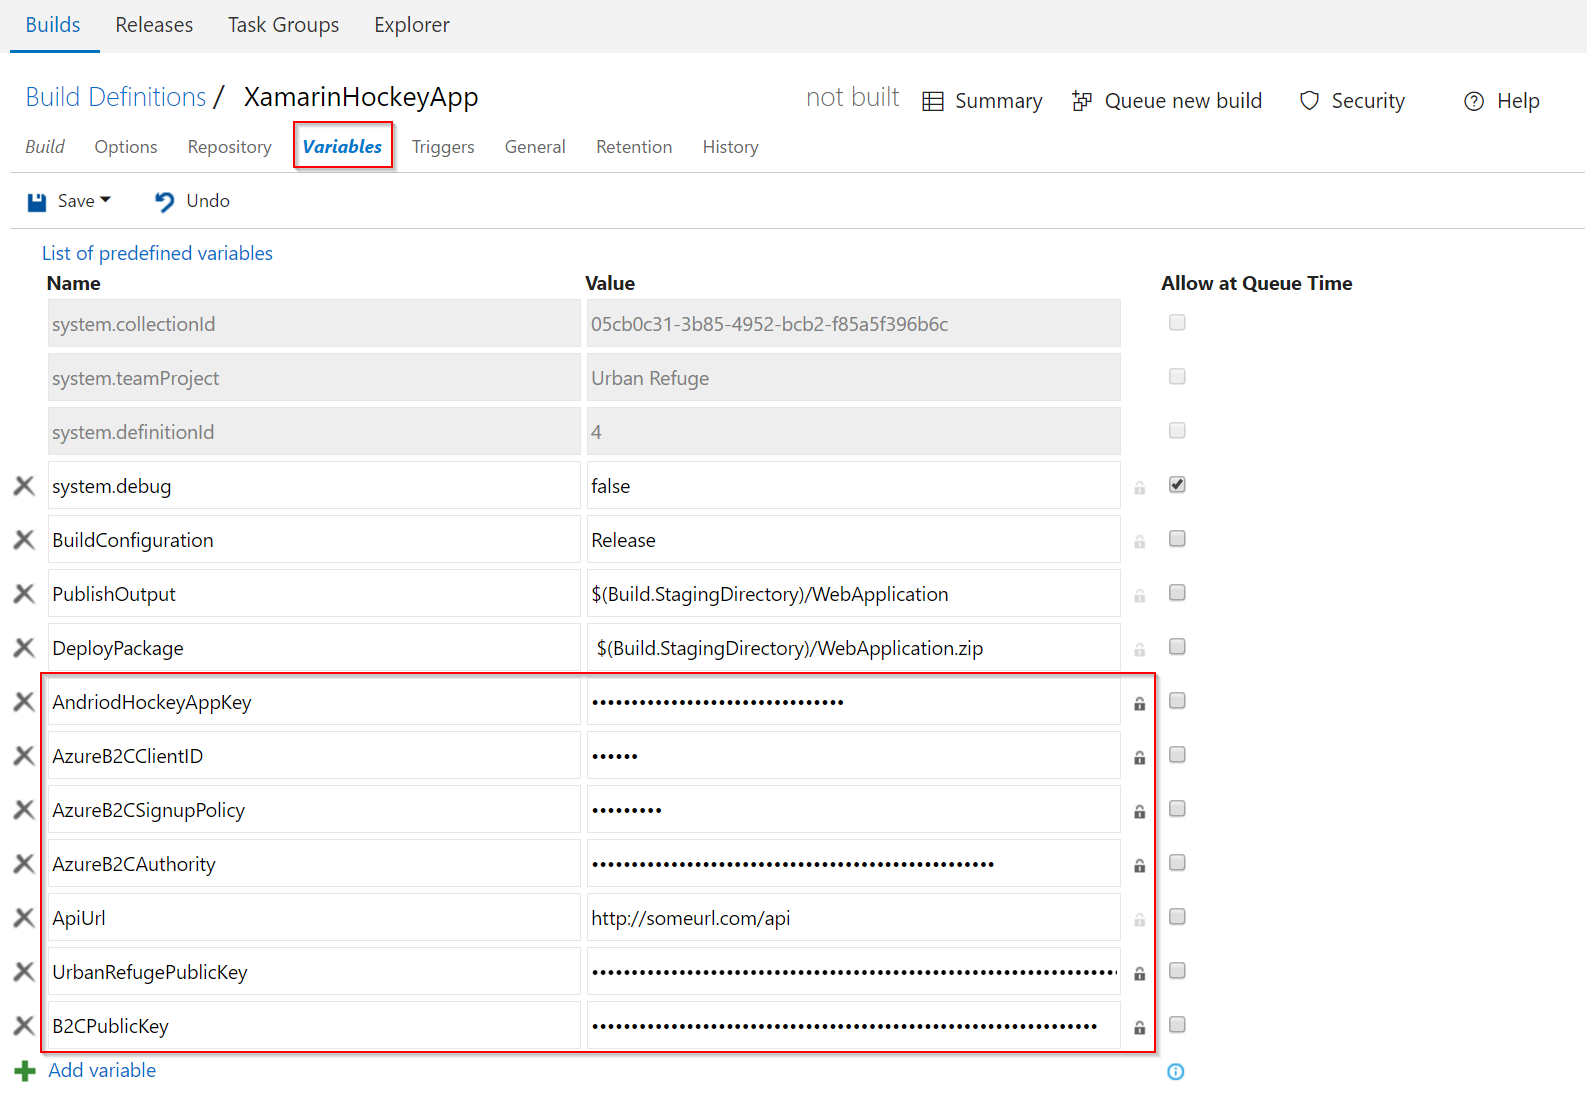
Note: The variable names are names between the double underscores in the source and do not include the double underscrore.
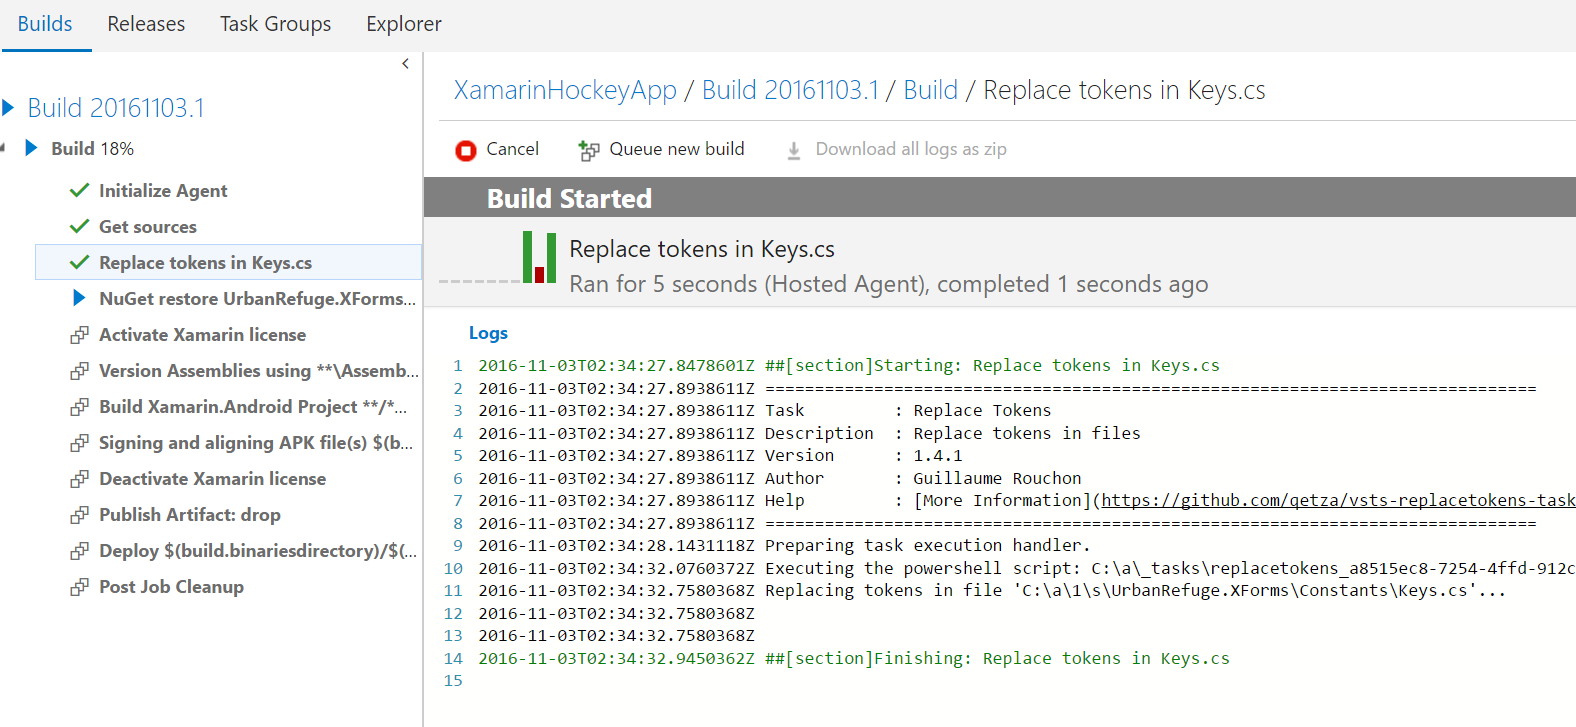
7. Run Build
Finally run the build for your applicaiton and it should build and deploy to HockeyApp as a new version!
Conclusion and Final thoughts
By using the extensible configuration system and a community build task we are now able to have an opensource project with out having to give up on any of the niceities that come along with a Continuous Build and Deployent practices.
Whether we use the Replace Tokens task or the Collins ALM Build and Release Tools depends on which we pefere and if we need any extra build tasks like the Version Assemblies task that Collins ALM Build and Release Tools has. Who knows there may even be other options in the Market Place when do your search.
Note: Here I have only configured the keys for some of my services. In the case of Xamarin crossplatform apps you will likely have configuration settings that are specific to each platform. For instance, for Andriod you might have configuration settings in the
AndroidManifest.xmlfile for Maps API key. Or on iOS you might have specific configuration that needs to be changed in theInfo.plistfile. In this case you can add another build step and congifure it for that file specifcally using steps 3-7 as guidance (or change configuration in existingReplace Tokenstep).
Comments