NOTE: This extention is no longer needed. Visual Studio now supports word wrap. The defualt short cut is ALT -Z
I use Visual Studio for most of my development work but I have always had a second editor that was smaller, lightweight and fast, to help accomplish those quick one off edits. A second editor always comes in handy when working on a configuration files, text files or maybe just peeking at code in another project.
I have always used NotePad++ for quick edits because of the speed at which it opens files and I currently use Atom to write my blog posts as it has support for Jekyll. But, as a primarily .NET developer, I find that most of the editors don’t have great out of the box support for C# syntax. Sure I can set it up with great tooling like Omnisharp but that’s an extra thing I have to configure, even if it is made easy with tools.
Visual Studio Code was announced just last year and has had some great momentum as an editor and so I had to take a look at it for my quick editing experience. So far I am very impressed with speed but I also get the syntax highlighting out of the box that I was missing from other editors. There are some other great features it has borrowed from Visual Studio that make it an attractive choice such as IntelliSense, debugging, and Code Lens. Not to mention it is also open source.
Soft wrap in VS Code
VS Code is still in beta so they are adding features all the time. As I have started to use it more often, especially for editing text files and Markdown, I noticed that it was missing a “soft wrap” feature for wrapping lines of text, which made it hard to read long lines without having to scroll.
To enable Soft wrap in VS Code you have to open your user settings file (open command pallet, type ‘settings’, select ‘Open User Settings’) and add the following line:
The default value is 300 and if you take a look at the default settings you will find the following comment which specifies setting the editor.wrappingColumn value to zero will cause a line wrap equivalent to a “soft wrap”:
// Controls after how many characters the editor will wrap to the next line. Setting this to 0 turns on viewport width wrapping
Softwrap the Visual Studio Code Extension
Obviously, manually opening the User Setting file and editing the editor.wrappingColumn value was going to get old quickly. So I did what any programmer would do… automate the process.
The result is Softwrap, an extension for VS Code, that enable you to quickly switch back and for between a “soft wrap” and your more friendly code wrap. Using Softwrap is simple:
Open Command Pallet
Type ‘Softwrap’ in the command window
Hit Enter.
That is it! Softwrap will toggle on/off and preserve the value it was previously set to even if you had a custom value for editor.wrappingColumn already set in your User Settings file. You can check out the source at my GitHub repository.
Softwrap Implementation Notes
Overall I was really impressed with VS Code’s Extension system and documentation. It was only announced about a month ago and yet it is fairly robust and detailed documentation.
Reading and Writing the User Settings File
The limitation I ran into when trying to write to the User Settings file was that there is no VS Code API for it (see github issue). Again, I got a quick response on twitter that this was something that is under consideration but not yet implemented. The suggestion was to directly modify the file itself as a work around.
This was fairly simple to do because VS Code is sitting on top of Electron and we can leverage all the power and infrastructure of Node.js and the strong ecosystem that comes with it. It was easy enough to use the File System module to read/write the User Settings file.
Finding the Settings Files cross-platform
It was not easy to find the location of all the settings files accross each platform. I finally found the documentation here and these two posts on how to work with Node.js cross-platform:
VS Code uses a custom JSON schema that allows comments in the settings file. My current implementation does not support comments and will strip them out. This is probably not the best way to handle the situation but will have to do for now.
Conclusion
Visual Studio Code is a strong candidate for my go to editor when editing quick files. It was very quick to build out an extension for VS Code and the community is there for support.
Update (12/18/2015): It is possible to compile ASP.NET 5 for the full .NET Framework on a Mac or Linux machine using Mono. More information can be found under the instructions for installing DNX for Mono on Mac. I didn't have Mono installed when I set up ASP.NET 5 and so ran into the errors below.
It is very exciting times as the Release Candidate for ASP.NET 5 was released a couple weeks ago. Of course, I just had to try it out on my Mac and it works! Simply awesome! I think this really opens up the doors for a lot of developers to try out ASP.NET and C#.
The Build Issue
I did run into one problem with compiling the project on my Mac which slowed me down when I first started the project. After creating a project using the [ASP.NET Yeoman Generator] (https://github.com/OmniSharp/generator-aspnet) (yo aspnet), I tried to build the project (dnu build) and got the following compile errors:
Building bosccdotnet for DNX,Version=v4.5.1
  Using Project dependency bosccdotnet 1.0.0
    Source: /Users/jsturtevant/projects/aspnetbostoncodecamp/src/bosccdotnet/project.json

    Unable to resolve dependency EntityFramework.Commands 7.0.0-rc1-final

    Unable to resolve dependency EntityFramework.MicrosoftSqlServer 7.0.0-rc1-final

    //removed for brevity

    /Users/jsturtevant/projects/aspnetbostoncodecamp/src/bosccdotnet/project.json(9,33): error NU1001: The dependency EntityFramework.Commands >= 7.0.0-rc1-final could not be resolved.

    /Users/jsturtevant/projects/aspnetbostoncodecamp/src/bosccdotnet/Startup.cs(9,7): DNX,Version=v4.5.1 error CS0246: The type or namespace name 'Microsoft' could not be found (are you missing a using directive or an assembly reference?)

    /Users/jsturtevant/projects/aspnetbostoncodecamp/src/bosccdotnet/Models/ApplicationDbContext.cs(4,7): DNX,Version=v4.5.1 error CS0246: The type or namespace name 'System' could not be found (are you missing a using directive or an assembly reference?)

    /Users/jsturtevant/projects/aspnetbostoncodecamp/src/bosccdotnet/Controllers/AccountController.cs(461,24): DNX,Version=v4.5.1 error CS0103: The name 'RedirectToAction' does not exist in the current context

    //removed for brevity
The Fix
The issue is obvious from the first line in the error message if you are aware of how ASP.NET 5 is architected but for the uninitiated this could be confusing. The issue is that you are building for the full .NET framework which is not available on Mac or Linux when using .NET Core based DNX (you can switch your .NET Execution Environment (DNX) using the .NET Version Manager (DNVM) and use Mono). The issue is well known and is documented in the Release Notes for RC1. Note that you can still work on the project on a Mac even with the errors as you are building for both versions of the .NET Framework.
The fix is also fairly straight forward. The project.json has references for the .NET Frameworks that ASP.NET 5 can be compiled for:
"frameworks":{"dnx451":{},"dnxcore50":{}},
As you can see, the default Yeoman Generator Template has dnx451 and dnxcore50 frameworks listed. The DNX451 reference is for the full .NET Framework which is not available on Mac or Linux. The dnxcore50 reference is a subset of the full .NET Framework that has been open source and developed to be cross platform. The fix is as simple as removing the reference for dnx451 in the project.json file so that only the reference to dnxcore50 is left:
"frameworks":{"dnxcore50":{}},
Now you should be able to run ```dnu build`` again and have a successful build. I hope this helps someone if they run into the same build errors. Being able to compile and run on Mac and Linux is awesome. I can’t wait to see where the platform goes from here!
There are a few different ways to spin up an PostgreSQL database in Microsoft Azure. One of the easiest ways is via the MS Open Tech VM Depot. The VM Depot is a collection of preconfigured VM’s that you can deploy to azure and is great if you want to install a complete stack such as LAMP or LAPP. If you choose this option then you can skip down below to configuring PostgreSQL.
Another option is to spin up a Linux VM and install PostgreSQL directly. This is a good option if you are only going to install PostgreSQL and don’t need a complete stack installed on a machine.
Creating the Azure Virtual machine
Assuming you have set up you Azure account (Ways to get Azure), setting up a VM is easy.
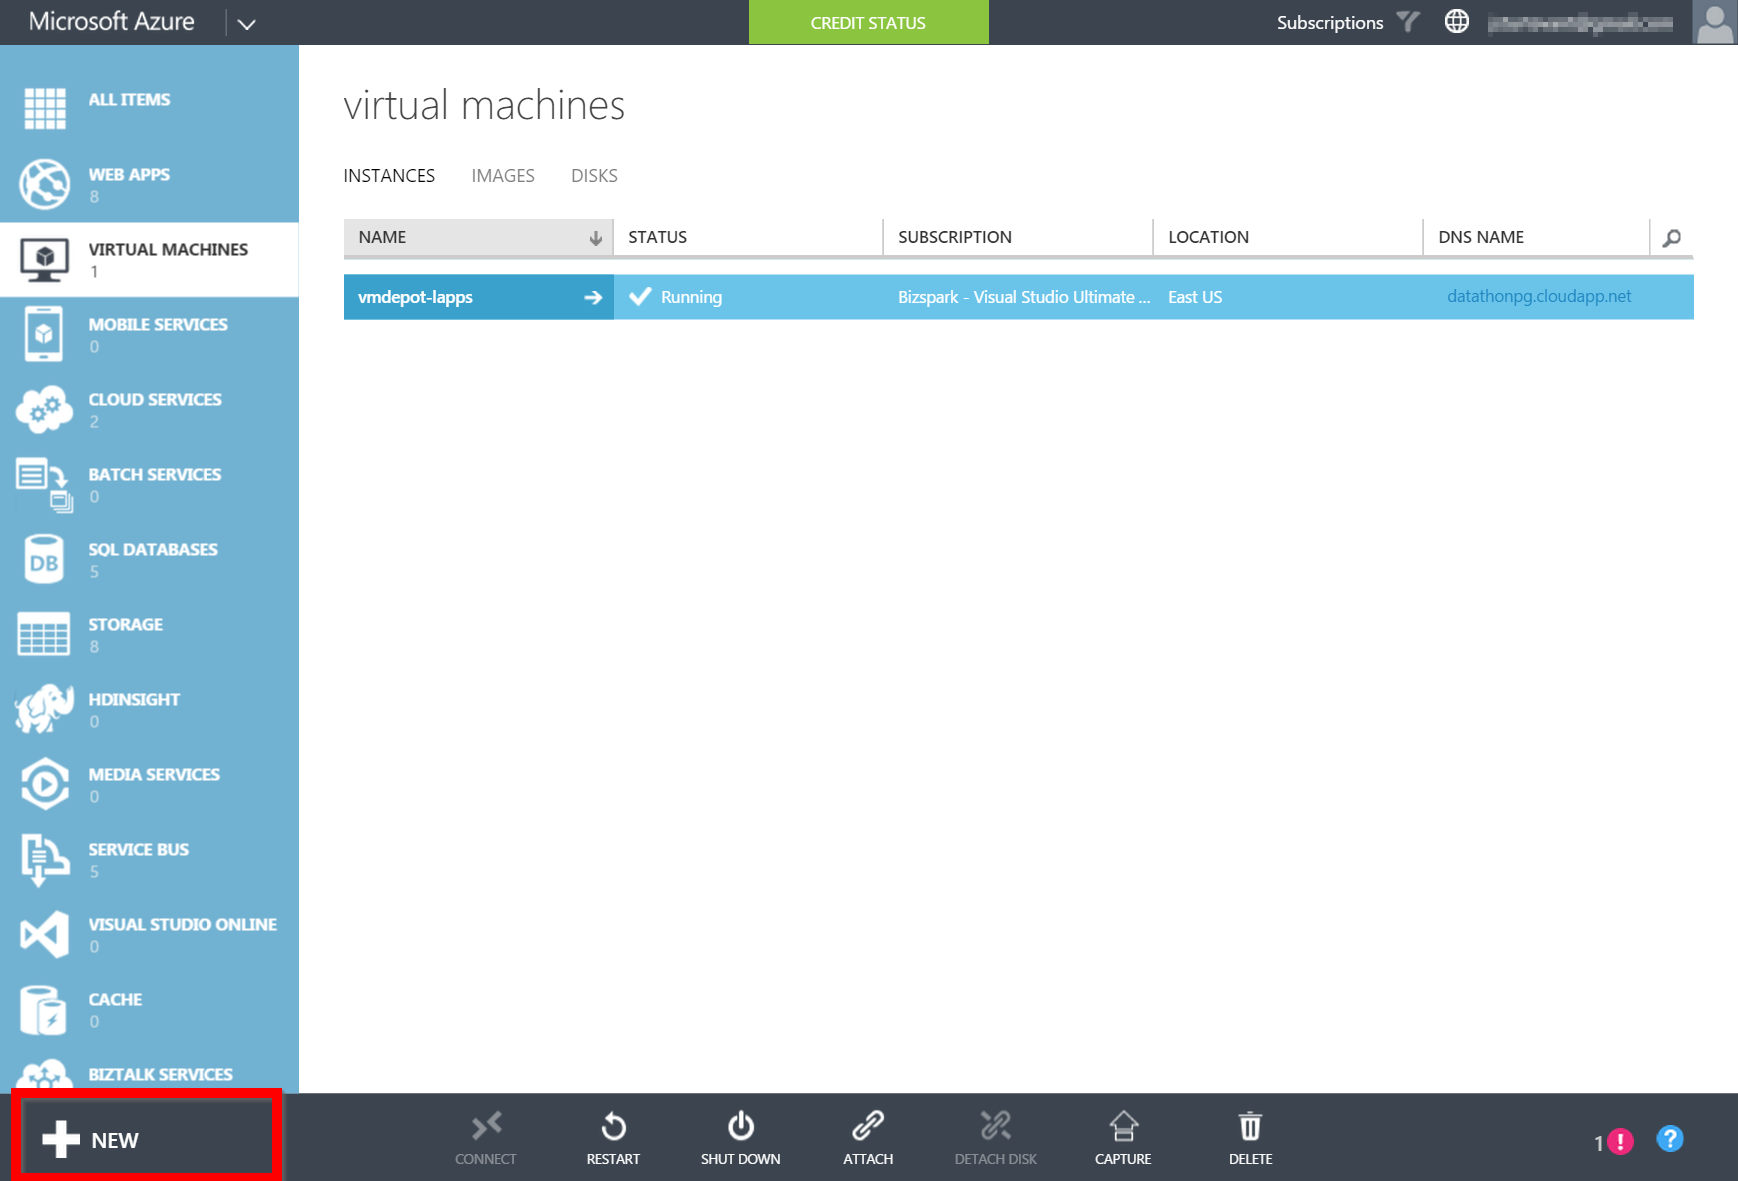
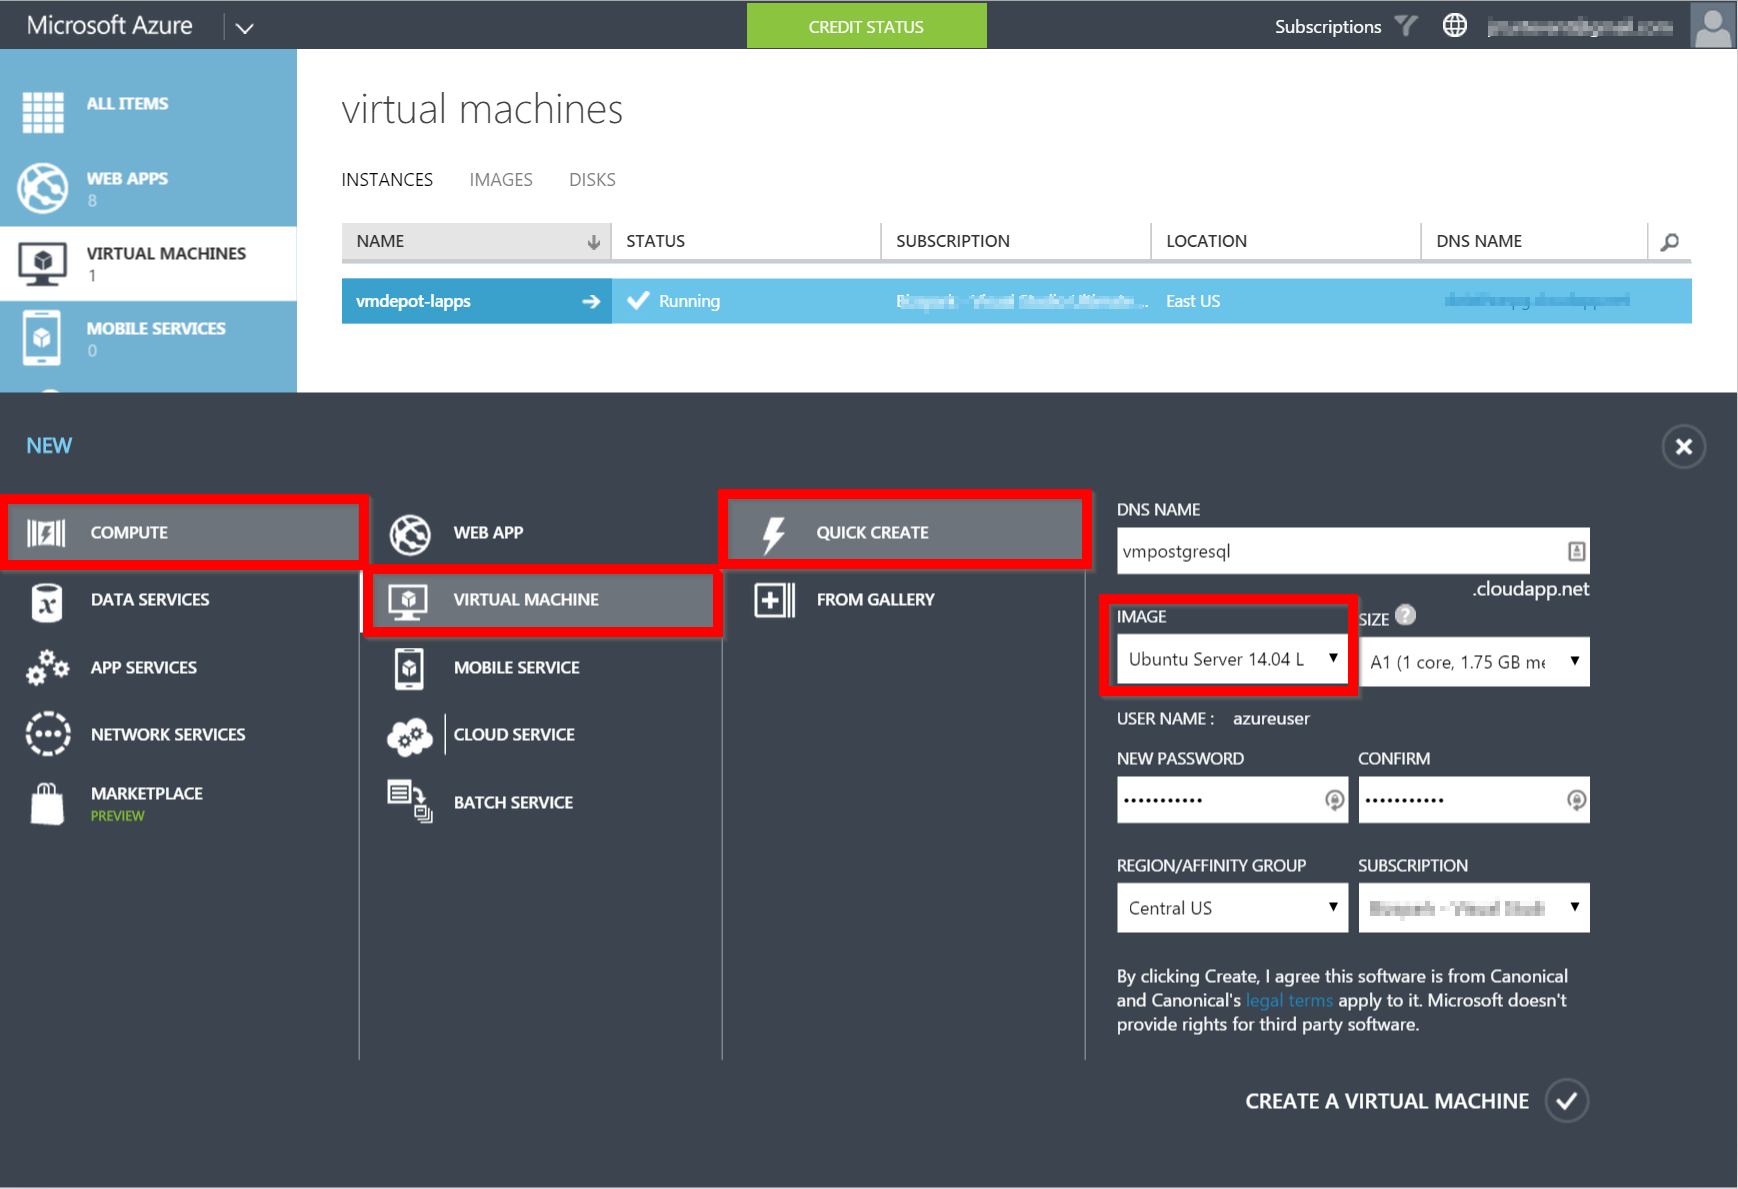
In the bottom drawer bar click on new:
Next select a new Compute Resource -> Virtual Machine -> Quick Create. Give the VM a unique name and be sure to pick your favorite Linux distro. In this case I will be walking through how to set up a Ubuntu Server. You will also need to provide a password, region to host the VM (select the location closest to you) and your Azure subscription. Click the Create button in the bottom right and a few minutes you will have a VM!
Installing PostgreSQL
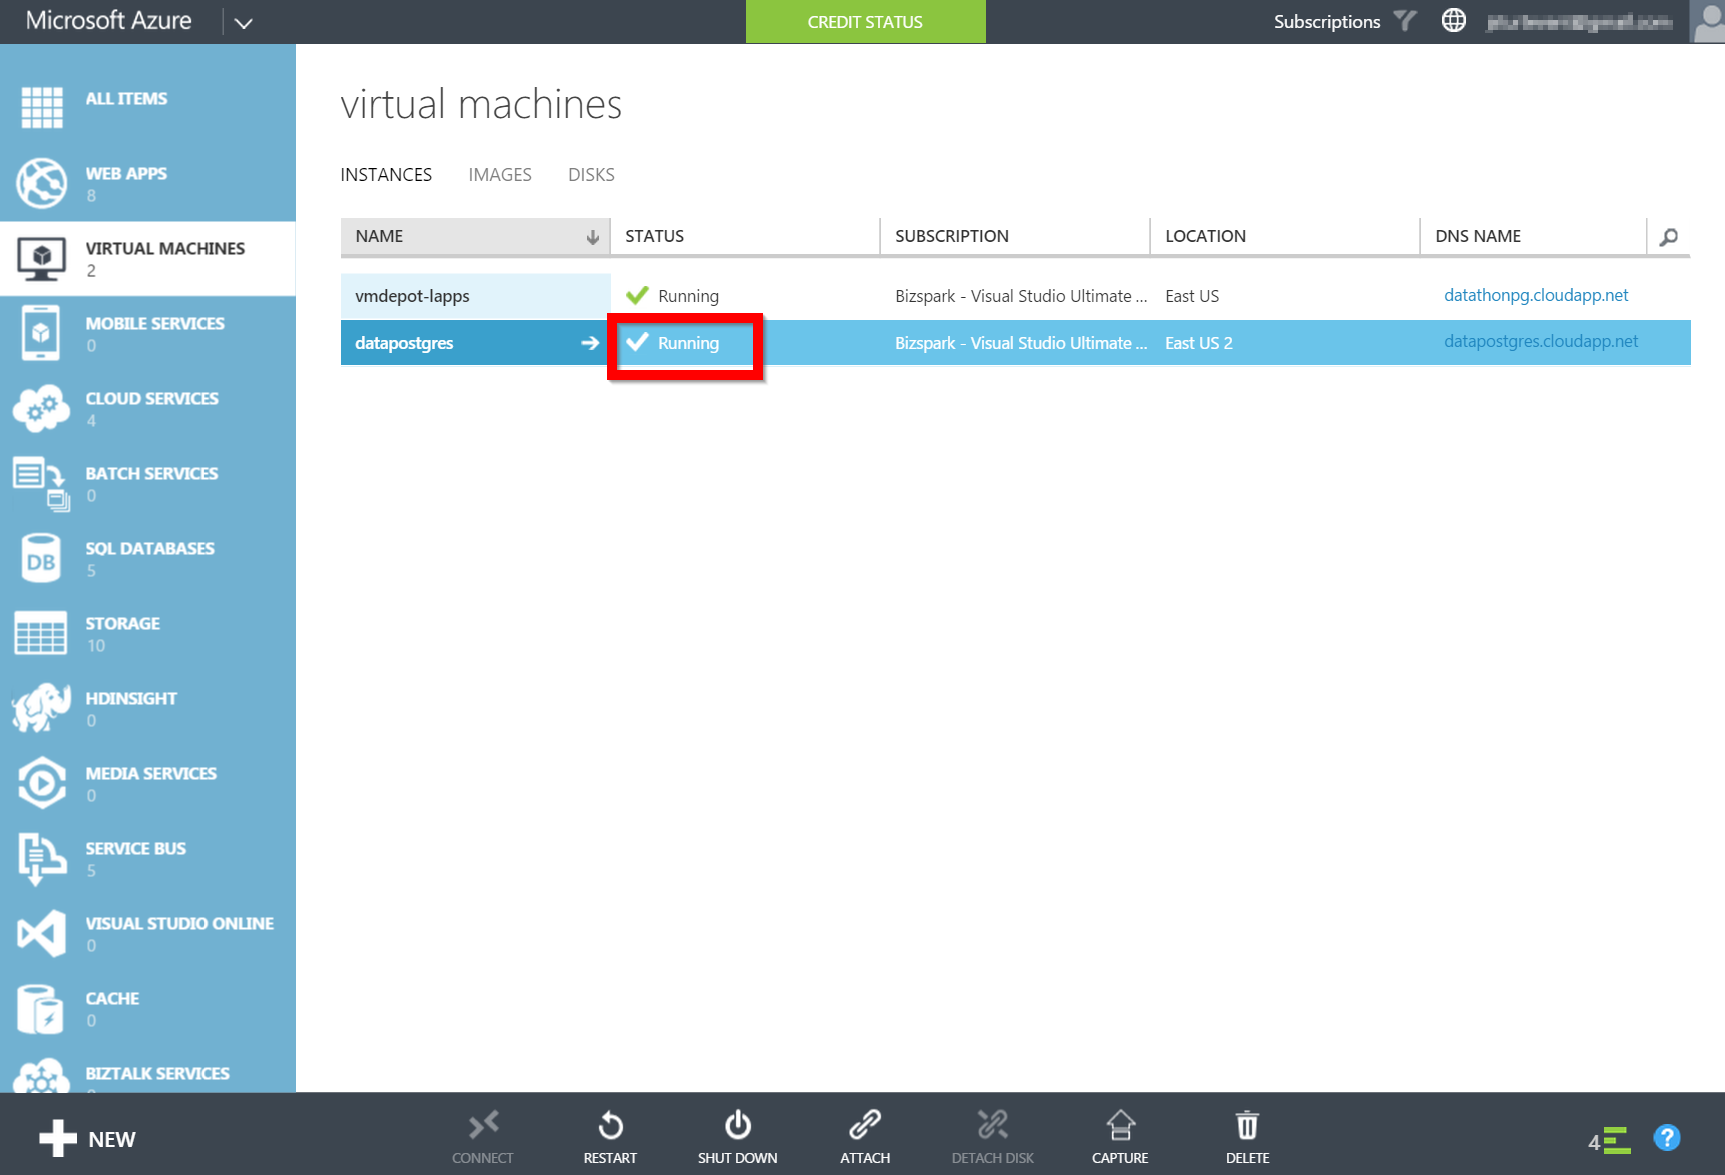
To install PostgreSQL you will need to ssh (secure shell) into the VM you just set up. Make sure that the VM says that it is running in the dashboard:
Now you can ssh into the machine. If you are on windows you are can use PuTTY. There is a tutorial located here. When you are logging into the VM you will provide the username and password that you created when provisioning the VM in the previous step.
Once you are connected to the machine we will use apt-get to install PostgreSQL. At the terminal type:
Next you need to allow IP addresses to access the PostgreSQL instance via the PostgreSQL configuration file. The path to the configuration file will change according to the version of PostgreSQL (or stack you installed). Using Vi, you should specify the exact IP addresses you want to allow access. You can find you IP address by google/binging ‘my ip address’.
#open vi
sudo vi /etc/postgresql/9.3/main/pg_hba.conf

#add the following line to the configuration file
host    all all       192.1.0.190/32 md5
Next tell PostgreSQL which IP’s to listen to. In this example I am enabling PostgreSQL to listen to all IP addresses but it would be more secure to specify an exact IP address.
#open vi
sudo vi /etc/postgresql/9.3/main/postgresql.conf

#enable remote connections
listen_addresses = '*'
Restart the PostgreSQL server:
sudo service postgresql restart
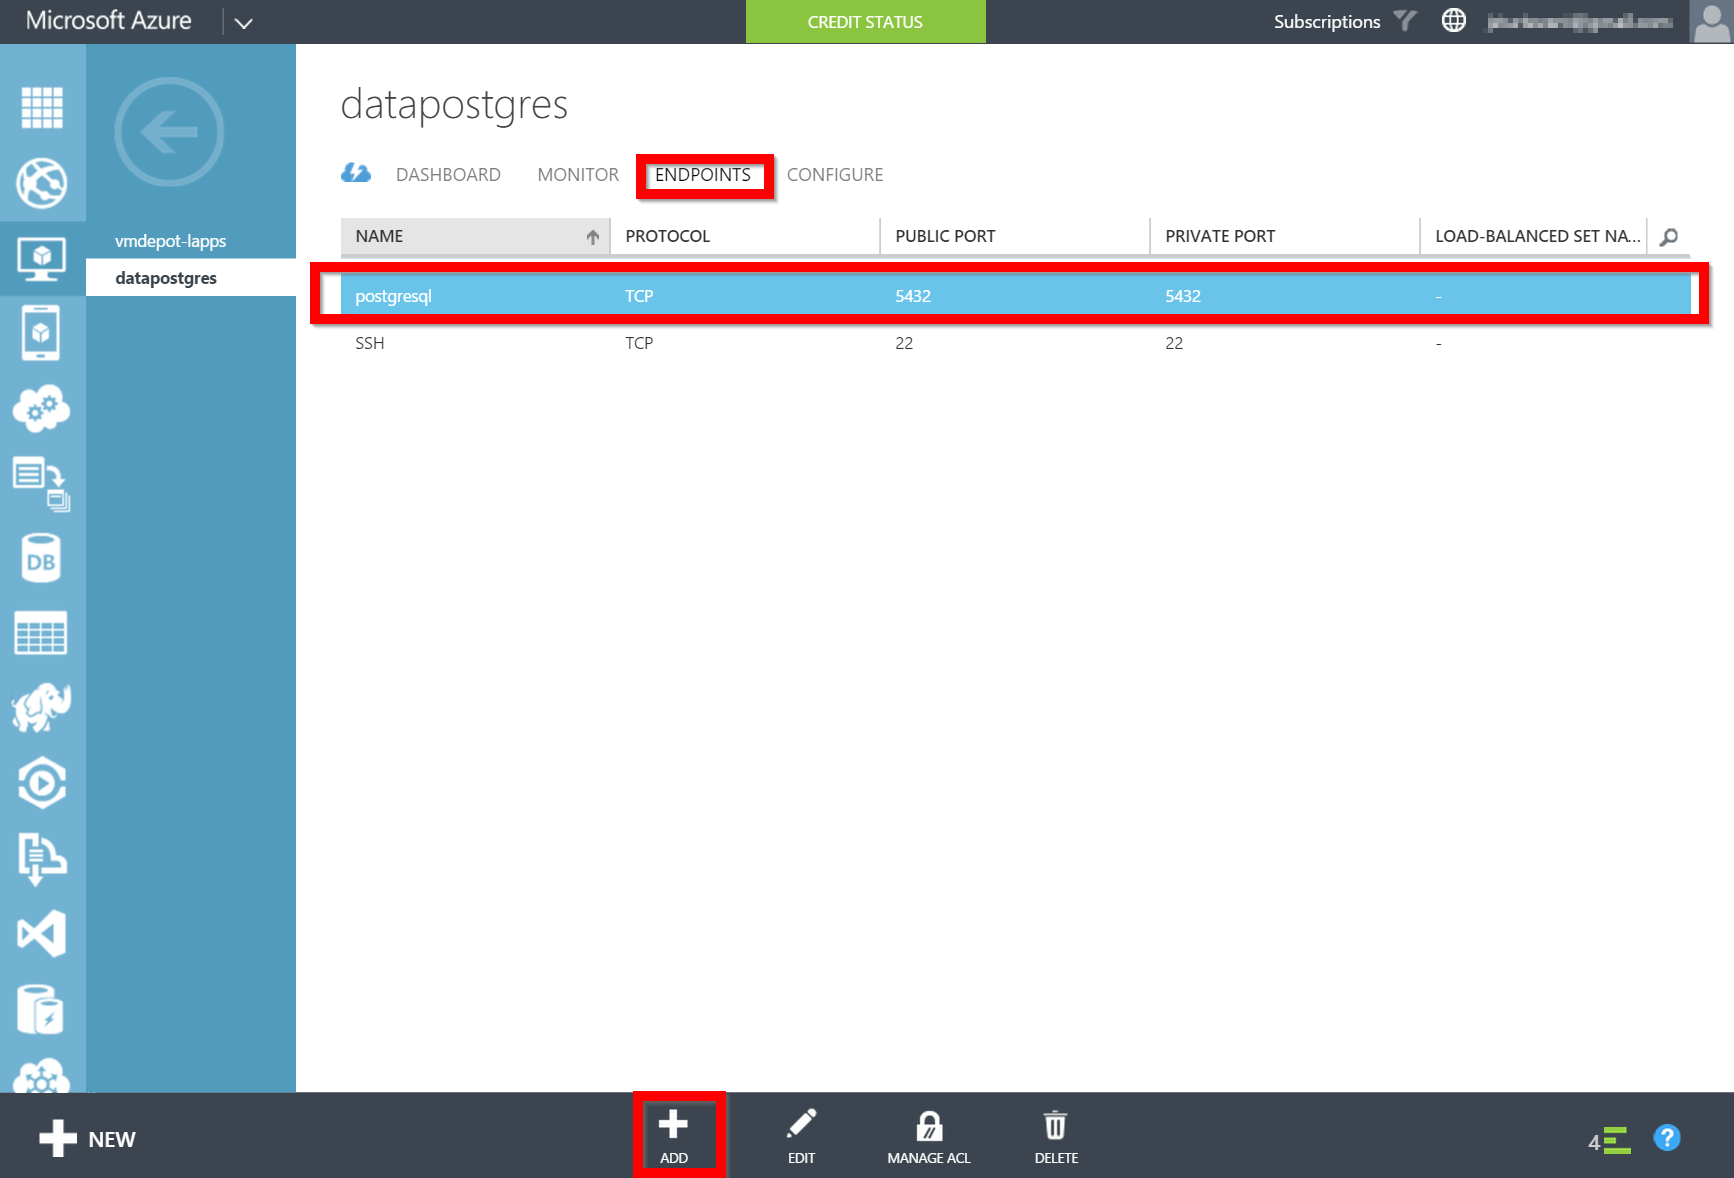
Finally inside the Azure Portal you need to open of the Firewall to all remote connection to the PostgreSQL port:
Connecting via pgAdmin
You can connect to the PostgreSQL instance via a command prompt like so:
psql -h <namespace>.cloudapp.net -U <user>
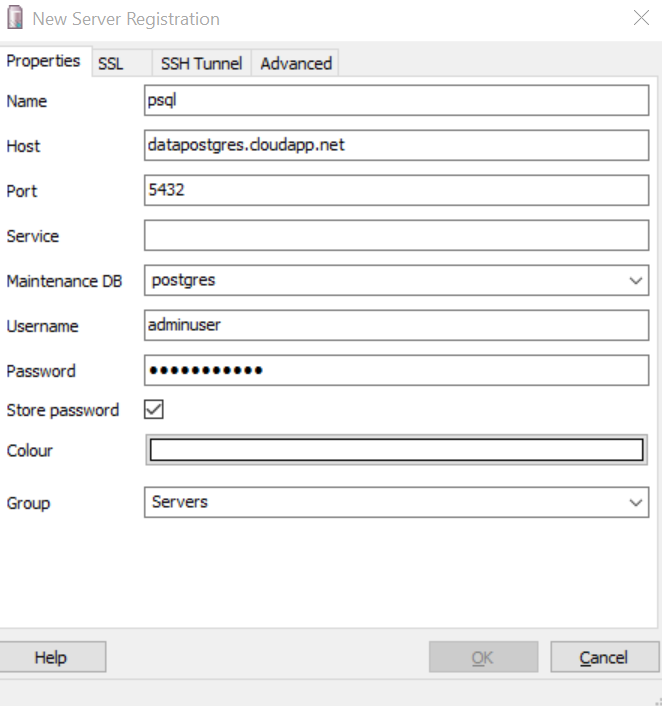
Another great way to connect is through a user interface such as pgAdmin. This is what the configuration screen would look like to connect to the VM in Azure:
In this interview I talk with Bryan Soltis from Kentico. Bryan is a Technical Evangelist for Kentico and has been working with Azure since it was in beta. In this video he talks about a tool developed internally to help manage Kentico’s Improvement Program, which is an optional program that gives anonymous feedback on features being used directly to Kentico. Bryan talks to us about why he chose Azure and more specifically why he chose Azure Table Storage. He even shows us a quick glimpse of the code used to query Azure Table storage.
Bryan is on twitter at @bryan_soltis and he writes on Kenitco and Azure on his blog.
There are alot of Visual Studio extensions out there and it has always surprised me at the number of Visual Studio users don’t know some of the must have extensions. Here is a list of my top 5 extensions that I must have installed and one bonus.
Productivity Power Tools 2015 - This extension brings powerful tools for improved developer productivity. Once installed there is no configuration nessary to start taking advantage of great features like the Syntactic Line Compression and Match Margin.
Web Essentials 2015 - If you do any type of web development inside visual studio this is a must have. It adds tons of great supoport for HTML5, JavaScript and other web tools like LESS.
SideWaffle Template Pack - Additional Templates for both item and projects. Provided templates are suitable for building websites, Windows apps, Windows Phone apps, WPF, Visual Studio extensibilty projects and a lot more.
Roaming Extension Manager - With all the extensions that you are going to install you need a way to track them across multiple machines. This extension does just that.
Visual Studio Spell Checker - Spelling is not my strong suite so why not let the spell checker do all the hard work.
Bonus
So I have to give me self a little plug here and draw attention to my extension called AceJump for Visual Studio. It is one I use all the time and it has great reviews, so that might count for something. If your a keyboard fanatic then this is a great tool otherwise you will probably never use. If you install it and use it, let me know what you think by leaving a comment below.
Conclusion
There are a lot of extensions out there but those are just a few of my favorites that have changed the way I interact with Visual Studio. If you have any you think I am missing be sure to let me know below.