11 Apr 2016
For the last few years there has been a major shift at Microsoft, one that has culminated in news from Build 2016 that I don’t think anyone saw coming…
Bash on Windows
The most exciting announcement for me to come out of Microsoft Build is that Bash Shell is coming to Windows 10!
If you are just learning about this, stop everything and go learn how to install Bash on Ubuntu on Windows right now. Seriously this post will be there for you to read while you upgrade.
Bash on Ubuntu on Windows is a game changer in a couple different ways. First when a developer is working on the Windows platform wants to get stated with any given technology they no longer have to worry if it is fully supported on Windows. No longer will the developer have to spend hours searching to the ends of the internet to figure out how to get it working for Windows. This is great not only for Windows developers but is great for the languages and tools themselves because now they will now have an easier on boarding and learning process for a new audience. On a deeper level this really means that there will be more collaboration and cross-pollination of ideas across the two eco systems.
Second when teaching any open source technologies there was always the problem of having to give instructions for two platforms (if the instructor bothered). Personally I have felt this pain when running courses using Node.js and Python. I went to great lengths to make sure that I had instructions for both Mac and Windows so that my students would have a great experience not matter what. With Bash on Windows this simplifies the work I need to do as a teacher and more importantly makes the experience for my students a better one because I don’t have to do the context switching. Again this leads to an overall smoother experience for everyone!
You can find more details in this video interview of the developers on the Bash in Window project. More technical details are available from Dustin from Ubuntu.
New members to the .NET Foundation
Another reason I am excited to be a .NET developer is because of the commitment and excitement around open source. I think the announcement of Red Hat, JetBrains and Unity joining the .NET Foundation really solidifies that the community is committed to .NET as an open and innovative platform. JetBrains in particular for me has been one of the companies that really changed the way I developed and thought about tooling with the ReSharper product. It is great to see them contributing to the direction of the .NET platform.
It really has been fun as an ASP.NET developer to watch the evolution of ASP.NET as it makes its journey cross-platform as ASP.NET Core. There are lots of exciting things happening on that project but again I think the important thing to note is that this opens up a platform that was not accessible to a whole trove of developers; developers that couldn’t even try it out. Now they can try .NET out which opens the door to new conversations and idea sharing. That is the truly exciting part.
Service Fabric goes GA
Microservices has been all the rage lately and for good reason. As you start to look into how to implement a microservices approach you will find there is a wealth of platform options to help you make sure you are delivering your services in a scalable, maintainable way. Most provide a way for orchestration, monitoring and automation of your services but what if they provided more?
Service Fabric is one of the most innovative platforms for microservices. It goes beyond just orchestration of your services and provides a platform that allows you to build your applications faster, with deeper diagnostics and health reporting. It is one of the most exciting technologies I have seen come out of Microsoft and with the Reliable Services application model it will change the way you think, develop and manage applications.
The announcement that Service Fabric is now Generally Available means that we can start using the same technology that is used to build services like Cortana, Azure Event Hubs and Azure SQL Database. Check out the Azure Service Fabric for Developers video to get a feel for what is possible.
The best part is that the platform it’s self is free. You can download the Service Fabric runtime and deploy it anywhere, even to AWS as they demonstrate in this video. This is a huge change from the way Microsoft has approached services like this in the past. This is yet another reason why I am excited to be a .NET developer. But this service is not only for .NET, they announced support for integrating in Java with the reliable services and actors and you can run any executable (node.js/python/etc) as a service.
Conclusion
All of this has led to companies looking at the Microsoft platform with new fresh look. Companies are considering things that we never thought possible. A great example would be Facebook bringing the Facebook Audience Network SDK to the Windows platform. This is opening up new opportunities and experiences on both sides - enabling 3 million Facebook advertisers to reach Windows 10 customers.
I really am excited to be a .NET developer. The ability to work side by side with developers from other platforms and languages excites me because of the possibilities of having conversations that were never possible before. There is opportunity to learn on both sides and I look forward to the next wave of innovations that is sure to come because of the new and open dialog we are having.
These were certainly not the only exciting announcements from Build 2016. You can catch all the keynotes and recorded technical sessions on Channel9 and find more reactions from other Technical Evangelist’s on Jeremy Foster’s Build 2016 Developer Reactions post. Be sure to let me know what you found most exciting in the comments below.
04 Mar 2016
It has been just over a year since I wrote a post on running Jekyll in Windows using Vagrant. The world has relentlessly moved on… we now have Jekyll 3 and Docker has become popular to the point that you might want to check it out. So I revisited the way I was running my local version of my Jekyll blog. The previous way I outlined using Vargrant to run Jekyll on Windows has no issues but I needed to test my Jekyll blog against the upgrade that GitHub Pages is doing and so I decided to also try running Jekyll in Docker just for fun.
There are a couple of different Docker containers that will work for testing your Jekyll site locally on Windows. The first option is the official Jekyll Docker container. With this container you can get up and going with Jekyll by its self or by using the provided pages container. Since GitHub Pages supports Jekyll and has extra packages/components that are available when your Jekyll site is built for GitHub Pages, it is a good idea to use the pages container provided to be sure you are getting the closest match to the GitHub Pages environment.
The second option for Docker containers is one created by Hans Kristian Flaatten. This container uses the github-pages gem that is maintained by GitHub themselves. Using this container will mimic the GitHub Pages enviroment and is very similar to the solution I created using Vagrant to Run Jekyll on Windows because they both use the github-pages gem. This is definitely my preferred way of running my blog locally because I know the environment will be closely mimicking the GitHub Pages environment.
Setting up Jekyll using Jekyll Docker Container on Windows
- Install Docker
- Open the Docker Quickstart terminal
- Clone or Create your Jekyll Project and move into the root folder of your project where you
_config.yml is located.
-
Run the following command in the console:
$ docker run --rm --label=jekyll --volume=%CD%:/srv/jekyll -it -p 4000:4000 jekyll/jekyll jekyll serve
- Visit the local address to view your site! (typically
192.168.99.100:4000 if you are using Docker on Mac or Windows)
note that the above command uses the defualt Jekyll docker container. If you want to use the container desgined for GitHub Pages change the image name to jekyll/jekyll:pages
Setting up Jekyll using the GitHub Pages Container on Windows (recommended if you deploy on GitHub Pages)
- Install Docker
- Open the Docker Quickstart terminal
- Clone or Create your Jekyll Project and move into the root folder of your project where you
_config.yml is located.
-
Run the following command in the console:
$ docker run -v "$PWD":/usr/src/app -p "4000:4000" starefossen/github-pages
- Visit the local address to view your site! (typically
192.168.99.100:4000 if you are using Docker on Mac or Windows)
Considerations
Project location for Docker on Windows
Where you create/clone your project on you machine matters other wise you may get permission errors or a note that your configuration file is not found. I found this issue on the Jekyll Docker repository where the project was in the wrong location. On Windows and Mac the Virtual Machine that is created to run Docker mounts the user’s home directory (c:\users\foo) by default. If your Jekyll project does not live in that path then you maybe get an error similar to:
Configuration file: none
       Source: /srv/jekyll
       Destination: /srv/jekyll/_site
Incremental build: disabled. Enable with --incremental
      Generating...
                    done in 0.017 seconds.
Auto-regeneration: enabled for '/srv/jekyll'
Configuration file: none
jekyll 3.0.2 | Error:  Permission denied @ dir_s_mkdir - /srv/jekyll/_site
ok: down: /etc/startup3.d/nginx: 1s, normally up
sh: can't kill pid 29: No such process
Upgrading Jekyll
If you have an existing project that is upgrading to Jekyll 3.0 you may need to make a few updates to your Jekyll project _config.yml file to get the project to run properly using GitHub Pages Container. See they details in Jekyll’s upgrade documentation.
Conclusion
It wasn’t strictly necessary to switch to using Docker to run Jekyll and my Jekyll Vagrant box will still work. Choosing to explorer Docker as an alternative was for fun and a learning experience. The world is moving to containerized solutions so it was a good experience running Jekyll in Docker and will make it easy to potentially deploy my blog to another location in the future. As always, I would love to hear your feedback and let me know if you are successful (or not) using this or other solutions to run Jekyll on Windows.
09 Feb 2016
Project Oxford is cool. I am out at a lot of hackathons where I see students creating some amazing applications. While at the hackathons I see students struggling to get started with Project Oxford in their language of choice. Project Oxford is so powerful that I hate to see students struggle getting started so I created a series of videos and sample projects to get them started quickly. But Project Oxford is not only for hackathons and students. Project Oxford has tons of real world applications such as image and video processing, OCR, and text to speech.
By the end of the videos you will have a full working sample and learn a few tricks like using the Kudu Dashboard along the way.
- Introduction to Project Oxford Machine Learning API’s
- How to set up your local Python environment for development and testing
- Configuring GitHub Continuous Deployment on Azure with Project Oxford Application
Sample projects
The sample project that used in the series is located at https://github.com/jsturtevant/happy-image-tester-django. If you prefer Node.js I have a made a similar project located at https://github.com/jsturtevant/happy-image-tester-nodejs.
Project Oxford API’s
You can find API wrappers for many of the languages:
18 Jan 2016
I got hooked on Elixir after reading Programming Elixir by Dave Thomas so I had to figure out how to install it on Windows. Turns out that installing Elixir on Windows is very easy using Chocolatey. If you haven’t heard of Chocolately before, it is the missing package manager for Windows (similar to apt-get or homebrew). When combined with Boxstarter, it can be used to automatically set up your development environment.
Installing Elixir
To install Elixir using Chocolaty:
- Make sure you have Chocolaty installed.
- Open an administrative
cmd prompt
- Type
choco install elixir (add -y to skip install prompts)
- Restart your
cmd prompt.
That is it! The last command will not only install the latest version of Elixir but it will install Erlang which is a prerequisite for Elixir. It will also add Elixir to your PATH (if not you can find the commands at C:\ProgramData\chocolatey\lib\Elixir\bin and manually add it) so you can open up a command prompt and type iex to start Elixir’s Interactive Mode.
Have fun getting started with Elixir!
07 Jan 2016
While debugging your Azure Web App deployments it is sometimes useful to view the files that are deployed to the service. Several situations come to mind. For example, trying to debug your database connection strings or possibly determining which files actually got deployed and where they sit in the file system. Or maybe you need to check if all your dependencies have been installed. Maybe a firewall blocks your FTP access.
But how do you do view the files if you are using a Platform as a Service (PaaS) solution such as Web Apps? PaaS doesn’t set up a virtual machine that you can remote into in the traditional sense and instead abstracts all that complexity away for you. Enter the Kudu Service Dashboard.
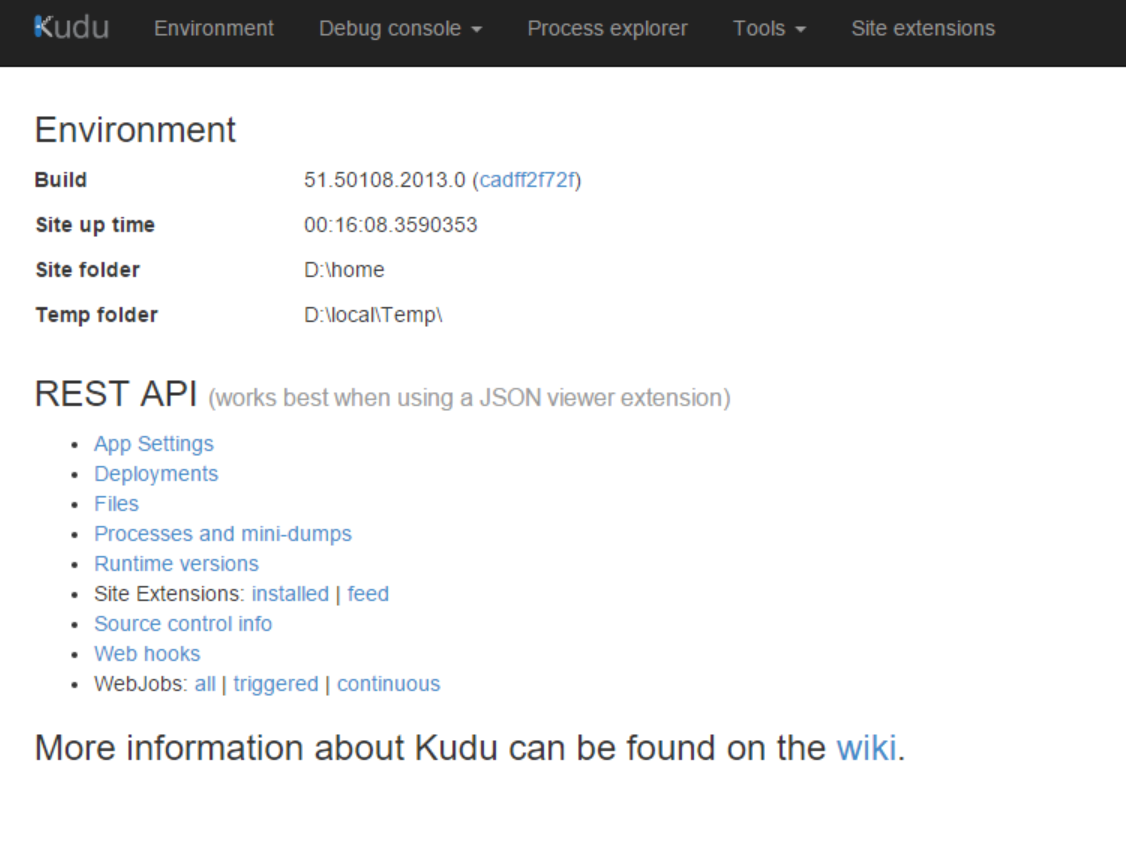
What is Kudu?
Kudu is a set of tools and extensibility points for App Service applications. Anytime you set up a git deployment in Azure Web Sites, Kudu is running and managing the deployment. Kudu also allows you to see environment variables, see processes running on the machine, use a cmd console and much more. It also provides a way for you to create extensions for Azure Websites that give you powerful capabilities like Image Optimization or adding Go support.
Not only can it do all that and more but it can also run outside of Azure on your on server. You can even fork the source code and tell Azure to use your own version of Kudu.
How do you start using it?
How to view Kudu service dashboard
There are two ways to access Kudu:
-
Simply modify your website URL and by adding scm to it. If you site is http://mysite.azurewebsites.net/, then the root URL of the Kudu service is https://mysite.scm.azurewebsites.net/. Note the added scm token.
-
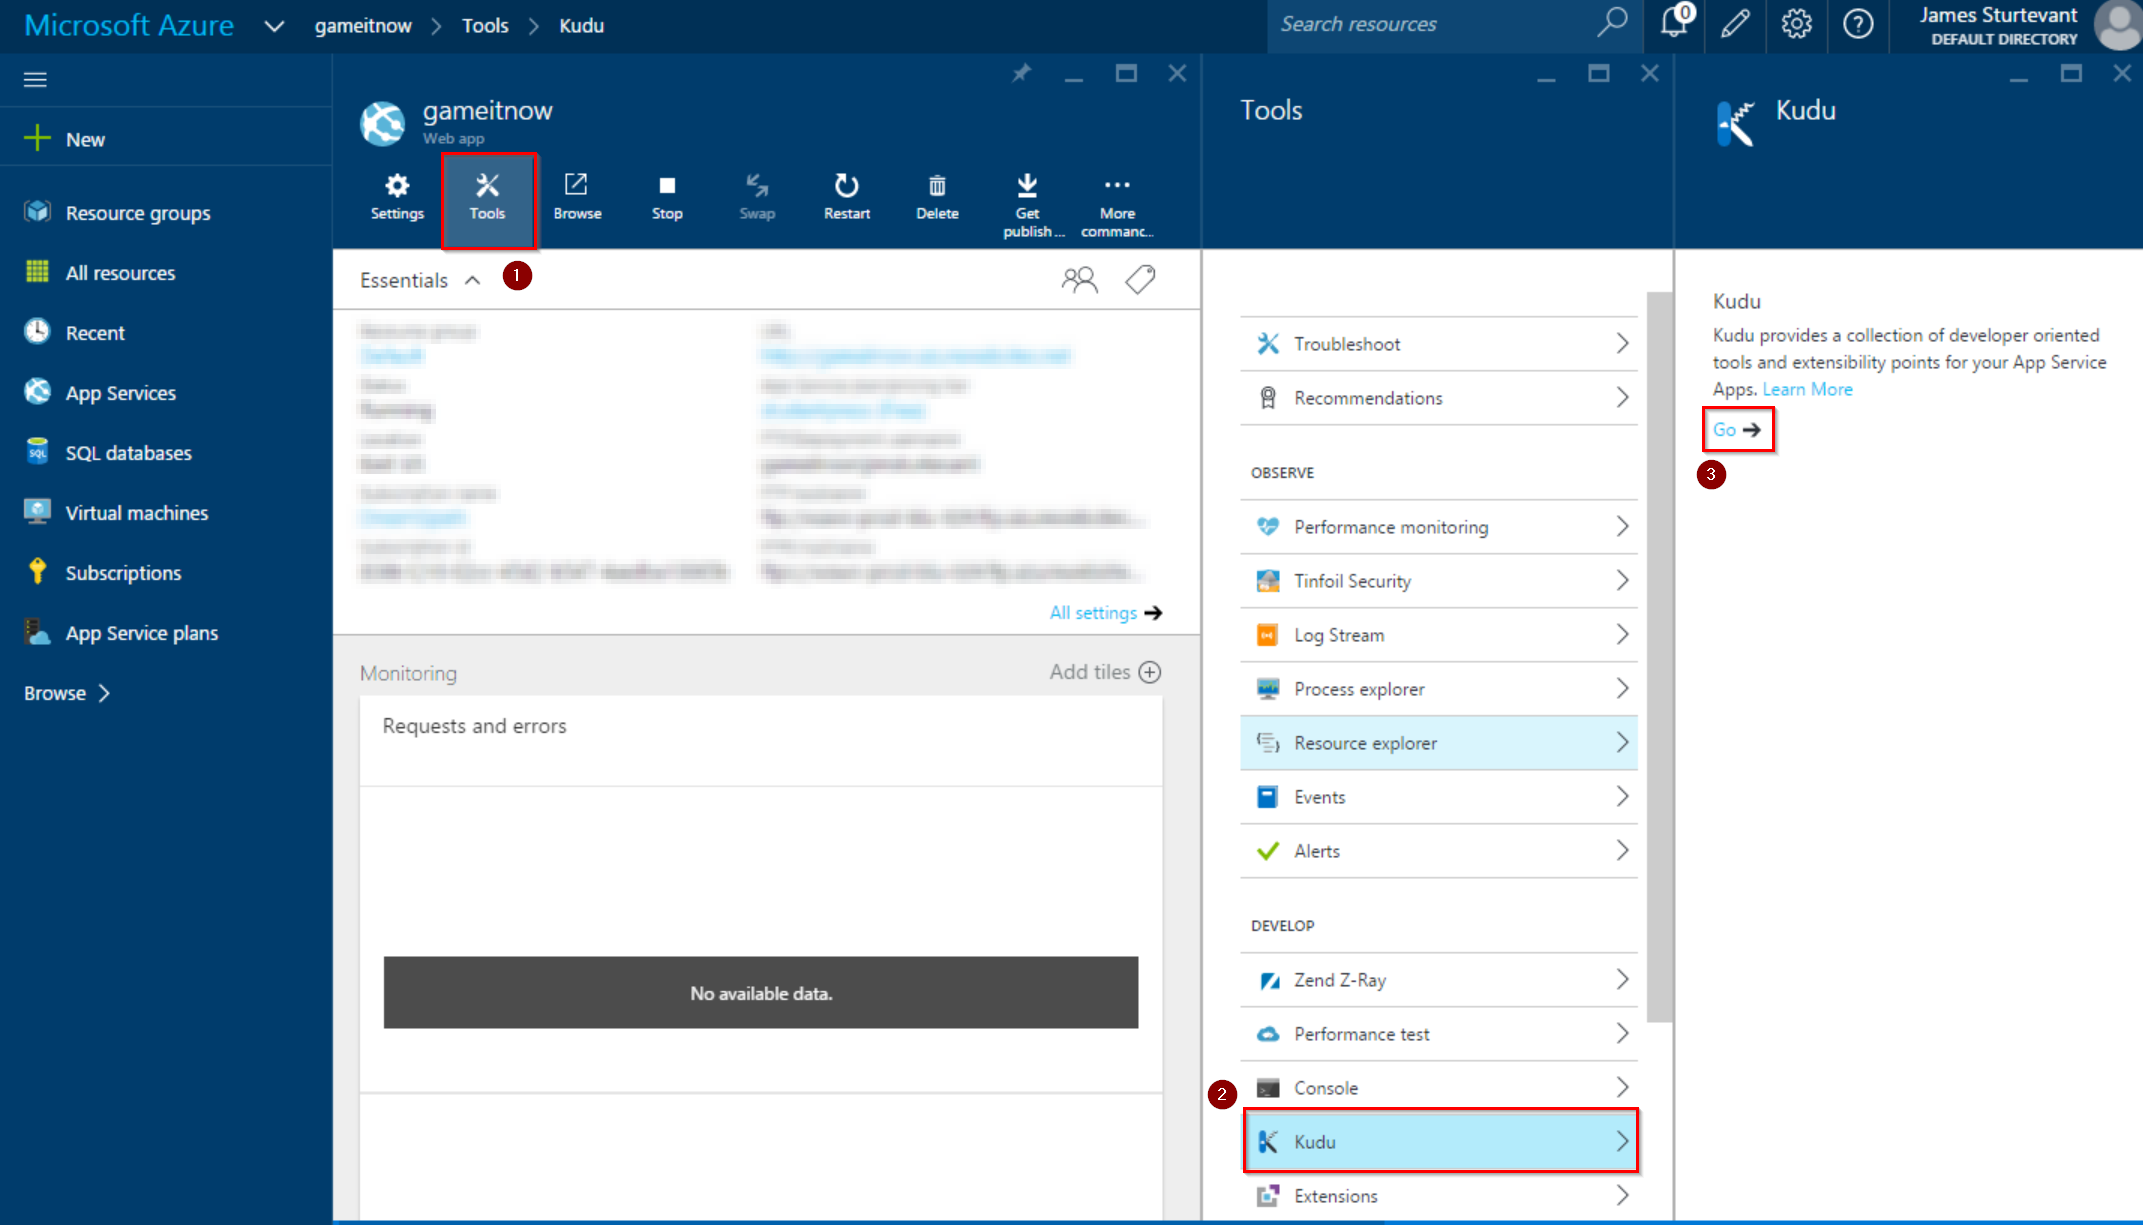
Using the Azure Portal. First Navigate to your Web App, Select Tools -> Kudu -> Go:
How to View, Add, Edit, and Remove files in Azure Web App using Kudu
Finally this post was about how you actually view, edit, add, and remove files from the Web App. Once you have your Kudu service Dashboard open you will see some basic information and links for more complex tasks:
View Current Files
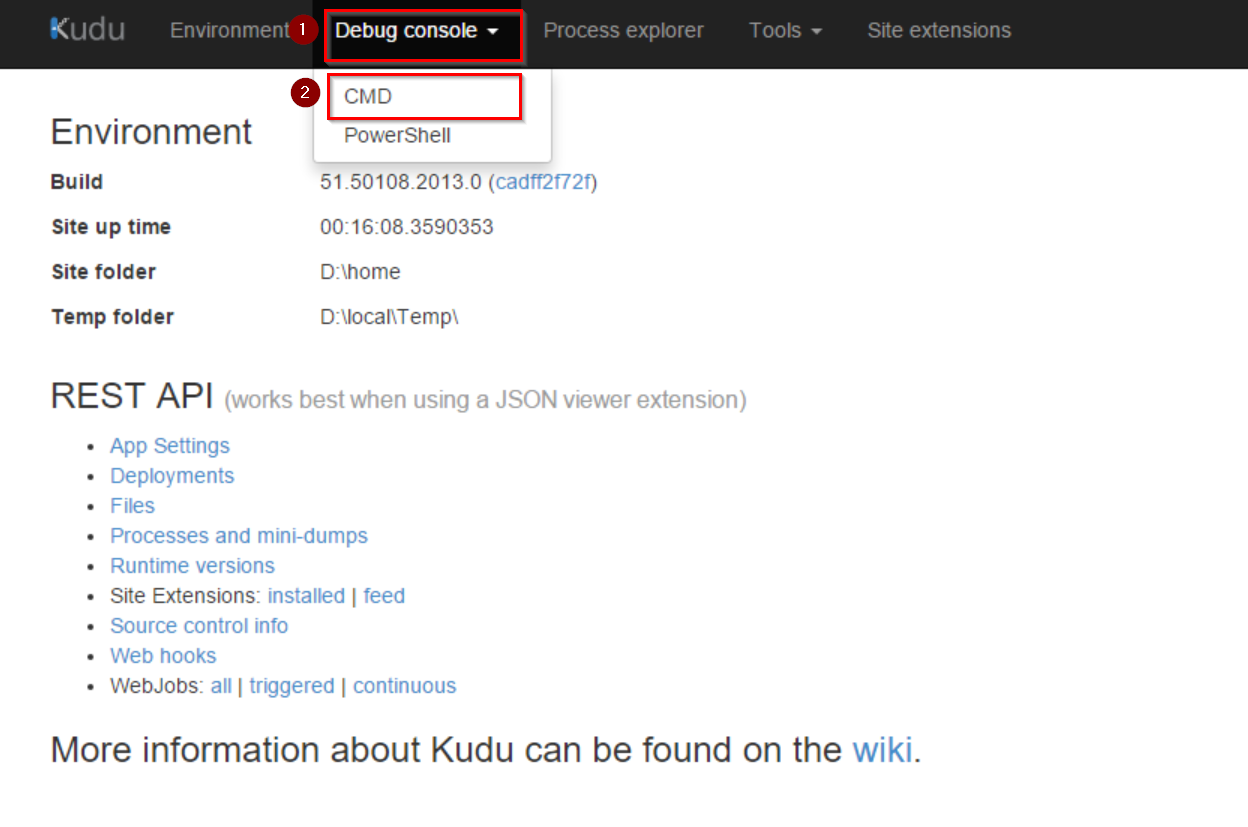
View current files in your application by Clicking on Debug Console -> CMD:
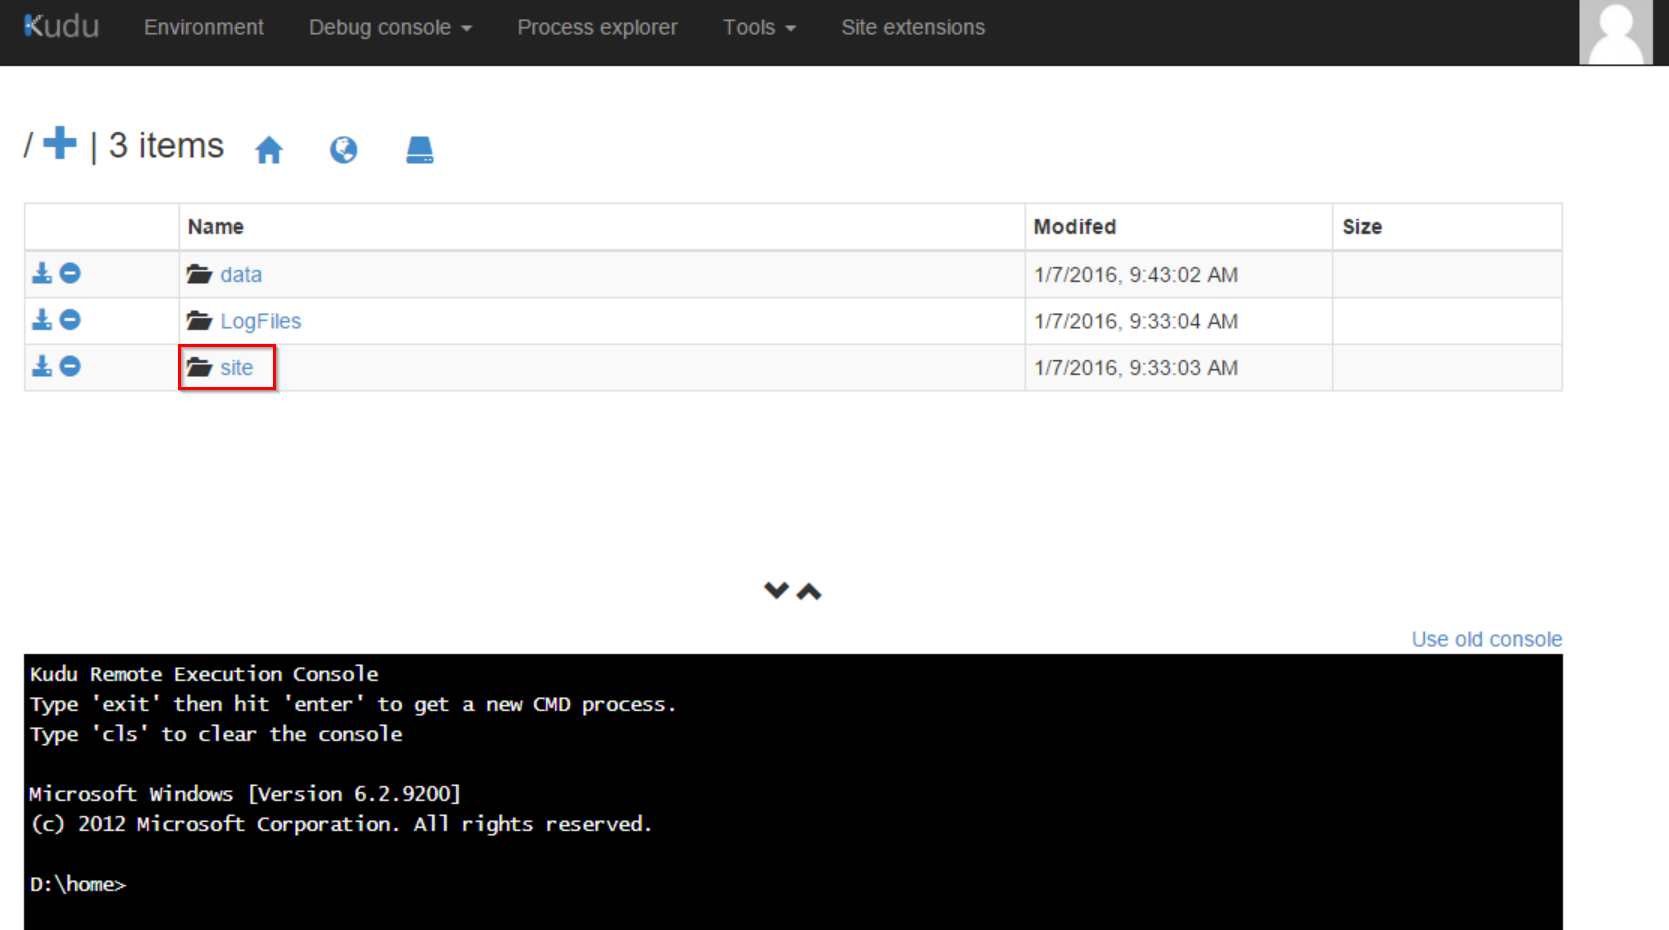
Once you are viewing the folder structure you can get to your application home directory by clicking the site folder:
And then the double clicking wwwroot folder:
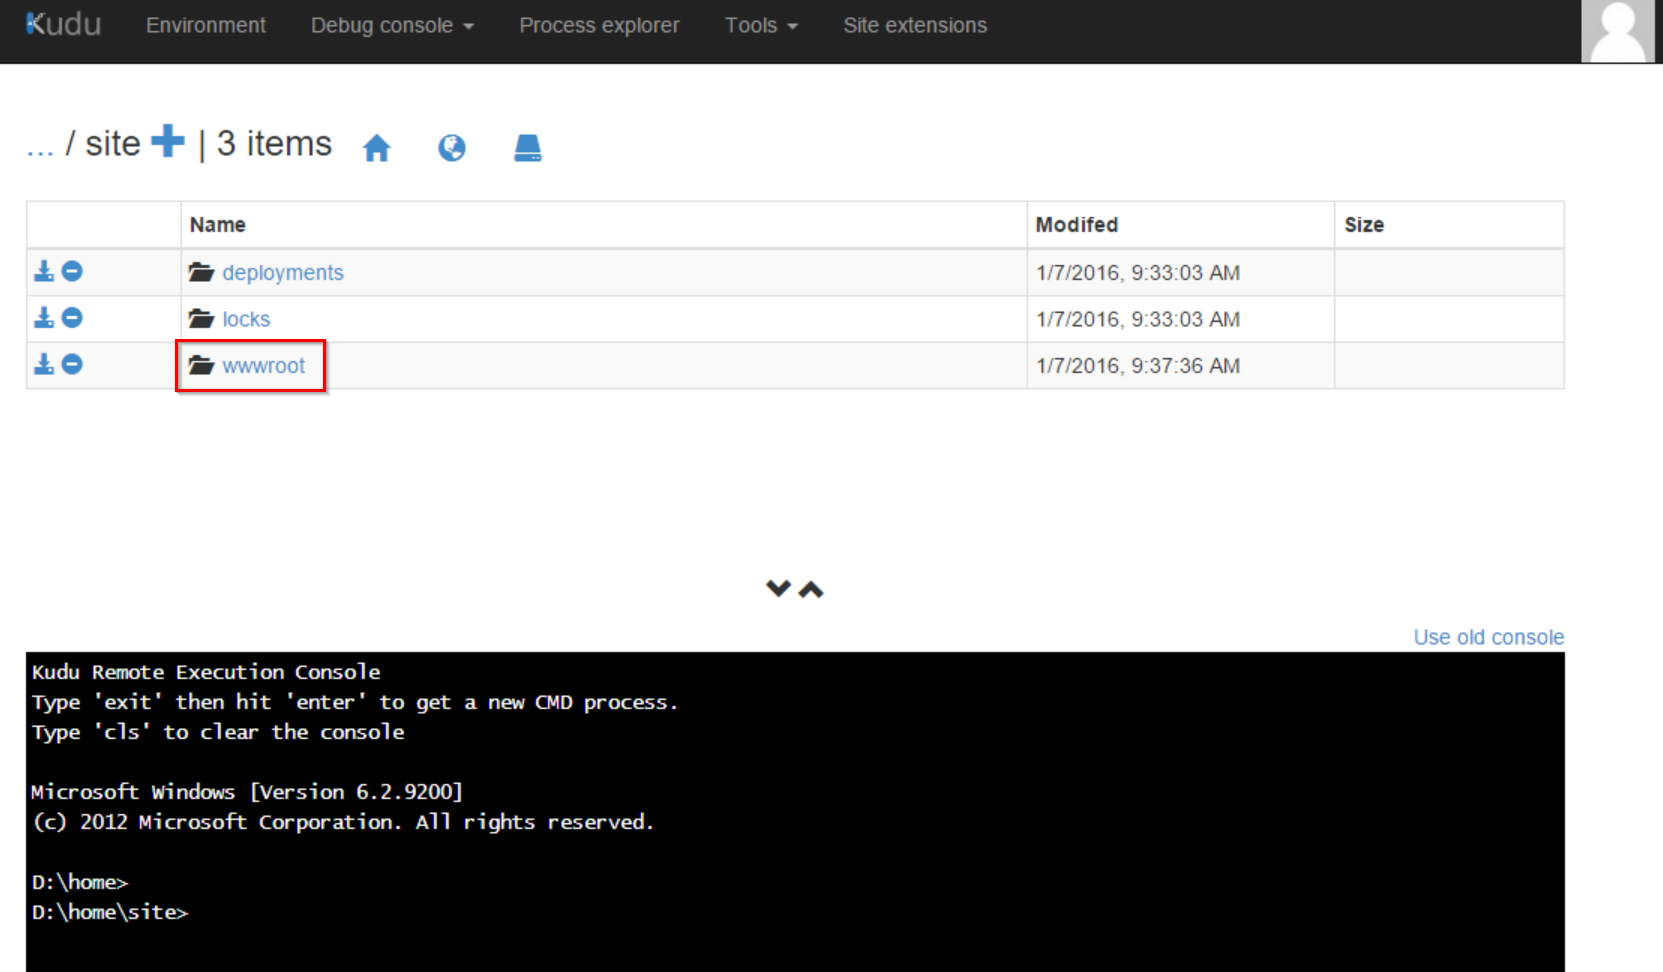
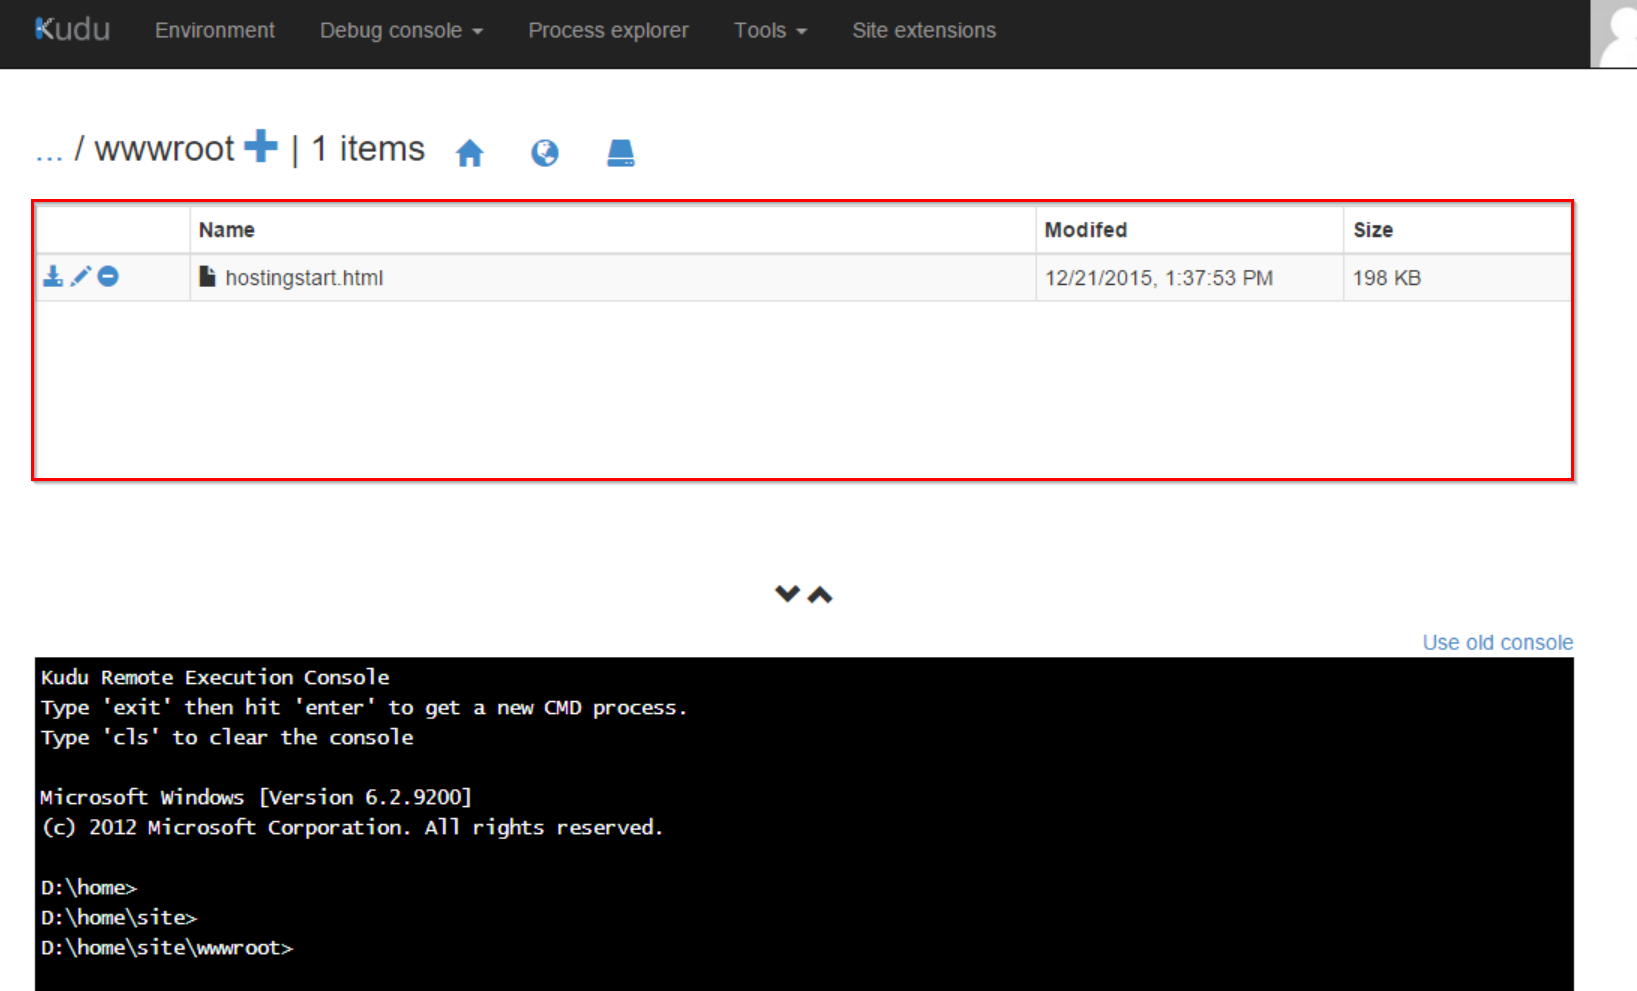
This is where all your files live. You can even customize this location. In this case, only the default starter HTML page is available but in the case of a larger application there would be many files.
Edit Files
To edit a file click the pencil icon:

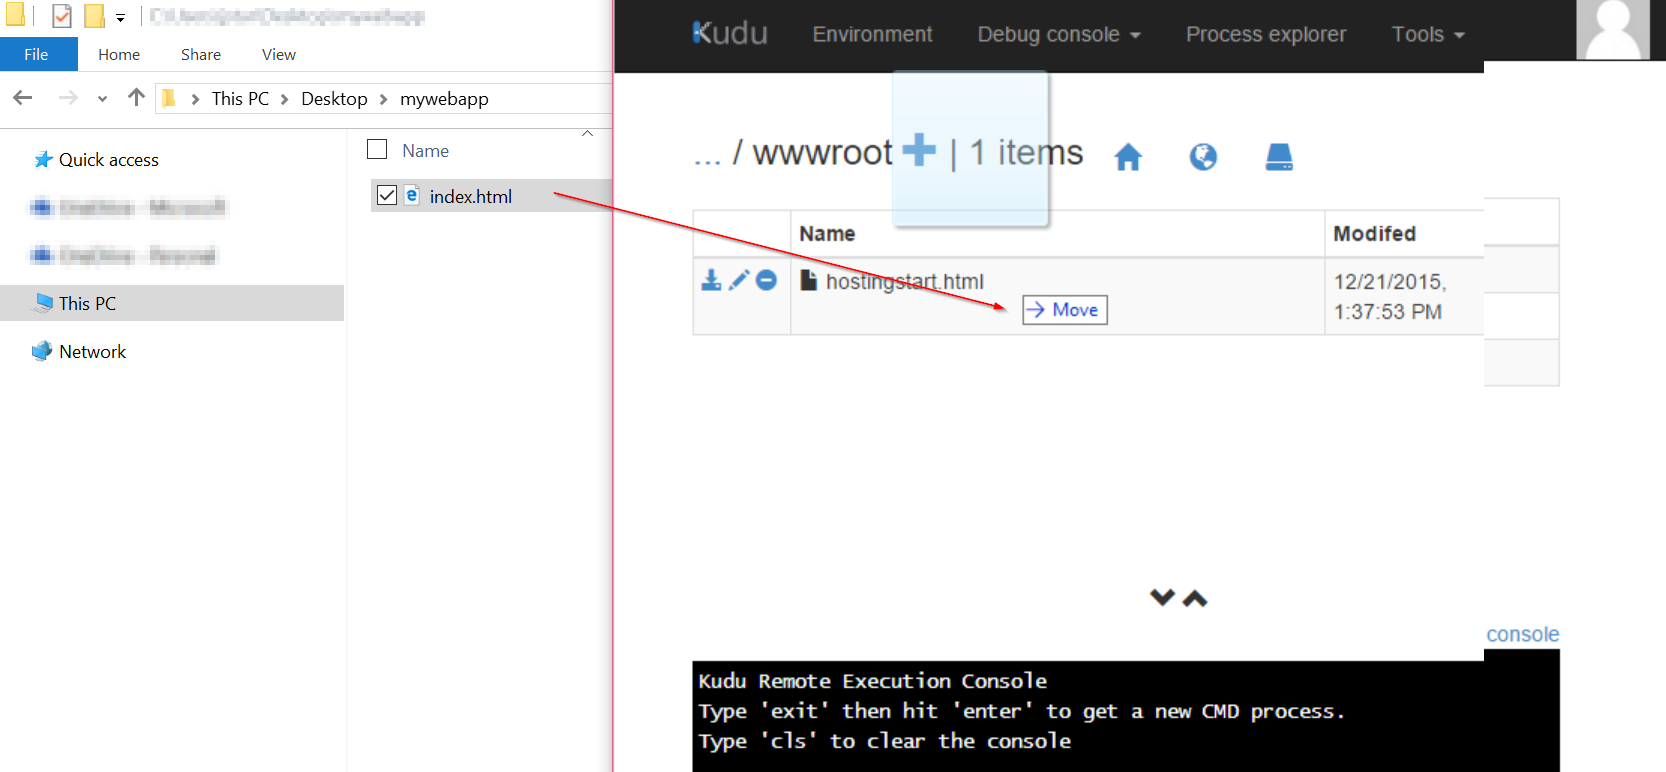
Add Files
To add a file you can drag it from your file system to the folder. It is important to drag it directly onto the folder viewer.
Remove Files
Toe remove a file click the minus icon:

Conclusion
It is really simple to use the Kudu Service to view, edit, add, and remove files from your Web App. But as you can see there are a lot of capabilities that Kudu brings to Azure Web apps. Another really useful ability that Kudu gives you is the ability to view log files.
Have fun getting to know Kudu and all the possibilities it brings to the table.