01 Jun 2016
I have had to start the Service Fabric Cluster Manager a few times without starting Visual Studio and deploying the application for talks or demos. Since the Cluster Manager is a separate process there is no need to run Visual Studio, simply:
- Open the Windows Run Dialog (
Windows Key + R)
- Type
ServiceFabricLocalClusterManager.exe and hit OK
Now your local Service Fabric Cluster is running and you can navigate to any endpoints you have exposed.
26 May 2016
Git is a major part of a developers work flow these days no matter what platform you work on. There are many different ways to install and use Git on Windows and in this post I will cover 5 different ways and talk about the pro’s and con’s of each. At the end you should have a good idea of how to have a great experience with Git on Windows not matter what your scenario. Be sure to let me know your favorite in the comments or if I missed one.
There is a walk through video for each of the ways to install git on Windows coming soon.
The Five ways
Below are the 5 basic ways to install git on Windows. There are probably others but these are the ones that I tend to show developers. I personally tend to end up installing git for command line usage and installing a GUI for more complex tasks. There are a few tasks (sqaushing commits) that are easier on the command line and a few that are easier in a GUI (selecting single lines from multiple changes in a file for an atomic commit).
- Git for Windows
- Using Chocolatey - preferred way on Windows 10
- Using Cmder - Great for older version of Windows
- Your Favorite Git GUI - Visual Studio, Sourcetree, GitHub Desktop, GitKraken, etc
- Bash on Windows - In preview for Windows 10 (sign up for the Windows Insider to try it out today)
Git for Windows
Git For Windows is the foundation for running Git on Windows. Many of the other options listed are using Git for Windows (previously msygit) under the hood. This option will install the git client, the windows implementation of BASH tools and a few Git GUI tools. If you want just the raw tools then this is the installer for you. If you want some more advance tooling then look to some of the other options. I generally prefer to install this via a different option.
You can install it from Git for Windows.
Pro’s
- basic tooling
- shell integration (right click to open BASH Promp / GUI)
Con’s
- GUI is old school
- BASH tools are only available in BASH prompt by default
- confusing installer with lots of options
Using Chocolatey
This is my preferred way to install the Git for Windows on Windows 10. It installs the same package before but in one line. If you have not heard of Chocolatey stop everything and go learn a bit more. Chocolatey can install the software with a single command; you don’t have to use click-through installers any more! If you are coming from Linux think of it as the apt-get/yum for Windows. Chocolatey is very powerful and I use it in combination with Boxstarter to set up my dev machines. If you are in charge of setting up machines for developers on windows it is definitely worth a look.
I love this option because it is fast to set up (one liner) and with Windows 10’s new command console (it resizes and has copy/paste) I get the a great native experience. Using keyboard shortcuts (Windows key + X then C), I can have a command prompt open quickly and start using git right away. Watch the video to see another cool trick where you can open the command window in any open folder.
Let’s see how you would install git using Chocolatey. I assume you have Chocolatey installed already (it is a one liner in the command prompt). Then simply open Administrator Command Window and type:
choco install git -params '"/GitAndUnixToolsOnPath"'
This will install git, the BASH tools and add them to your path.
Pro’s
- fast setup
- use existing Windows 10 command prompt for native experience
Con’s
- if done on older version of windows the command prompt experience is poor
- have to have Chocolately installed (though really easy to set up and over all awesome tool)
Using Cmder
This was my go to option before Windows 10 and would be what I recommend for anyone not using Windows 10. The command line experience in older versions of Windows is poor (no resize/copy paste) and Cmder brings together a set of awesome tools to make a great command line experience. I always choose the larger install option, as it comes with git (again Git for Windows) and the BASH tools all hooked up. Some of the other features it brings along are portability (which is great if you are running events), keyboard shortcuts like copy and paste, easy aliasing, and more.
You install it by downloading the “Full” option on the Cmder page.
Pro’s
- portable
- brings copy/paste, resizing and more options to command prompt in older versions of Windows
- nice looking prompt
Con’s
- emulator (no quick shortcuts to open without other tools, can be less responsive)
Your Favorite Git GUI
I don’t want to get into the battle of the best GUI for git as they all have pros and cons. The key here is that all of them come with git installed. If you a fan of GUI’s or just getting started this is great place to get started as you don’t have to worry about the command line or setting up command PATH’s.
I tend install git via Chocolately then use a GUI for my day to day work. That said, I usually use the right tool for the right job when it comes to GUI vs command line. Some scenarios I really enjoy using the GUI are when viewing complex diff’s or helping make atomic commits (I made more than one change because I got carried away and want to commit then one at a time ;-) ).
I don’t have a section on installing the GUI’s in the video as there are to many to show, each one is behaves differently and are relatively easy to install and set up.
Pro’s
- easy guided git experience through GUI
- no need to mess with PATH and other tooling
Con’s
- git not usually added to PATH (can’t kick over to command line when
- everyone prefers a different UI and may not know how to use yours
Bash on Windows
This is one of the more promising solutions for the future. At the time of writing, it is in preview on the Fast ring of the Windows Insider program. I talk about why this is a promising solution on my Thoughts on Build 2016 post along with a demo. This allows us to run git directly on BASH on Ubuntu on Windows. This means that we are not using a Windows implementation of BASH but the real BASH. More in-depth details on the from the developers themselves can be found at the discussion on Linux Command Line on Windows. This option is going to be really exciting for open source projects where developers might work on a variety of platforms.
The set up for this requires you to be on the Windows Insider program at the time of writing. Once you have the latest insider build installed you can follow the instructions at https://blogs.msdn.microsoft.com/commandline/2016/04/06/bash-on-ubuntu-on-windows-download-now-3/.
Pro’s
- real BASH and git
- it is the real BASH!
- fast
Con’s
- still in preview
- requires the insider preview build
Conclusion
There are many options for getting Git install on Windows to create a great experience no matter what your requirements are. As with any choice there are trade off’s depending on your specific scenario so try a few of the options out and find the one that works best for you. Did I miss one? What is your favorite? Let me know in the comments below.
20 May 2016
Azure Service Fabric is a manage service that abstracts the server infrastructure away from you. You give Service Fabric the application composed of services and it decides what machines to run the individual services on (this can be customized on CPU/memory/etc via configuration. If a machine goes down it will automatically redistribute the loads, wait till the server comes back online then distribute the load evenly (or as configured). This all happens with out you noticing or any direct intervention.
During development you might mis-configure something and occasionally you might need to look at an individual server to diagnose an error. This happened to me the other day and I learned how access a unique server via Remote Desktop (RDP) to look at the log files. Full Azure Portal support for VM Scale Sets is still in the works. Here we will see how you can find the end points for your Virtual Machines and log in via Remote Desktop in the mean time.
Note: This is something that should be done as a last resort for debugging purposes only. The underlying infrastructure is abstracted away and making changes can negatively affect many things. Also as Scale Set support in the portal becomes more robust this will likely no longer be needed. Also if there is a better way make sure you leave a note in the comments.
Find your RDP end point for the machines
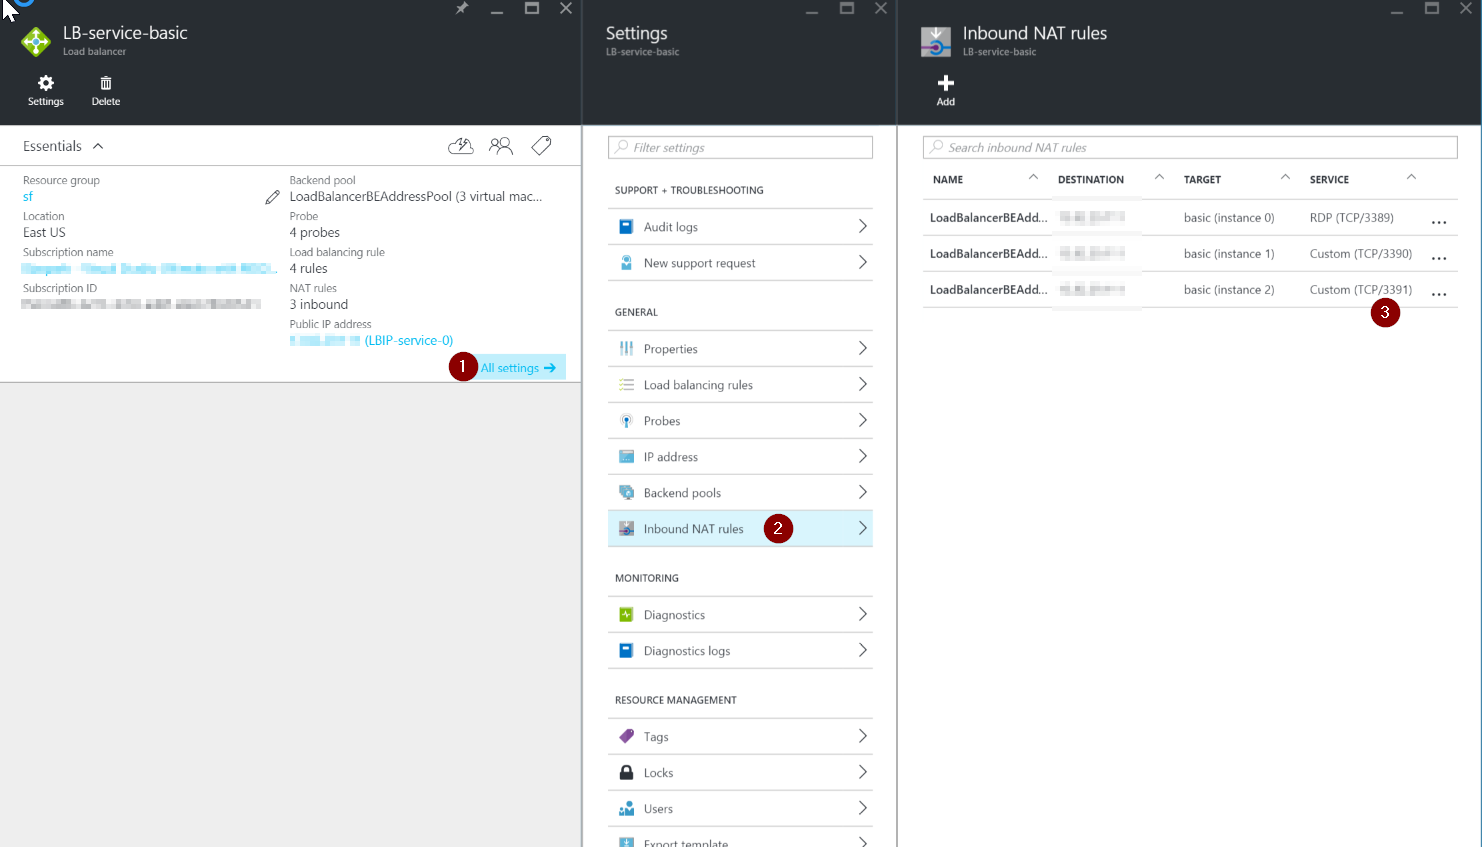
When you create a Azure Service Fabric Cluster a lot of services are scaffolded out for you. One of the services is the Load Balancer. This is where we will find the Inbound NAT Rules that correspond to the VM’s we have created. Using this we can determine the port we should connect to in order to RDP into the server.
First, navigate to your load balancer in the Azure Portal by opening your Service Fabric Cluster:
- Click on your Resource Group
- Click on the Load Balancer resource
- A pane should open that is labeled as “Load Balancer”
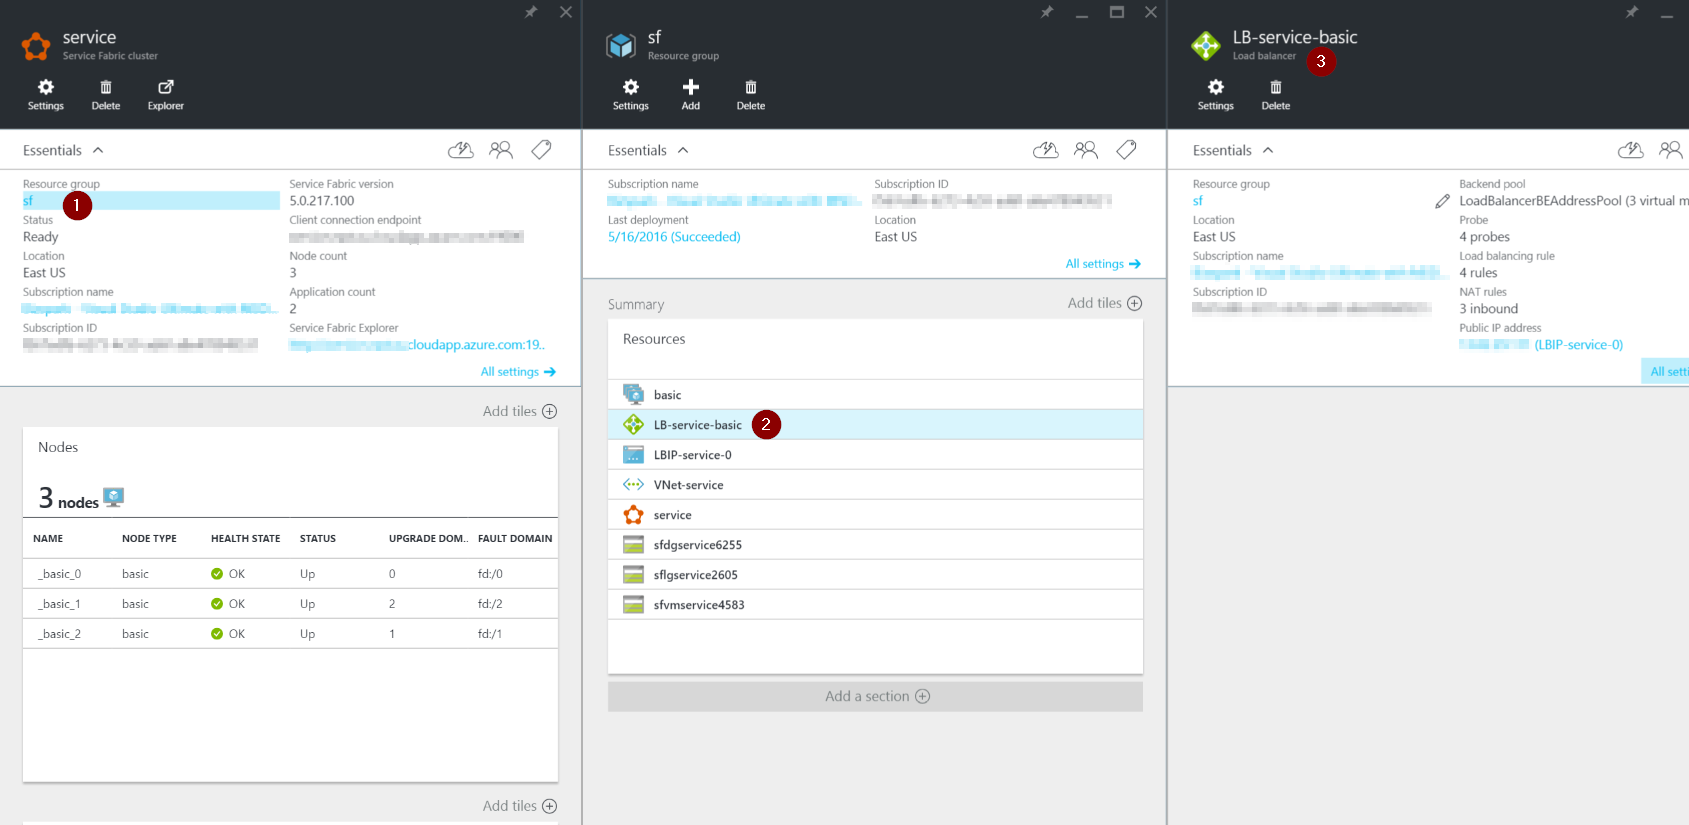
Next, navigate to the NAT rules to find the VM instances and the ports configured ports. If you know which instance is causing the issue (in my case the instance was marked as a failed instance in the portal) you can then find the instance under Target and the port under service. It seems to always start with 3389 and go up from there.
- Click All Settings
- Select Inbound NAT Rules
- Find the port number under
Service Column
Open RDP and log in
Once you know your machines port number:
- Open the run dialog by typing
Windows key + R
- Type
mstsc /v:<your-sf-cluster-name>.eastus.cloudapp.azure.com:<your port number>
- Log into the machines using your user name and password that you created for the machines.
An example would be:
mstsc /v:samplesf.eastus.cloudapp.azure.com:3391
16 May 2016
In my previous post I talked about how Azure Service Fabric went to General Availability in Azure and why it was important. Since then I have been diving deeper on Service Fabric and I will be giving a talk on it at ContainerDays Boston 2016 next week. Today we are going to talk about how to wire up dependency injection in Service Fabric for Reliable Services and Actors. This will be useful to understand so that later we can setup Unit Tests.
Registering a Service
First lets take a look at how you register a Reliable Service. There are a couple different types of Reliable services: Stateless and Stateful. For this post we don’t need to know much about the differences but you can learn more at the post Service Fabric Service Types. Both versions have a ServiceContext that is passed in to the constructor. The default Visual Studio templates for stateless or stateful services actually has the basic Dependency injection set up in the program.cs file:
ServiceRuntime.RegisterServiceAsync("State1Type", context => new Service(context)).GetAwaiter().GetResult();
Depending on the service type (stateful or stateless) the context that is passed into the service will either be a StatefulServiceContext or a StatelessServiceContext. Both derive from ServiceContext.
As you can see we are already injecting our dependency on the ServiceContext into the service. Adding another dependency is easy:
ServiceRuntime.RegisterServiceAsync("State1Type", context => new Service(context, new MyNewDependency())).GetAwaiter().GetResult();
For Stateless services that is all we need to do. When it comes to Stateful services, if we want to be able to unit test the service, we also need to be inject the ReliableStateManager:
ServiceRuntime.RegisterServiceAsync("Stateful1Type", context => new Service(context, new ReliableStateManager(context), new MyNewDependency())).GetAwaiter().GetResult();
We then need to update the Stateful service to pass this dependency on to the base class in the Service constructor:
public Service(StatefulServiceContext serviceContext,
            IReliableStateManager stateManager, IMyDependency dep)
            : base(serviceContext, stateManager as IReliableStateManagerReplica)
        {
            this._dep = dep;
        }
In later posts I will go into how to actually set up the unit tests for the services.
Registering an Actor
The Actor programming model is built on top of the Reliable Services Model. Registering an Actor is fairly straight forward:
ActorRuntime.RegisterActorAsync<Actor2>().GetAwaiter().GetResult();
The RegisterActorAsync method actually takes a second overload that allows you to register the Actor via a factory method and this is where you would set up dependency injections:
ActorRuntime.RegisterActorAsync<Actor2>(
    (context, actorType) => new ActorService(context, actorType, () => new Actor2(new MyDependency()))).GetAwaiter().GetResult();
Taking it to the next level
This is how you would set up dependency injection at the program level. If you wanted to use a more advanced DI container system you might take it to the next level by using a container as in this example. Beware that there are lots of nuances for the way the Reliable Services are created and removed and could cause some trouble if you are not careful.
Stay tuned as be begin to look at setting up unit tests for the Service Fabric services.
09 May 2016
The model for Service Fabric allows for flexibility when it comes to designing the individual services, giving you the ability to pick the right programming model for each service. Deciphering the multiple options can be complex and really depends on each scenario and service you are building. Here I will try to break down the options how I see them. Please leave feedback if it was helpful or you think of options in a different way. Remember every application is composed of many services and each service will likely have a different programming model so assess each service individually.
Service Types
There are two main types of services you can build with Service Fabric:
- Stateless Services - no state is maintained in the service. Longer term state is stored in an external database. This is your typical application/data layer approach to building services that you are already likely familiar with.
- Stateful Services - state is stored with the service. Allows for state to be persisted with out the need for an external database. Data is co-located with the code that is running the service.
One of the real advantage of using a platform like Service Fabric is when you begin to leverage the power of Stateful services. But Stateful services takes a bit of a mind shift in the way we think about building applications so let’s look at stateless applications first then move onto the stateful service approach.
Once you have decided whether you are building a Stateful or Stateless service you can then choose from multiple types of programming models to help you build you services:
- Guest - allows you to run any executable inside Service Fabric runtime. This can be an executable or a container
- Reliable Services - light weight framework that lets you integrate with the Service Fabric runtime (can be stateful or stateless)
- Reliable Actor - framework that lets you build your applications using the Actor pattern (can be stateful or stateless)
Stateless Services
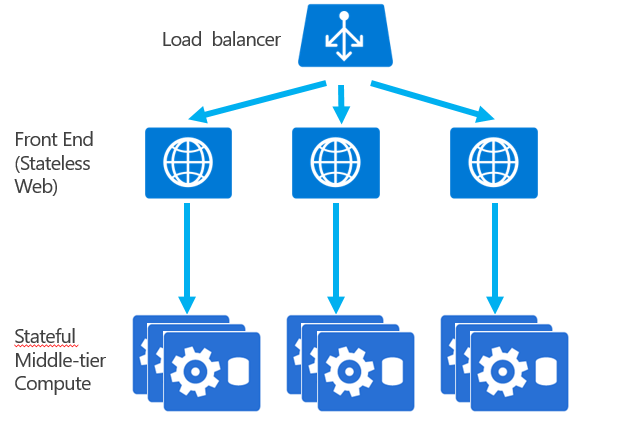
Stateless services are a familiar paradigm in most web development. You typically have a middle tier layer that receives requests and then calls out to a database where the state is stored. When those requests to the data store are expensive there is often a caching mechanism in place. Since there is no state maintained inside the service a request can be routed to any instance of the service. A typical application using stateless services looks like:
 [modified image from https://github.com/Azure/azure-content/blob/master/articles/service-fabric/media/service-fabric-application-scenarios/AppwithStatelessServices.jpg]
It is important to note that the above diagram only uses stateless services. Inside a service fabric application you will typically have a combination of stateless and stateful services.
Stateless Application Use Cases
Typical use cases for a Stateless Application are:
- web interface for end users
- API gateway to other services
- proxies
- existing stateless service
- calculations that don’t require state (complex math calculations where all state is provided and a result is returned)
Stateless Service Fabric Programming Models
The Service Fabric Programming model that you might use depends on the specific use case. A few guiding tips:
- Guest Executable - There are a few scenarios where using an existing application make sense. Existing applications that are moving over to Service Fabric is a great use case. Another use case would be team familiarity with a language or the particular external service (data store or service) that is part of the system has better first class support for a language that doesn’t have an Service Fabric Runtime API currently. With a Guest Executable you get the advantages like service orchestration and rolling upgrades but miss out on being able to tie into the more advance features that service fabric platform has to offer such as custom health reporting.
- Stateless Reliable Services - Use Stateless Reliable Services when you are building new services from scratch and want to take advantage of the Service Fabric platform features. By using the Reliable Services API’s you get access to the features like health monitoring, endpoint registration, load reporting and more. Any application endpoints built using ASP.NET Core (MVC or WebAPI) are great use cases for Reliable Services. A Java Reliable Services API is in the works.
Stateful Services
Stateful services are different from Stateless services in the fact that the data is stored on the same machine that the service is running. There is no external data store. This removes the need for additional layers like caches and queues, simplify the service. The latency in the system drops because the data can be retrieved without additional network calls to the external store. A diagram says it all (be sure to compare this to the diagram of a stateless application):
 [modified image from https://github.com/Azure/azure-content/blob/master/articles/service-fabric/media/service-fabric-application-scenarios/AppwithStatefulServices.jpg]
Now that the data is on the same machine as the service, if the machine failed then you would lose all the data but this is not the case with Service Fabric. The Service Fabric runtime manages the reliability of the state for you so you do not have to worry about machine failures. The way the reliability is accomplished using replicas is fairly complex and ultimately you don’t have to think about it to much but I do recommend that you learn how the reliability of your data is ensured so you can understand some of the considerations you need to take in place. A great introduction is in the video Building MicroServices with Service Fabric.
Another reason the Stateful approach to services is powerful is because now you remove the need to translate between your conceptual model and data model (multiple rows and tables in the case of a SQL database). This simplifies your programming model and enables you to work in one mental model with out worry (to much) about how it is stored in the database. This is achieved through the Reliable Collections IReliableQueue and IReliableDictionary interfaces.
Use Cases
Typical use cases for a Stateful application are:
- any data service (such as order service or inventory service)
- gaming scenarios
- most services where data is stored externally and pulled into do processing (you would model it so the data is local)
- data analytics and workflows
Stateful Service Fabric Programming Models
The Service Fabric Programming model that you might use depends on the specific use case. A few guiding tips:
- Stateful Reliable Services - allows the most flexibility around the managing state. It allows you create transactions around multiple data types or create complex processing units of work. Most Stateful services can be created using this programming model and is a great place to start if you are sure your domain doesn’t fit the Actor Model.
- Stateful Actor Model - This model is useful anytime the Actor pattern can be used to describe your domain space. This sounds obvious but is only useful if you know where you might use the Actor model to model your domain space. A few scenario’s would be where you are doing a high number of small, independent calculations or have many concurrent interactions that need supervision. Understanding the Actor model is outside the scope of this post. If you are not familiar with the Actor model I would recommend learning a little bit more so you can be sure to leverage this powerful programming model inside Service Fabric when appropriate. Another important note is the the level of reliability at which a Actor stores state can be configured. They can be configured to store the state as persisted, volatile, and only in memory.
Conclusion
There are two main types of services that can run inside Service Fabric. The first being Stateless services where state is stored in external service. This is the familiar way to build services and applications today. In the stateless applications you can either bring your own service or build one using the Service Fabric API’s that let you tie into the Service Fabric runtime. Tying into the runtime allows you to begin to leverage the platform to get more insight into your services.
The second type is a Stateful service where the data is co-located with code that runs the service reducing latency and reducing service complexity. There are currently two models for building Stateful services: Reliable Service and Reliable Actors. By choosing a Stateful service you are beginning to tap into the Service Fabric platform which goes beyond service orchestration.
Hope that was a helpful break down of the services. Let me know in the comments or tell me how you view the options for building services in Service Fabric.