05 Feb 2018
Creating a Secure Fabric cluster in Azure has become easier. Currently if you use the Azure Cli you can do it in only two commands. Note that you may wish to change the location or operating system parameters.
az group create --name <resource-group-name> --location eastus

az sf cluster create
  --resource-group <resource-group-name> \
  --location eastus \
  --certificate-output-folder . \
  --certificate-password <password> \
  --certificate-subject-name <clustername>.eastus.cloudapp.azure.com \
  --cluster-name <cluster-name> \
  --cluster-size 5 \
  --os WindowsServer2016DatacenterwithContainers \
  --vault-name <keyvault-name> \
  --vault-resource-group <resource-group-name> \
  --vm-password <vm-password> \
  --vm-user-name azureadmin
Using an ARM Template
It is possible to create the cluster with a specified ARM template with --template-file and --parameter-file. Working with Noel, I found that in the the ARM parameter template (parameters.json) you need provide entries with blank values for certificateThumbprint, sourceVaultValue, and certificateUrlValue. This will create certificate and drop it on your machine as well.
An example is:
az sf cluster create \
  -g <rg-name> \
  -l eastus \
  --template-file template.json \
  --parameter-file parameters.json \
  --vault-name <vault-name> \
  --certificate-subject-name <clustername>.eastus.cloudapp.azure.com \
  --certificate-password <password> \
  --certificate-output-folder .
Connect
The command above creates the cluster and drops the pfx and pem files for the certificate to your current folder. You can connect to your cluster through the Service Fabric Explorer or through the Service Fabric Cli (sfctl).
Connect using the Service Fabric Explorer
To install the cert so you can connect to the Service Fabric explorer:
powershell.exe Import-PfxCertificate -FilePath .\<yourpfx>.pfx -CertStoreLocation 'Cert:\CurrentUser\My\'
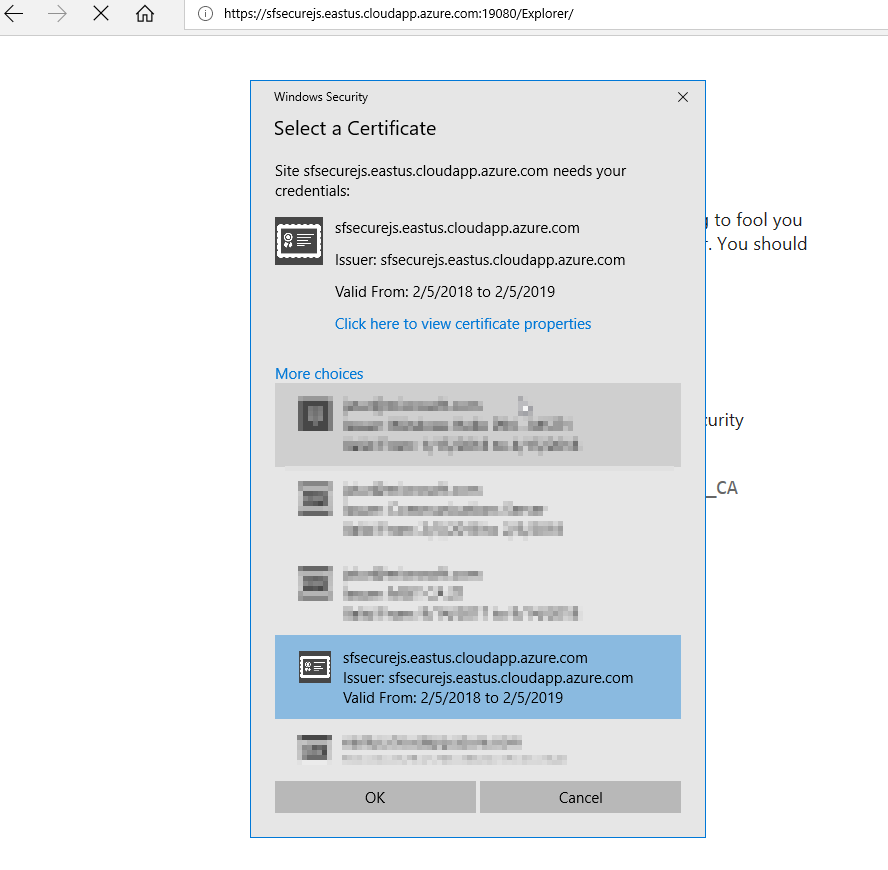
Browse to you Service Fabric Explorer (https://yourclustername.eastus.cloudapp.azure.com:19080/Explorer) and when prompted select your certificate:
Connect using the Service Fabric Cli (sfctl)
To connect with sfctl run the following command:
sfctl cluster select --endpoint https://<yourclustername>.eastus.cloudapp.azure.com:19080 --pem .\<yourpem>.pem --ca .\<yourpem>.pem

## get nodes
sfctl node list
Your certs
If you review the command we ran to create the cluster you will notice that you create an Azure Key Vault. If you ever need to get your private keys you can head back to the Key Vault resource either via the CLI or the portal to get your keys.
Thanks Vy Ta here is a quick example:
az keyvault secret download --vault-name <vault-name> -n <key-name> -f pfx-out.pfx

# if you want the pem
openssl pkcs12 -in pfx-out.pfx -out pem-out.pem -nodes
15 Dec 2017
Sometimes you want to be able to deploy and develop applications locally with out having to spin up an entire cluster. Setting up Minikube on Windows 10 hasn’t been the easiest thing to do but with the help of a colleague, Noel Bundick and GitHub issues, I got it working this week so this post is for me in the future when I can’t remember how i did it :-).
Install Minikube
This part is pretty easy if you use Chocolately (not using Chocolatly? Check out why you should). Alternatively you can download it and add it to your path.
Create a Virtual Switch in Hyper-V
This is the extra step you need to do to get Hyper-V to work with minikube. Open a Powershell prompt and type:
# get list of network adapter to attach to
Get-NetAdapter

#output
Name                      InterfaceDescription                    ifIndex Status          LinkSpeed
----                      --------------------                    ------- ------          ---------
vEthernet (minikube)      Hyper-V Virtual Ethernet Adapter #3          62 Up              400 Mbps
Network Bridge            Microsoft Network Adapter Multiplexo...      46 Up              400 Mbps
vEthernet (nat)           Hyper-V Virtual Ethernet Adapter #2          12 Up              10 Gbps
vEthernet (Default Swi... Hyper-V Virtual Ethernet Adapter             13 Up              10 Gbps
Bluetooth Network Conn... Bluetooth Device (Personal Area Netw...      23 Disconnected    3 Mbps
Ethernet                  Intel(R) Ethernet Connection (4) I21...       9 Disconnected    0 bps
Wi-Fi                     Intel(R) Dual Band Wireless-AC 8265          14 Up              400 Mbps

#Create the switch
New-VMSwitch -name minikube  -NetAdapterName <your-network-adapter-name> -AllowManagementOS $true
Create minikube
From the Powershell prompt in Windows, create minikube using the switch you just created:
minikube start --vm-driver hyperv --hyperv-virtual-switch minikube
Minikube adds the configuration to your .kube/config file upon successful creation so you should be able to connect to the minikube from the powershell prompt using kubectl if you have it installed on windows:
kubectl get nodes

#output
NAME       STATUS    ROLES     AGE       VERSION
minikube   Ready     <none>    18h       v1.8.0
Using WSL to talk to minikube
I mostly use WSL as my command prompt in Windows these days which means I have kubectl, helm and my other tools all installed there. Since we just installed minikube on windows, the .kube/config file was created on the windows side at C:\Users\<username>\.kube\config. To get kubectl to work we will need to add the configuration to our .kube/config on WSL at /home/<bash-user-name>/.kube.
Note: the following might vary depending on your existing .kube/config file and set up. Check out sharing cluster access on kubernetes docs for more info and alternative ways to configure.
To see the values created on for you windows environment you can run kubectl config view from your powershell prompt. Use those values for the minikube entries below.
From your WSL terminal add the minikube context info:
kubectl config set-cluster minikube --server=https://<minikubeip>:port --certificate-authority=/mnt/c/Users/<windows-user-name>/.minikube/ca.crt
kubectl config set-credentials minikube --client-certificate=/mnt/c/Users/<windows-user-name>/.minikube/cert.crt --client-key=/mnt/c/Users/<windows-user-name>/.minikube/client.key
kubectl config set-context minikube --cluster=minikube --user=minikube
This points the context at the cert files minikube created on Windows. To verify you have set the values correctly view the context in WSL (if you have other contexts if might look slightly different):
kubectl config view

#output
apiVersion: v1
clusters:
- cluster:
    certificate-authority: /mnt/c/Users/<windows-user-name>/.minikube/ca.crt
    server: https://<minikubeip>port
  name: minikube
contexts:
- context:
    cluster: minikube
    user: minikube
  name: minikube
current-context: minikube
kind: Config
preferences: {}
users:
- name: minikube
  user:
    client-certificate: /mnt/c/Users/<windows-user-name>/.minikube/client.crt
    client-key: /mnt/c/Users/<windows-user-name>/.minikube/client.key
Now set your current context to minikube and try connecting to your minikube instance:
kubectl config use-context minikube

kubectl get nodes

#output
NAME       STATUS    ROLES     AGE       VERSION
minikube   Ready     <none>    20h       v1.8.0
Limitations
I can use kubectl as I would with any other cluster but I have found that the can’t run the minikube commands from WSL. I have to go back to my Windows prompt to run commands like minikube service <servicename> --url
01 Dec 2017
The accompanying source code can be found at https://github.com/jsturtevant/azure-event-grid-nodejs.
It is possible to register your own webhook endpoint with Azure Event Grid. To do so you need to pass the Event Grid Validation process which happens when you first subscribe your endpoint to a Event Grid Topic.
At subscription time, Event Grid will make a HTTP POST request to you endpoint with a header value of Aeg-Event-Type: SubscriptionValidation. Inside the request there will be a validation code that you need to echo back to the service. A sample request will look like:
[{
  "id": "2d1781af-3a4c-4d7c-bd0c-e34b19da4e66",
  "topic": "/subscriptions/xxxxxxxx-xxxx-xxxx-xxxx-xxxxxxxxxxxx",
  "subject": "",
  "data": {
    "validationCode": "512d38b6-c7b8-40c8-89fe-f46f9e9622b6"
  },
  "eventType": "Microsoft.EventGrid.SubscriptionValidationEvent",
  "eventTime": "2017-08-06T22:09:30.740323Z"
}]
And the response expected is:
{
  "validationResponse": "512d38b6-c7b8-40c8-89fe-f46f9e9622b6"
}
You can read about all the details of Event Grid security and authentication.
Note: The endpoint must be https. To debug your function locally, you can use ngrok as described in this post on Locally debugging an Azure Function Triggered by Event Grid. The general concept of using ngrok can be used even though we are not using Functions.
Handling the Response in Node.js
Handling the response in Node.js is fairly straight forward by checking the header type, event type and then returning the 200 status with the validation body. Here is an example in Express.js
app.post('/event', (req, res) => {
    var header = req.get("Aeg-Event-Type");
    if(header && header === 'SubscriptionValidation'){
         var event = req.body[0]
         var isValidationEvent = event && event.data &&
                                 event.data.validationCode &&
                                 event.eventType && event.eventType == 'Microsoft.EventGrid.SubscriptionValidationEvent'
         if(isValidationEvent){
             return res.send({
                "validationResponse": event.data.validationCode
            })
         }
    }

    // Do something on other event types
    console.log(req.body)
    res.send(req.body)
})
Testing it out
Create a topic:
az group create --name eventgridrg
az eventgrid topic create --name nodejs -l westus2 -g eventgridrg
Set up ngrok in a separate terminal (optionally tag on –log “stdout” –log-level “debug” if running ngrok from WSL)
./ngrok http 3000 #optional --log "stdout" --log-level "debug"
Register your ngrok https endpoint with Event Grid:
az eventgrid topic event-subscription create --name expressapp \
          --endpoint https://994a01e1.ngrok.io/event \
          -g eventgridrg \
          --topic-name nodejs
The registration should succeed with `“provisioningState”: “Succeeded”’ in the response because it has the validation code. Once it is finished registering send a request and get the response:
# get endpoint and key
endpoint=$(az eventgrid topic show --name nodejs -g eventgridrg --query "endpoint" --output tsv)
key=$(az eventgrid topic key list --name nodejs -g eventgridrg --query "key1" --output tsv)

# use the example event from docs
body=$(eval echo "'$(curl https://raw.githubusercontent.com/Azure/azure-docs-json-samples/master/event-grid/customevent.json)'")

# post the event
curl -X POST -H "aeg-sas-key: $key" -d "$body" $endpoint
In your terminal where the app is running you should see the log output of the custom event:
node index.js

#output
Example app listening on port 3000!
[ { id: '10107',
    eventType: 'recordInserted',
    subject: 'myapp/vehicles/motorcycles',
    eventTime: '2017-12-01T20:28:59+00:00',
    data: { make: 'Ducati', model: 'Monster' },
    topic: '/SUBSCRIPTIONS/B9D9436A-0C07-4FE8-B779-xxxxxxxxxxx/RESOURCEGROUPS/EVENTGRIDRG/PROVIDERS/MICROSOFT.EVENTGRID/TOPICS/NODEJS' } ]
30 Nov 2017
In the previous post on running Azure Functions on Kubernetes we deployed everything using manual commands. To improve upon the solution, I created a Helm Chart that enables you to deploy the Function Application. There are a few advantages to this:
- Simplified upgrades
- Simplify the deployment of multiple Functions
- Simplify the CI/CD of multiple Function App
Checkout the chart at https://github.com/jsturtevant/azure-functions-kubernetes-chart. There are a few improvements that need to be made, such as setting up with Secrets for a private repository to pull the image. PR’s are welcome :-).
Usage
To use, clone the repository and cd into the folder and run:
helm install --set functionApp.name=sampleapp \
             --set resources.requests.cpu=200m \
             --set image.repository=vyta/functions \
             --set scale.maxReplicas=10 \
             --set scale.minReplicas=1 \
             --set scale.cpuUtilizationPercentage=50 \
             ./az-func-k8
30 Nov 2017
This is a two part series. The second post is on Deploying an Azure Function App to Kubernetes using a Helm Chart.
The Azure Functions team recently released the preview of Azure Functions on Linux. A colleague Vy Ta and I thought it would be fun to see if we could get Azure Functions running in Kubernetes. Here are the steps to get it work. To follow along you will need to have:
Create a your Function App and Docker image
The first step is to use the Functions Core Tools to create a sample function:
func init . --docker --sample
Next build your Docker image and push to a docker repository:
docker build -t az-functions.
docker tag az-functions <your-repo>/az-functions

docker login
docker push <your-repo>/az-functions
Set up and run on Kubernetes
Next we will create a deployment and service on Kubernetes and make sure we can access it. The commands below assume you have a Kubernetes cluster running in a Cloud.
Create a deployment on Kubernetes:
kubectl run azfunctions --image=<your-repo>/az-functions --port=80 --requests=cpu=200m
Create a service and wait for an IP address:
kubectl expose deployment azfunctions --port=80 --type=LoadBalancer
kubectl get svc -w
Once you have a ip address you should be able to open a browser and view the end point at http://<your-ip-address>/api/httpfunction?name=james (assuming you used the sample function).
Autoscale your Function App
Once we have both of those running we can set up a Pod Auto Scaler and test scaling our function app.
Set up auto Scaling by:
kubectl autoscale deployment azfunctions --cpu-percent=50 --min=1 --max=10
Note: For the auto-scaler to work you need to create you deployment with the --requests=cpu=200m property as we did above in kubectl run command. It is possible to autoscale on other metrics as well.
Test Autoscaling
We have enabled auto scaling so let give it a spin. We will test it the same way as in Kubernetes Pod Autoscale walk through.
Open a new terminal and run:
kubectl run -i --tty load-generator --image=busybox /bin/sh
/ \#: 		while true; do wget -q -O- http://<your-ipaddress>/api/httpfunction?name=testingload; done
This will ping your endpoint. After a few moments you should be able to see the load increasing:
kubectl get hpa

#output
NAME          REFERENCE                TARGETS      MINPODS   MAXPODS   REPLICAS   AGE
azfunctions   Deployment/azfunctions   167% / 50%   1         10        4          5m
You can also see the number of pods in the deployment increase:
kubectl get deploy azfunctions

#output
NAME          DESIRED   CURRENT   UP-TO-DATE   AVAILABLE   AGE
azfunctions   4         4         4            4           10m
If you kill the busybox command we used to generate the load you will see the pods scale back down.
Where to next
This is a great way to see how you could use the Azure Functions runtime on premise and opens a lot of possibilities. One scenario might be that you have two teams. One that is working On Premises and another that works in Azure but you want to share the same programming model of Azure functions across the two teams. Another scenario is to use Kubernetes and then use Azure Container Instances for extra scaling when needed. What do you think you might use this for? Leave a note in the comments.
Some other interesting scenarios you can looking into are: