15 Dec 2017
Sometimes you want to be able to deploy and develop applications locally with out having to spin up an entire cluster. Setting up Minikube on Windows 10 hasn’t been the easiest thing to do but with the help of a colleague, Noel Bundick and GitHub issues, I got it working this week so this post is for me in the future when I can’t remember how i did it :-).
Install Minikube
This part is pretty easy if you use Chocolately (not using Chocolatly? Check out why you should). Alternatively you can download it and add it to your path.
Create a Virtual Switch in Hyper-V
This is the extra step you need to do to get Hyper-V to work with minikube. Open a Powershell prompt and type:
# get list of network adapter to attach to
Get-NetAdapter

#output
Name                      InterfaceDescription                    ifIndex Status          LinkSpeed
----                      --------------------                    ------- ------          ---------
vEthernet (minikube)      Hyper-V Virtual Ethernet Adapter #3          62 Up              400 Mbps
Network Bridge            Microsoft Network Adapter Multiplexo...      46 Up              400 Mbps
vEthernet (nat)           Hyper-V Virtual Ethernet Adapter #2          12 Up              10 Gbps
vEthernet (Default Swi... Hyper-V Virtual Ethernet Adapter             13 Up              10 Gbps
Bluetooth Network Conn... Bluetooth Device (Personal Area Netw...      23 Disconnected    3 Mbps
Ethernet                  Intel(R) Ethernet Connection (4) I21...       9 Disconnected    0 bps
Wi-Fi                     Intel(R) Dual Band Wireless-AC 8265          14 Up              400 Mbps

#Create the switch
New-VMSwitch -name minikube  -NetAdapterName <your-network-adapter-name> -AllowManagementOS $true
Create minikube
From the Powershell prompt in Windows, create minikube using the switch you just created:
minikube start --vm-driver hyperv --hyperv-virtual-switch minikube
Minikube adds the configuration to your .kube/config file upon successful creation so you should be able to connect to the minikube from the powershell prompt using kubectl if you have it installed on windows:
kubectl get nodes

#output
NAME       STATUS    ROLES     AGE       VERSION
minikube   Ready     <none>    18h       v1.8.0
Using WSL to talk to minikube
I mostly use WSL as my command prompt in Windows these days which means I have kubectl, helm and my other tools all installed there. Since we just installed minikube on windows, the .kube/config file was created on the windows side at C:\Users\<username>\.kube\config. To get kubectl to work we will need to add the configuration to our .kube/config on WSL at /home/<bash-user-name>/.kube.
Note: the following might vary depending on your existing .kube/config file and set up. Check out sharing cluster access on kubernetes docs for more info and alternative ways to configure.
To see the values created on for you windows environment you can run kubectl config view from your powershell prompt. Use those values for the minikube entries below.
From your WSL terminal add the minikube context info:
kubectl config set-cluster minikube --server=https://<minikubeip>:port --certificate-authority=/mnt/c/Users/<windows-user-name>/.minikube/ca.crt
kubectl config set-credentials minikube --client-certificate=/mnt/c/Users/<windows-user-name>/.minikube/cert.crt --client-key=/mnt/c/Users/<windows-user-name>/.minikube/client.key
kubectl config set-context minikube --cluster=minikube --user=minikube
This points the context at the cert files minikube created on Windows. To verify you have set the values correctly view the context in WSL (if you have other contexts if might look slightly different):
kubectl config view

#output
apiVersion: v1
clusters:
- cluster:
    certificate-authority: /mnt/c/Users/<windows-user-name>/.minikube/ca.crt
    server: https://<minikubeip>port
  name: minikube
contexts:
- context:
    cluster: minikube
    user: minikube
  name: minikube
current-context: minikube
kind: Config
preferences: {}
users:
- name: minikube
  user:
    client-certificate: /mnt/c/Users/<windows-user-name>/.minikube/client.crt
    client-key: /mnt/c/Users/<windows-user-name>/.minikube/client.key
Now set your current context to minikube and try connecting to your minikube instance:
kubectl config use-context minikube

kubectl get nodes

#output
NAME       STATUS    ROLES     AGE       VERSION
minikube   Ready     <none>    20h       v1.8.0
Limitations
I can use kubectl as I would with any other cluster but I have found that the can’t run the minikube commands from WSL. I have to go back to my Windows prompt to run commands like minikube service <servicename> --url
01 Dec 2017
The accompanying source code can be found at https://github.com/jsturtevant/azure-event-grid-nodejs.
It is possible to register your own webhook endpoint with Azure Event Grid. To do so you need to pass the Event Grid Validation process which happens when you first subscribe your endpoint to a Event Grid Topic.
At subscription time, Event Grid will make a HTTP POST request to you endpoint with a header value of Aeg-Event-Type: SubscriptionValidation. Inside the request there will be a validation code that you need to echo back to the service. A sample request will look like:
[{
  "id": "2d1781af-3a4c-4d7c-bd0c-e34b19da4e66",
  "topic": "/subscriptions/xxxxxxxx-xxxx-xxxx-xxxx-xxxxxxxxxxxx",
  "subject": "",
  "data": {
    "validationCode": "512d38b6-c7b8-40c8-89fe-f46f9e9622b6"
  },
  "eventType": "Microsoft.EventGrid.SubscriptionValidationEvent",
  "eventTime": "2017-08-06T22:09:30.740323Z"
}]
And the response expected is:
{
  "validationResponse": "512d38b6-c7b8-40c8-89fe-f46f9e9622b6"
}
You can read about all the details of Event Grid security and authentication.
Note: The endpoint must be https. To debug your function locally, you can use ngrok as described in this post on Locally debugging an Azure Function Triggered by Event Grid. The general concept of using ngrok can be used even though we are not using Functions.
Handling the Response in Node.js
Handling the response in Node.js is fairly straight forward by checking the header type, event type and then returning the 200 status with the validation body. Here is an example in Express.js
app.post('/event', (req, res) => {
    var header = req.get("Aeg-Event-Type");
    if(header && header === 'SubscriptionValidation'){
         var event = req.body[0]
         var isValidationEvent = event && event.data &&
                                 event.data.validationCode &&
                                 event.eventType && event.eventType == 'Microsoft.EventGrid.SubscriptionValidationEvent'
         if(isValidationEvent){
             return res.send({
                "validationResponse": event.data.validationCode
            })
         }
    }

    // Do something on other event types
    console.log(req.body)
    res.send(req.body)
})
Testing it out
Create a topic:
az group create --name eventgridrg
az eventgrid topic create --name nodejs -l westus2 -g eventgridrg
Set up ngrok in a separate terminal (optionally tag on –log “stdout” –log-level “debug” if running ngrok from WSL)
./ngrok http 3000 #optional --log "stdout" --log-level "debug"
Register your ngrok https endpoint with Event Grid:
az eventgrid topic event-subscription create --name expressapp \
          --endpoint https://994a01e1.ngrok.io/event \
          -g eventgridrg \
          --topic-name nodejs
The registration should succeed with `“provisioningState”: “Succeeded”’ in the response because it has the validation code. Once it is finished registering send a request and get the response:
# get endpoint and key
endpoint=$(az eventgrid topic show --name nodejs -g eventgridrg --query "endpoint" --output tsv)
key=$(az eventgrid topic key list --name nodejs -g eventgridrg --query "key1" --output tsv)

# use the example event from docs
body=$(eval echo "'$(curl https://raw.githubusercontent.com/Azure/azure-docs-json-samples/master/event-grid/customevent.json)'")

# post the event
curl -X POST -H "aeg-sas-key: $key" -d "$body" $endpoint
In your terminal where the app is running you should see the log output of the custom event:
node index.js

#output
Example app listening on port 3000!
[ { id: '10107',
    eventType: 'recordInserted',
    subject: 'myapp/vehicles/motorcycles',
    eventTime: '2017-12-01T20:28:59+00:00',
    data: { make: 'Ducati', model: 'Monster' },
    topic: '/SUBSCRIPTIONS/B9D9436A-0C07-4FE8-B779-xxxxxxxxxxx/RESOURCEGROUPS/EVENTGRIDRG/PROVIDERS/MICROSOFT.EVENTGRID/TOPICS/NODEJS' } ]
30 Nov 2017
In the previous post on running Azure Functions on Kubernetes we deployed everything using manual commands. To improve upon the solution, I created a Helm Chart that enables you to deploy the Function Application. There are a few advantages to this:
- Simplified upgrades
- Simplify the deployment of multiple Functions
- Simplify the CI/CD of multiple Function App
Checkout the chart at https://github.com/jsturtevant/azure-functions-kubernetes-chart. There are a few improvements that need to be made, such as setting up with Secrets for a private repository to pull the image. PR’s are welcome :-).
Usage
To use, clone the repository and cd into the folder and run:
helm install --set functionApp.name=sampleapp \
             --set resources.requests.cpu=200m \
             --set image.repository=vyta/functions \
             --set scale.maxReplicas=10 \
             --set scale.minReplicas=1 \
             --set scale.cpuUtilizationPercentage=50 \
             ./az-func-k8
30 Nov 2017
This is a two part series. The second post is on Deploying an Azure Function App to Kubernetes using a Helm Chart.
The Azure Functions team recently released the preview of Azure Functions on Linux. A colleague Vy Ta and I thought it would be fun to see if we could get Azure Functions running in Kubernetes. Here are the steps to get it work. To follow along you will need to have:
Create a your Function App and Docker image
The first step is to use the Functions Core Tools to create a sample function:
func init . --docker --sample
Next build your Docker image and push to a docker repository:
docker build -t az-functions.
docker tag az-functions <your-repo>/az-functions

docker login
docker push <your-repo>/az-functions
Set up and run on Kubernetes
Next we will create a deployment and service on Kubernetes and make sure we can access it. The commands below assume you have a Kubernetes cluster running in a Cloud.
Create a deployment on Kubernetes:
kubectl run azfunctions --image=<your-repo>/az-functions --port=80 --requests=cpu=200m
Create a service and wait for an IP address:
kubectl expose deployment azfunctions --port=80 --type=LoadBalancer
kubectl get svc -w
Once you have a ip address you should be able to open a browser and view the end point at http://<your-ip-address>/api/httpfunction?name=james (assuming you used the sample function).
Autoscale your Function App
Once we have both of those running we can set up a Pod Auto Scaler and test scaling our function app.
Set up auto Scaling by:
kubectl autoscale deployment azfunctions --cpu-percent=50 --min=1 --max=10
Note: For the auto-scaler to work you need to create you deployment with the --requests=cpu=200m property as we did above in kubectl run command. It is possible to autoscale on other metrics as well.
Test Autoscaling
We have enabled auto scaling so let give it a spin. We will test it the same way as in Kubernetes Pod Autoscale walk through.
Open a new terminal and run:
kubectl run -i --tty load-generator --image=busybox /bin/sh
/ \#: 		while true; do wget -q -O- http://<your-ipaddress>/api/httpfunction?name=testingload; done
This will ping your endpoint. After a few moments you should be able to see the load increasing:
kubectl get hpa

#output
NAME          REFERENCE                TARGETS      MINPODS   MAXPODS   REPLICAS   AGE
azfunctions   Deployment/azfunctions   167% / 50%   1         10        4          5m
You can also see the number of pods in the deployment increase:
kubectl get deploy azfunctions

#output
NAME          DESIRED   CURRENT   UP-TO-DATE   AVAILABLE   AGE
azfunctions   4         4         4            4           10m
If you kill the busybox command we used to generate the load you will see the pods scale back down.
Where to next
This is a great way to see how you could use the Azure Functions runtime on premise and opens a lot of possibilities. One scenario might be that you have two teams. One that is working On Premises and another that works in Azure but you want to share the same programming model of Azure functions across the two teams. Another scenario is to use Kubernetes and then use Azure Container Instances for extra scaling when needed. What do you think you might use this for? Leave a note in the comments.
Some other interesting scenarios you can looking into are:
21 Nov 2017
The accompanying source code can be found at github.com/jsturtevant/azure-service-fabric-actor-fsm.
I recently had to manage a long running workflow inside Azure Service Fabric solution. I remembered reading about using a Finite State Machine (FSM) with Actors in the book Programming Microsoft Azure Service Fabric by Haishi Bai. When I went looking for examples of how I might use a FSM with the Service Fabric Actor Programming model I wasn’t able to find one, so I built an example of using a FSM with Service Fabric Actors.
Although, Finite State Machines might sound scary they are not to hard to implement or us, once you learn some basic terminology. FSM’s are great for many types of scenarios but keeping tack of long running workflows with a predetermined sequence of actions is a great use case.
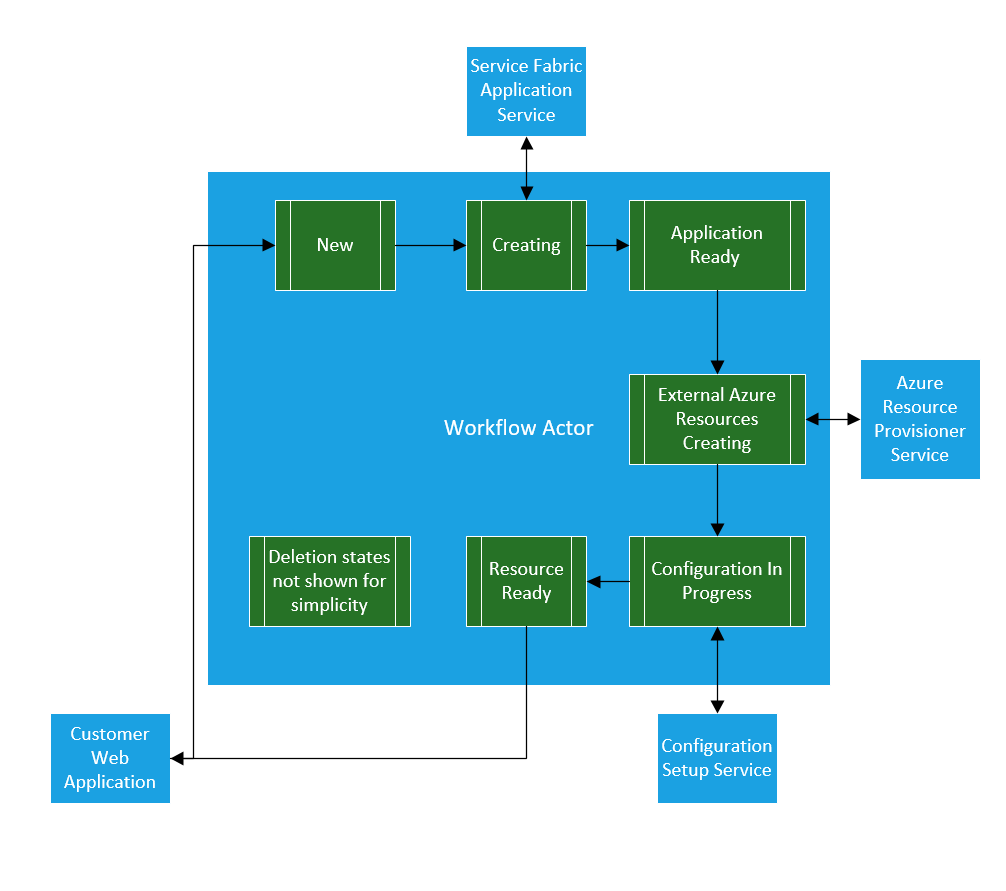
In Haishi’s book, he walks through the example of how it might be used in an ordering and shipping process to track items as they move through the ordering, manufacturing, shipping and invoicing product stages. In my case I needed to manage creating and configuring multiple resources within my Service Fabric cluster (applications and services) and Azure (IP addresses and Load balancers, etc). Each individual step required the previous step to be complete and could take anywhere from a few seconds to 10 minutes.
In such a distributed workflow, where there are many different services implementing each of the individual steps you it can be challenge to track and manage all of the different steps. A single Actor for each instance of the workflow simplifies the process and simplifies the scaling of the workflow service. For each instance of a new workflow a new actor is created and the state for the workflow is managed by that actor.
An example of a Actor managing multiple states and services might look like:
A few of the benifits of using a Reliable Actor with a FSM in this case are:
- FSM will centralize the logic for the workflow into one location
- the workflow service will scale well as each actor has independent state and logic for a given workflow instance
- can use timed Reminders on the actor to trigger workflow timeouts and notify other services something is wrong.
- monitoring status of the workflow is simplified
- canceling a workflow is simplified (if in correct state)
A notable trade off of using Reliable Actors are they are inheritly single threaded. If your workflow requires a high number of reads and writes then you might find that the Actors will not be a good choice do to throughput performance. In both of the use cases noted above this is not an issue so the models maps nicely to the Reliable Actors.
Create the Finite State Machine (FSM) with Service Fabric Actor
Instead of implementing a FSM myself I used the very popular Stateless FSM library. I chose this library because of its popularity and it comes with the ability to externalize the state of the FSM. In this case I wanted to persist the state using a Service Fabric Stateful Reliable Actor.
You can install the library via Nuget Install-Package Stateless and checkout some of the examples to get an understanding of to use the library.
I adapted the BugTracker example to create the Service Fabric code samples below.
For the remainder of the article we will walk through some of the important parts of the solution.
Working with external State inside the Actor
Stateless uses a simple enum to track the state the FSM is in at any given time. We can use Reliable Actors StateManager to save this value durably when ever the State Machine changes state.
Using external state in Stateless is fairly easy:
//Private member Variable
enum State { Open, Assigned, Deferred, Resolved, Closed }

//initializing Stateless StateMachine with external state.
machine = new StateMachine<State, Trigger>(() => this.state, s => this.state = s);
Saving the State durably (replicated across multiple nodes for failover) using Reliable Actors is also straight forward. Within any method of the Actor we can pass a key and value:
await this.StateManager.SetStateAsync("state", machine.State);
Now let’s see how we can use this to create a FSM using Service Fabric Reliable Actors.
Initializing the State of the Actor
Reliable Actors are virtual, which means they always “exist” and the lifetime of an actor is not tied to their in-memory representation. An individual actor can also be “Garbage Collected” (deactivated) from the system at if not used for a period of time, although the state will be persisted. This means two things when an working with the FSM in the actor framework:
- The first time an actor is activated we need to set the initial FSM state and configure the FSM
- When a new request comes in for a Actor that has been deactivated we will need to load the state and re-configure the FSM
The code to handle both first time activation and re-activation happens in the OnActivateAsync method and will look something like:
protected override async Task OnActivateAsync()
{
    // Handle Activation for first time and re-activation after being garbage collected
    ActorEventSource.Current.ActorMessage(this, $"Actor activated: {this.GetActorId()}");

    var savedState = await this.StateManager.TryGetStateAsync<State>("state");
    if (savedState.HasValue)
    {
        // has started processing
        this.state = savedState.Value;
    }
    else
    {
        // first load ever - initialize
        this.state = State.Open;
        await this.StateManager.SetStateAsync<State>("state", this.state);
    }

    ActorEventSource.Current.ActorMessage(this, $"Actor state at activation: {this.GetActorId()}, {this.state}");

    //Configure the Stateless StateMachine with the state.
    machine = new StateMachine<State, Trigger>(() => this.state, s => this.state = s);
    assignTrigger = machine.SetTriggerParameters<string>(Trigger.Assign);
    machine.Configure(State.Open)
        .Permit(Trigger.Assign, State.Assigned);
    machine.Configure(State.Assigned)
        .SubstateOf(State.Open)
        .OnEntryFromAsync(assignTrigger, assignee => OnAssigned(assignee))
        .PermitReentry(Trigger.Assign)
        .Permit(Trigger.Close, State.Closed)
        .Permit(Trigger.Defer, State.Deferred)
        .OnExitAsync(() => OnDeassigned());
    machine.Configure(State.Deferred)
        .OnEntryAsync(() => this.StateManager.SetStateAsync<string>("assignee", null))
        .Permit(Trigger.Assign, State.Assigned);
}
You will notice that the state machine gets saved in a local member variable. From here on out we will interact with our state machine in memory and persist the state object using the StateManager when ever the FSM Transitions from one state to another.
Triggering a new state from external system
In the case of managing a distributed workflow, the external services that are doing the work of at each step of the workflow will need a way to notify the workflow actor that there work has either completed or failed. We can create methods on the actor that will enable the clients to interact with the actor and workflow. If any service requests a transition of state outside of the workflow, an error will be returned to the client notifying them that the action is not available at this time.
The first step is to modify the interface that Actor implements:
public interface IFSM : IActor
{
    Task Close(CancellationToken cancellationToken);
    Task Assign(string assignee, CancellationToken cancellationToken);
    Task<bool> CanAssign(CancellationToken cancellationToken);
    Task Defer(CancellationToken cancellationToken);
}

[StatePersistence(StatePersistence.Persisted)]
internal class FSM : Actor, IFSM
{
  /// implement members and methods like OnActivateAsync here
}
The next step is to implement the methods and save the FSM state as the workflow transitions. Since the FSM is in memory when an actor is active we can work with the FSM’s actual state:
public async Task Assign(string assignee, CancellationToken cancellationToken)
{
    //trigger transition to next workflow state.
    await machine.FireAsync(assignTrigger, assignee);

    //check that local state is same as machine state then save.
    Debug.Assert(state == machine.State);
    await this.StateManager.SetStateAsync("state", machine.State);
}
This creates a transition in the FSM (assignTrigger) and fires an event which could then call out to another service to kick of the next step of the workflow. Now that the next step in the workflow has been activated we can save the state of the machine. Calling the Assign method from an external service is simple:
ActorId actorId = new ActorId(Guid.NewGuid().ToString());
IFSM actor = ActorProxy.Create<IFSM>(actorId, new Uri("fabric:/ActorFSM/FSMActorService"));
var token = new CancellationToken();
await actor.Assign("Joe", token);
In the assignTrigger of the FSM we can also save the the actual assignee durably using the Actors StateManager. This means that we can not only query the actor to get the current step of the workflow but also who is assigned. The event wired to FireAsync looks like:
async Task OnAssigned(string assignee)
{
    var _assignee = await this.StateManager.TryGetStateAsync<string>("assignee");
    if (_assignee.HasValue && assignee != _assignee.Value)
      await SendEmailToAssignee("Don't forget to help the new employee!");

    await this.StateManager.SetStateAsync("assignee", assignee);
    await SendEmailToAssignee("You own it.");
}
Getting current State of a workflow
A system out side our workflow might want to know what state a given workflow instance is in. This is again is made simple through the Actor. What is interesting to note is that since the actor is single threaded, you will always get the latest state of the Workflow.
Implement the current status as a method on the Actor:
public async Task<BugStatus> GetStatus()
{
  var statusHistory = await this.StateManager.TryGetStateAsync<StatusHistory>("statusHistory");
  var assignee = await this.StateManager.TryGetStateAsync<string>("assignee");

  var status = new BugStatus(this.machine.State);
  status.History = statusHistory.HasValue ? statusHistory.Value : new StatusHistory(machine.State);
  status.Assignee = assignee.HasValue ? assignee.Value : string.Empty;

  return status;
}
Getting the current status:
var actor1Status = await actor.GetStatus();
Console.WriteLine($"Actor 1 with {actorId} has state {actor1Status.CurrentStatus}");
Knowing the history of all the states a workflow has gone through will almost certainly be a requirement. Updating the workflow history as it move throught the FSM is straight forward using the machines machine.OnTransitionedAsync(LogTransitionAsync) event and wiring up a function to log it:
private async Task LogTransitionAsync(StateMachine<State, Trigger>.Transition arg)
{
    var conditionalValue = await this.StateManager.TryGetStateAsync<StatusHistory>("statusHistory");

    StatusHistory history;
    if (conditionalValue.HasValue)
    {
        history = StatusHistory.AddNewStatus(arg.Destination, conditionalValue.Value);
    }
    else
    {
        history = new StatusHistory(arg.Destination);
    }

    await this.StateManager.SetStateAsync<StatusHistory>("statusHistory", history);
}
You can see that the GetStatus method previously implemented already returns that value.
Testing state persistance
As was discussed earlier, the Reliable Actor can be Garbage collected from the system if not used with in a given time period. I wanted to test this to make sure the Activation code worked properly with the FSM. The actor framework gives you some configuration settings that you can modify to tweak your actor’s behavior. I used these settings to aggressively garbage collect the Actors to test the state.
Note: Only modify these Actor settings is you have data to backup making a change to the default settings. In other words you should have sufficient monitoring set up that points to your actors being garbage collected to early or to late for your scenario.
During registration of the Actor with Service Fabric in the program.cs you can adjust the ActorGarbageCollectionSettings. The first number is scan interval (how often it checks the system) and the second number is the idle time out (how long an actor must be idle for):
internal static class Program
{
  private static void Main()
  {
      try
      {
          ActorRuntime.RegisterActorAsync<FSM>(
              (context, actorType) => new ActorService(context, actorType, settings: new ActorServiceSettings()
              {
                  ActorGarbageCollectionSettings = new ActorGarbageCollectionSettings(10, 5)
              })).GetAwaiter().GetResult();

          Thread.Sleep(Timeout.Infinite);
      }
      catch (Exception e)
      {
          ActorEventSource.Current.ActorHostInitializationFailed(e.ToString());
          throw;
      }
  }
}
Then during my test I waited period of time before working with the actors and used the Service Fabric management API’s to make sure the Actors were deactivated:
ActorId actorId2 = new ActorId(Guid.NewGuid().ToString());
IFSM actor2 = ActorProxy.Create<IFSM>(actorId2, new Uri("fabric:/ActorFSM/FSMActorService"));
await actor2.Assign("Sue", token);

// Wait for actors to get garbage collected
await Task.Delay(TimeSpan.FromSeconds(20));

//Query management API's to verify
var actorService = ActorServiceProxy.Create(new Uri("fabric:/ActorFSM/FSMActorService"), actorId);
ContinuationToken continuationToken = null;
IEnumerable<ActorInformation> inactiveActors;
do
{
    var queryResult = await actorService.GetActorsAsync(continuationToken, token);
    inactiveActors = queryResult.Items.Where(x => !x.IsActive);
    continuationToken = queryResult.ContinuationToken;
} while (continuationToken != null);

foreach (var actorInformation in inactiveActors)
{
    Console.WriteLine($"\t {actorInformation.ActorId}");
}
Conclusion
Creating a distributed workflow with multiple steps and variable times to complete can be a difficult problem. Using Service Fabric’s Reliable Actors with a FSM machine library like Stateless not only simplifies the code that needs to be written but also ensures the scalablity of the solution because of the partitioned nature of Reliable Actors. If you don’t need lots of concurrent reads and writes then the Reliable Actors could be a great solution.
You can find the complete sample code for this solution at https://github.com/jsturtevant/azure-service-fabric-actor-fsm.