28 Apr 2017
Docker Swarm introduced Secrets in version 1.13, which enables your share secrets across the cluster securely and only with the containers that need access to them. The secrets are encrypted during transit and at rest which makes them a great way to distribute connection strings, passwords, certs or any other sensitive information.
I will leave it to the official documentation to describe exactly how all this works but when you give a service access to the secret you essentially give it access to an in-memory file. This means your application needs to know how to read the secret from the file to be able to use the application.
This article will walk through the basics of reading that file from an ASP.NET Core application. The basic steps would be the same for ASP.NET 4.6 or any other language.
Note: In ASP.NET Core 2.0 (still in preview as of this writing) will have this functionality as a Configuration Provider which you can simply add the nuget and wire up.
Create a Secret
We will start by creating a secret on our swarm. Log into a Manager node on your swarm and add a secret by running he following command:
echo 'yoursupersecretpassword' | docker secret create secret_password -
You can confirm that the secret was created by running:
$ docker secret ls
ID                          NAME                CREATED             UPDATED
8gv5uzszlgtzk5lkpoi87ehql   secret_password     1 second ago        1 second ago
Notice that you will not be list the value of the secret. For any containers that you explicitly give access to this secret, they would be able to read the value as a string at the path:
/run/secrets/postgres_password
Reading Secrets
Your next step is to read the secret inside you ASP.NET Core application. Before Docker Secrets were introduced you had a few options to pass the secrets along to your service:
Modifying your ASP.NET Core to read Docker Swarm Secrets
During development, you may not want to read the value from a Swarm Secret for simplicity sake. To accommodate this you can check to see if a Swarm Secret is available and if not read the ASP.NET Configuration variable instead. This enables you to load the value from any of the other configuration providers as a fallback. The code is fairly straight forward:
public string GetSecretOrEnvVar(string key)
{
  const string DOCKER_SECRET_PATH = "/run/secrets/";
  if (Directory.Exists(DOCKER_SECRET_PATH))
  {
    IFileProvider provider = new PhysicalFileProvider(DOCKER_SECRET_PATH);
    IFileInfo fileInfo = provider.GetFileInfo(key);
    if (fileInfo.Exists)
    {
      using (var stream = fileInfo.CreateReadStream())
      using (var streamReader = new StreamReader(stream))
      {
        return streamReader.ReadToEnd();
      }
    }
  }

  return Configuration.GetValue<string>(key);
}
This checks to see if the directory exists and if it does checks for a file with a given key. Finally, if that key exists as a file then reads the value.
You can use this function anytime after the configuration has been loaded from other providers. You will likely call this function somewhere in your startup.cs but could be anywhere you have access to the Configuraiton object. Note that depending on your set-up you may want to tweak the function to not fall back on the Configuration object. As always consider your environment and adjust as needed.
Create a service that has access to the Secret
The final step is to create a service in the Swarm that has access to the value:
docker service create --name="aspnetcore" --secret="secret_password" myaspnetcoreapp
or in your Compose file version 3.1 and higher (only including relevant info for example):
version: '3.1'

services:
  aspnetcoreapp:
    image: myaspnetcoreapp
  secrets:
    - secret_password

secrets:
  secret_password:
    external: true
Creating an ASP.NET Core Configuration Provider
I am going to leave it to the reader to create an ASP.NET Core Configuration Provider (or wait until it is a NuGet package supplied with ASP.NET Core 2.0). If you decide to turn the code into a configuration provider (or use ASP.NET Core 2.0’s) you could simply use in you start.cs and it might look something like:
 public Startup(IHostingEnvironment env)
{
    var builder = new ConfigurationBuilder()
        .SetBasePath(env.ContentRootPath)
        .AddJsonFile("appsettings.json", optional: false, reloadOnChange: true)
        .AddJsonFile($"appsettings.{env.EnvironmentName}.json", optional: true)
        .AddEnvironmentVariables()
        .AddDockerSecrets();
    Configuration = builder.Build();
}
IMPORTANT: this is just an example the actual implementation might look slightly different.
Conclusion
Docker Secrets are a good way to keep your sensitive information only available to the services that need access to it. You can see that you can modify your application code in a fairly straight forward way that supports backward compatibility. You can learn more about managing secrets at Docker’s documentation.
08 Jan 2017
This post will cover how to deploy a Python Website to Azure Web Apps for Linux using python. With the release of Web Apps for Linux it makes it easier to deploy any application to Azure Web Apps.
Before Web Apps for Linux there needed to be explicit support for a language in Azure or you had to create a complicated Kudo Extention to enable a language. For many languages, it also means you need to use the Windows specific distribution which often had issues with 3rd party libraries not supporting windows (although this is getting better now).
This tutorial will walk you through how to create your first Python Flask Website but if you already have an existing Python website (either Flask, Django or any other framework) you can skip to the step where you Add a Dockerfile. I assume you have Python and Docker installed.
This post is a bit long but the steps are quite simple:
- Create Python Website (optional if you have an existing app)
- Add a Dockerfile
- Build your docker image
- Publish your docker image to a repository
- Create and Configure Azure Web App for Linux using your custom docker image
If you’re looking for complete samples, here is the Flask Example from this tutorial and Django example.
Create your Python Website
I will use Flask in this example but you could use Django or any other python web framework you would like.
Create files
First, from the command line create a new directory for your application,then move into the directory:
mkdir flaskwebapp
cd flaskwebapp
Next, create two files: app.py and requirements.txt
touch app.py
touch requirements.txt
Add Python Code
Open app.py in your favorite editor (I use VS Code) and paste in the following code:
from flask import Flask
app = Flask(__name__)

@app.route("/")
def hello():
    return "Hello from an Azure Web App running on Linux!"

if __name__ == "__main__":
    app.run(host='0.0.0.0')
This creates a simple Flask site with one route that displays a simple hello world message. You can learn more about Flask at the Flask Website.
Note: app.run() passes a argument called host with a value of 0.0.0.0. This is important for working with Docker. You can learn more about it in this stackoverflow answer.
Add your requirements
Open requirements.txt and add the following:
This will be used by Pip to install the Flask Library.
Run your site
Finally, you can make sure you site runs by running the following in a command line:
pip install -r requirements.txt
python app.py
If you navigate to localhost:5000 you will see your new website. Congrats you just created your first Flask app!
Add a Dockerfile
The first step to getting your app ready to run Azure Web App for Linux using Docker is to add a Docker File. When I was creating this tutorial I found a great plug-in for Visual Studio Code that makes working with Docker easy from VS Code. If your using VS Code I would recommend checking it out.
In the root directory of your Python App (again can be any framework you like but if you following along with the tutorial we used Flask) create a file called Dockerfile:
Open this file and add the following:
FROM python:3.6

RUN mkdir /code
WORKDIR /code
ADD . /code/
RUN pip install -r requirements.txt

EXPOSE 5000
CMD ["python", "/code/app.py"]
This Dockerfile uses the official Python Base image. The Dockerfile then creates a folder code and copies all the files from the current directory into the docker image. Next, it runs pip which installs all the library dependencies from the requirements file (in the case of this tutorial that would just be Flask). It opens the port and finally runs the command that launches the website.
The Dockerfile above exposes port 5000 and calls the command python /code/hello.py which works great for our flask app but you may need to tweak the last two lines to get it to work for another framework. For instance, if you wanted to run a Django app you would need to replace those two lines with:
EXPOSE 8000
CMD ["python", "/code/manage.py", "runserver", "0.0.0.0:8000"]
You can find the specific command to launch your app in your framework documentation.
Note: With Django, we are again binding the app to the 0.0.0.0 IP address so that it can be exposed to the outside world through docker. This is slightly different location than we are doing with the binding in the case of Flask.
Build your Docker Image
To get your app ready for Deployment on Azure you need to build your docker image from your dockerfile. Run the following from your command prompt in the folder where you created your Dockerfile:
docker build -f Dockerfile -t flaskwebapp:latest .
This will download the Python base docker image (if not already local), perform the actions in your Dockerfile (copy the files/run pip/etc) and then tag the new docker image as flaskwebapp.
To actually run and test your new docker image, run the newly created image using docker and you should get an output like the following:
docker run -p 5000:5000 --rm flaskwebapp
#should get output similar to this:
  * Running on http://0.0.0.0:5000/ (Press CTRL+C to quit)
You can now navigate to localhost:5000 and you should see your Flask App running inside a docker container.
Publish your Docker Image
The next step is to publish your docker image to a location where Azure Web Apps can pull the image to use inside Azure Web App environment. If your app is open source then you can host it in the public Docker Hub, which is what will do for this tutorial. Otherwise, there are many options for hosting a private Docker image such as Docker Hub or Azure Container Service.
To publish it to Docker Hub make sure you have already signed up for an account.
First, find the image id by running docker images and looking for flaskwebapp container id:
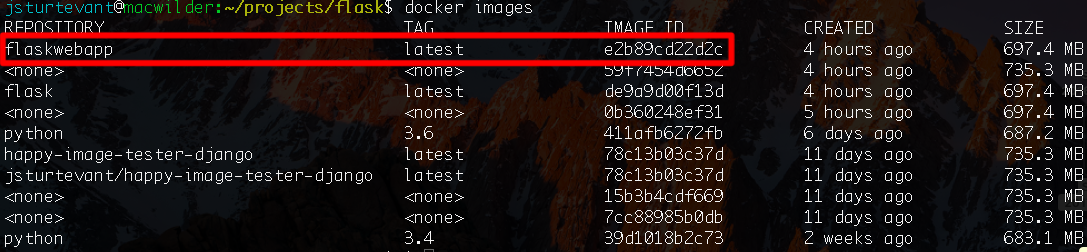
Next, you can tag the existing image with your Docker Hub username, using the following command with the id you just located (important: replace the id and user name below with yours):
docker tag e2b89cd22d2c jsturtevant/flaskwebapp
Now that you have tagged your image you need to login into Docker Hub and push the image to docker hub:
docker login #follow prompts for login
docker push jsturtevant/flaskwebapp
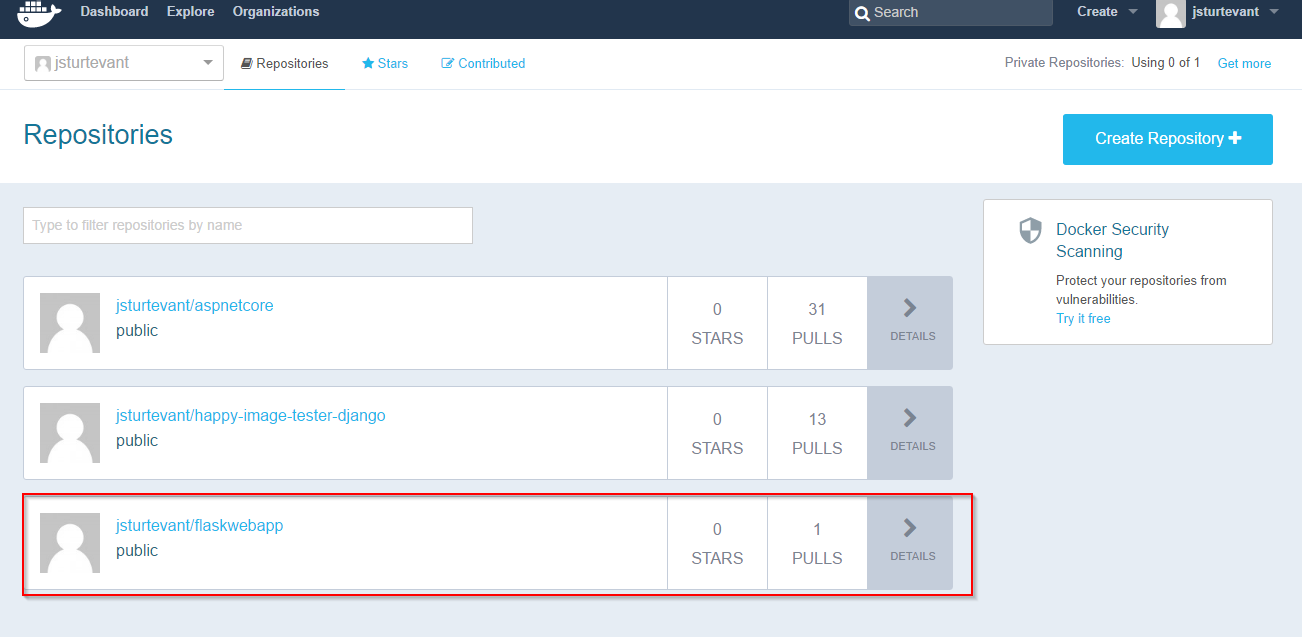
You should now see the image on your docker hub repository:
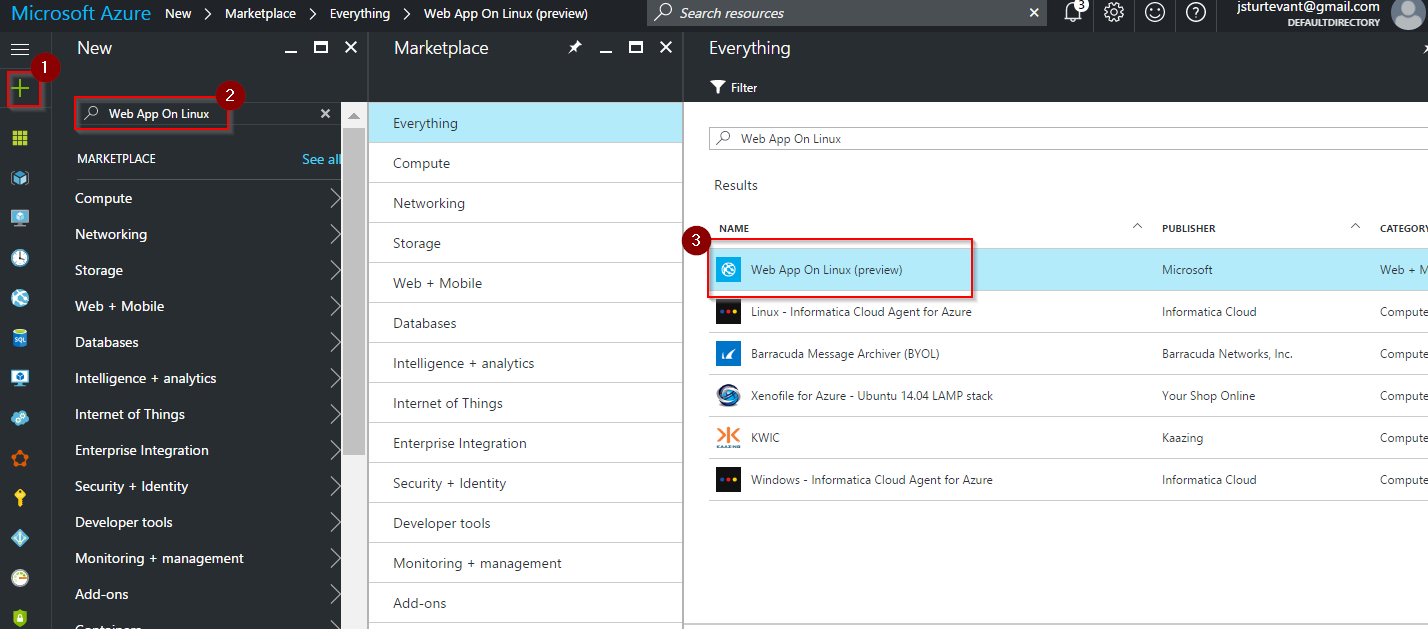
Inside the Azure portal click the Add (+) button in the top left corner and search for Web App for Linux:
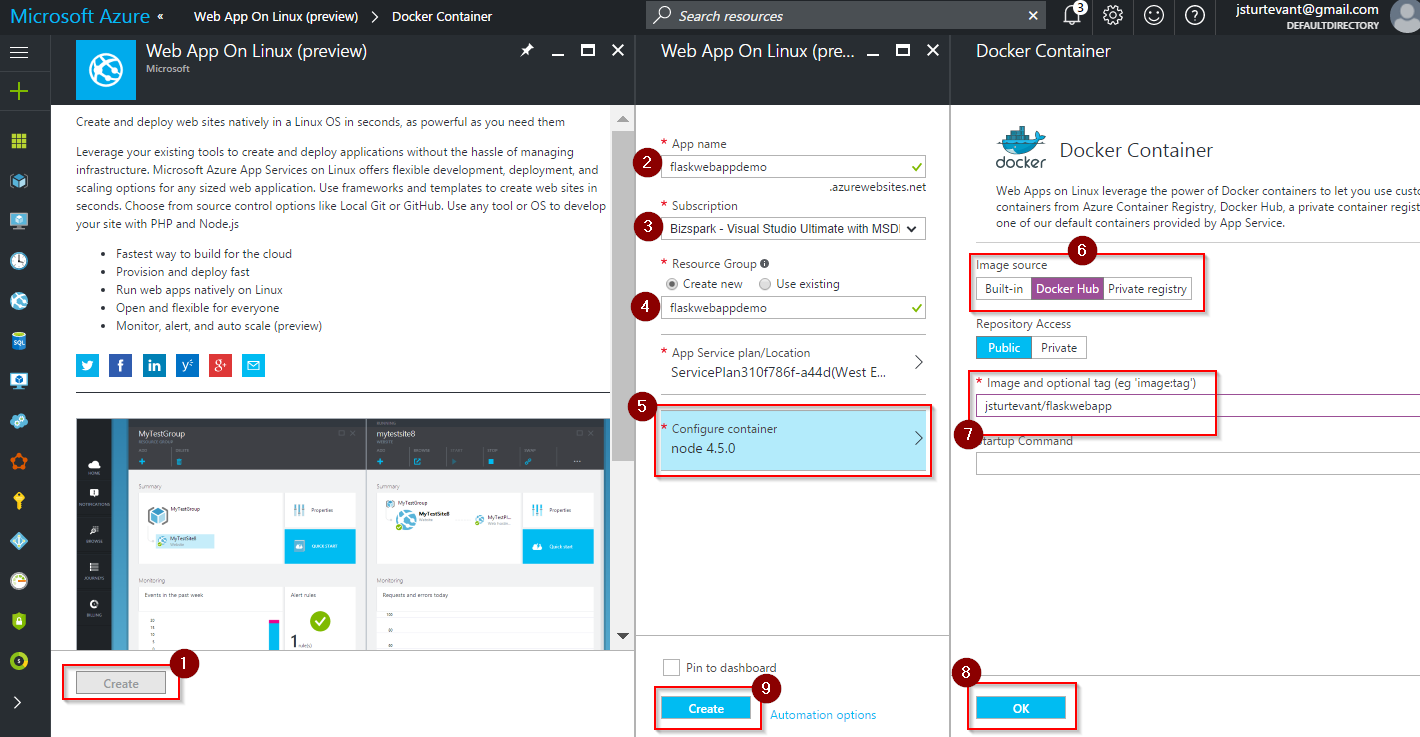
Next, Click Create, fill in the app name, subscription, resource group and App Service as in the image below.
When you get to the Configure Container Section click on it to open a new blade. You then have the option to use a preconfigured image, Docker Hub, or private Registry. In this example, we will choose Docker Hub and then fill in the image name with the docker image name we just pushed in the previous step (in my case jsturtevant/flaskwebapp).
Click Ok and then Create. Azure will then create the Web App for Linux using your custom image!
We are not completely finished though because we need to configure Azure to use port 5000 that we specified in our Dockerfile.
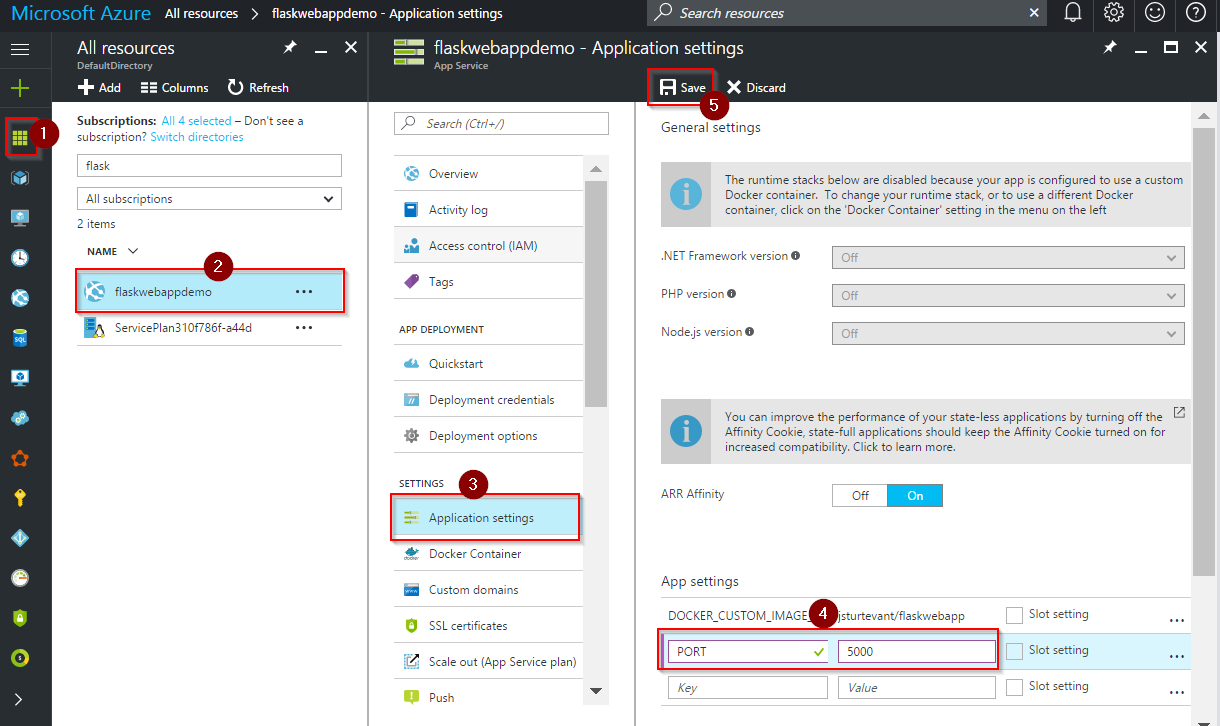
Once the Web App is published we can navigate to the Web App dashboard by clicking on All Resources, Selecting the Web App you just created, then Clicking on AppSettings.
Once you are in the Application Settings blade you can add an App Setting key of PORT with a value of 5000. Click Save at the top.
Note: If you need to set environment variables for your application this is also where you set them. Azure will take care of passing the environment variables through to your docker container.
Now you can navigate to your new Azure Web App (http://yourappname.azurewebsites.net/) and see your project!
Conclusion
In this tutorial, we created a new Flask Web app, added a Dockerfile and then deployed the built image to an Azure Web App for Linux. Although this tutorial was for Flask, you could easily make a few changes for your favorite python framework. And the same basic principles would work for any language (node.js/Go/Elixir/etc.).
You can see a complete Flask example from this tutorial and Django example here.
11 Nov 2016
A while back I was working a one-click Azure Deploy button for the Hoodie sample application. If you have not seen Hoodie before you should check the project out. It is an opensource project with a complete backend that allows front end developers to build amazing applications and they have a great community.
ARM Template Debugging Issues
I ran into an issue during development and testing of the ARM template that powers the one click deploy. When deploying, the template was deploying the VM successfully but the custom linux script was not completing properly.
After several attempts someone pointed out that I made a silly mistake by including a interactive prompt in the docker command. This caused one command in the script to time out but not actually fail the entire ARM deployment leaving me with no way to determine what went wrong or so I thought.
ARM Template Logs
After debugging for longer than I want to admit, I learned that the ARM templates store logs on the VM. Knowing this would have cut my debug time down considerably. You can find all the logs for ARM Deployments at:
In my case the log I was interested in for my custom script was located at:
/var/log/azure/Microsoft.OSTCExtensions.CustomScriptForLinux/1.5
.2.0/extension.log
Hope that helps someone not have to spend hours trying different configurations over and over because a silly interactive prompt.
02 Nov 2016
When working with an opensource project it is important to not keep the keys in your source control, otherwise this happens. We all know we need to keep the secrects out of public source code but how do have a Continuous Integration/Continuous Deployment setup in the case of an open source project? One solution to keep secrets out of the source code is to use envirornment varibables. At runtime you read the enviroment variables that have been set up for the given environment.
This works great for server side applications, but in the case of mobile applications where environment variables are not avalible, another strategy is to have a file that contains all of the configuration values/secrets with placeholders and then at build time either load a different file or replace the placeholders in the file for a given envirornment. Many times you might still store the envirment specific information in a environment variable and use a pre-processor to replace the placeholder with the value.
I have been working on a project with Xamarin Forms that will be released as opensource and had to figure out how to set all of this up using Visual Studio Team Services (VSTS). I have been using VSTS for the build process with a final deployment to the Hockey App. This process has been great becuase I can trigger a build using a commit into the master branch or I can trigger it manually on demand. It greatly simplifies the build process and enables me to have a repeatble process.
Step By Step Process for loading secrets in Visual Studio Team Services
This step by step does not cover how to setup your build process for Xamarin VSTS but instead covers how to setup your build process so that you can dynamically load your secrets with out having to keep them in your source. Another benifit is this can also help you provide different values for your different environments (Dev, QA, Prod, etc.).
Initial Xamarin VSTS Configuration
If you are looking for how to setup your VSTS to build Xamarin applications check out:
0. Pre-Requisits
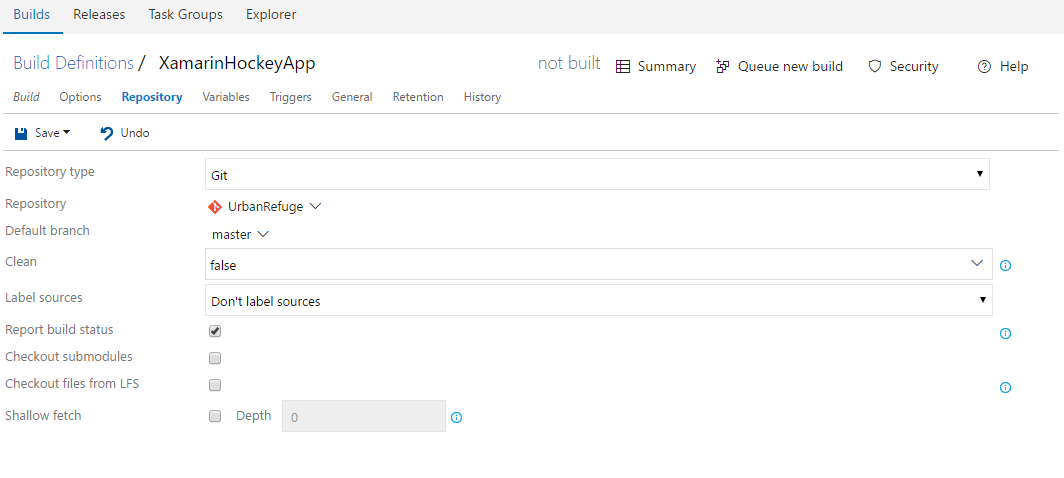
In post I assume your VSTS configuration will already have been configured with a Repository (VSTS/Github/etc.):
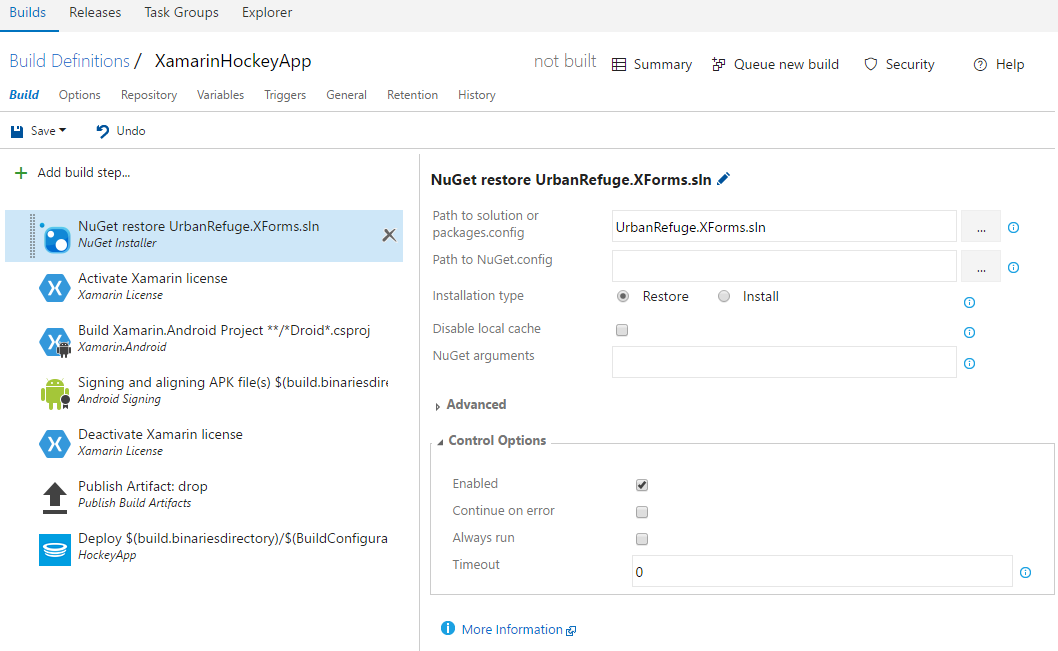
And the following steps (you can refer to the links above if not):
- NuGet Restore
- Activate Xamarin License
- Build Xamarin.Andriod/Xamarin.iOS
- Signing and Provisioning Step (Andriod/iOS specific)
- Deactivate Xamarin License
- Publish Artifact: drop
- Deploy to HockeyApp
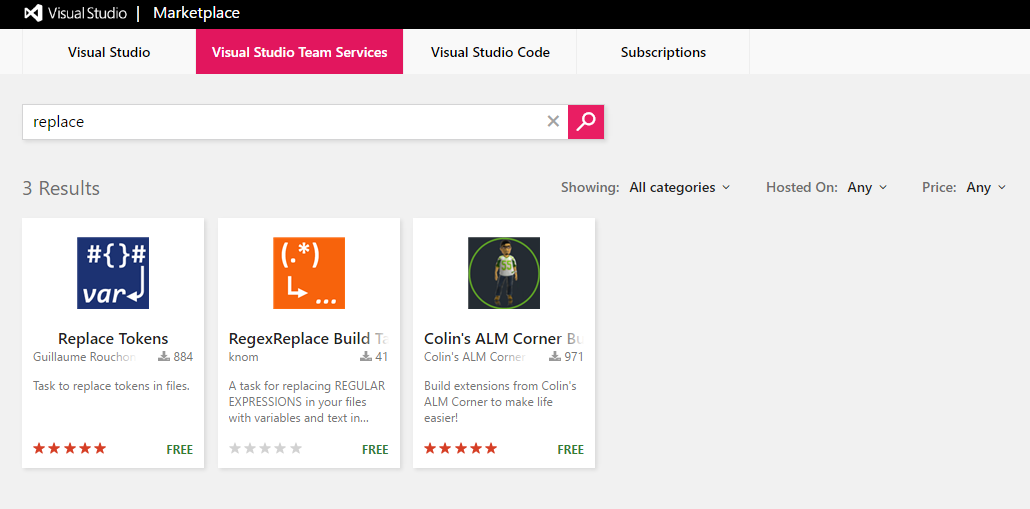
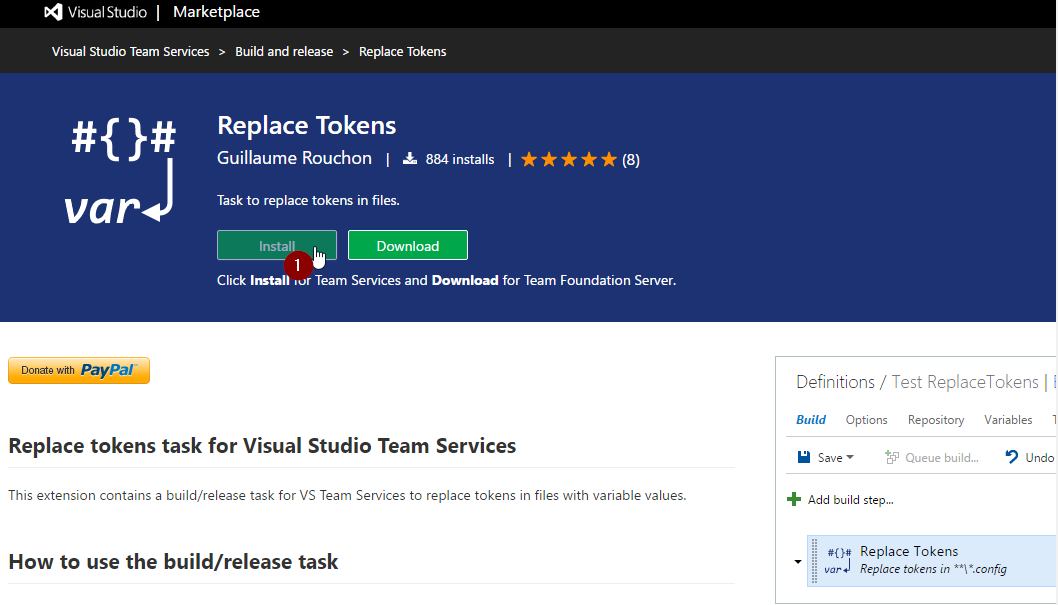
1. Find a Replace Token Task for your VSTS instance
VSTS is an extensible task based build system. VSTS has a large selection of tasks that you can use out of the box but VSTS doesn’t currently have any tasks for replacing tokens in your source control.
You could build your own custom extension, but there is also a ton of extensions on the Visual Studio Market Place contributed by community.
Searching on the Market Place for replace and you will get a few different options:
2. Install a Replace Token Task for your VSTS instance
In this case I will use Replace Tokens task but Collins ALM Build and Release Tools has a replace token task and several other useful tasks for the build process. They function in a similiar way so it is up to you if you need a few other tasks as well.
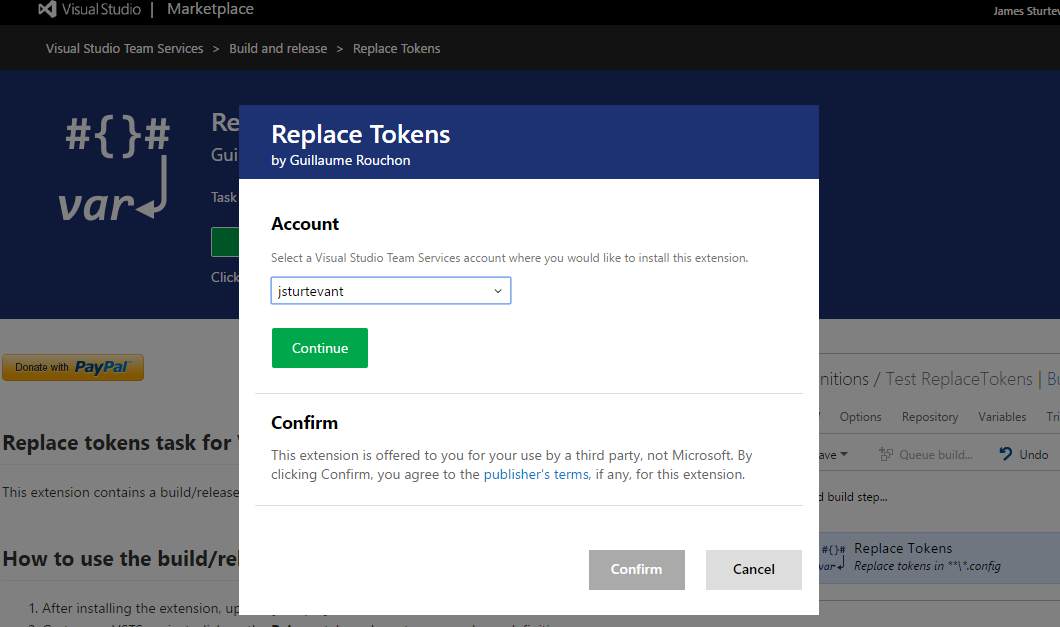
Click Install to install the task. You will be asked to login into you VSTS account.
If you belong to multiple teams you will be given the option to install the task to a particular Team Instance of VSTS.
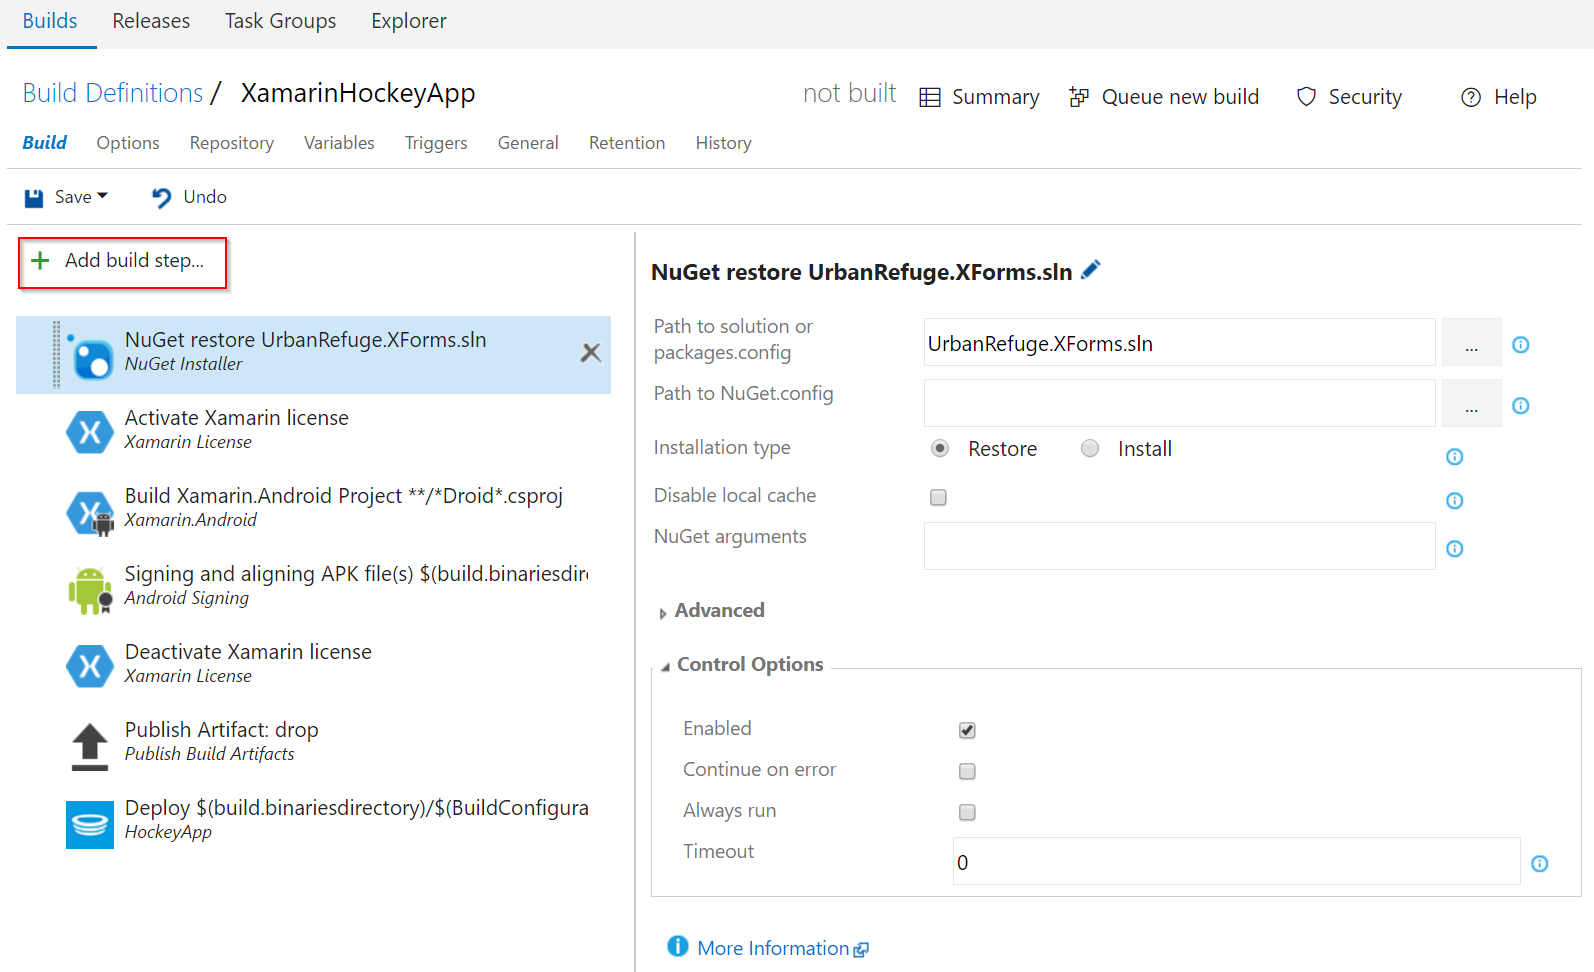
3. Add Replace Token Task to Build
Next we will add the new Replace Token task to our build pipeline.
Click Add Build Step.
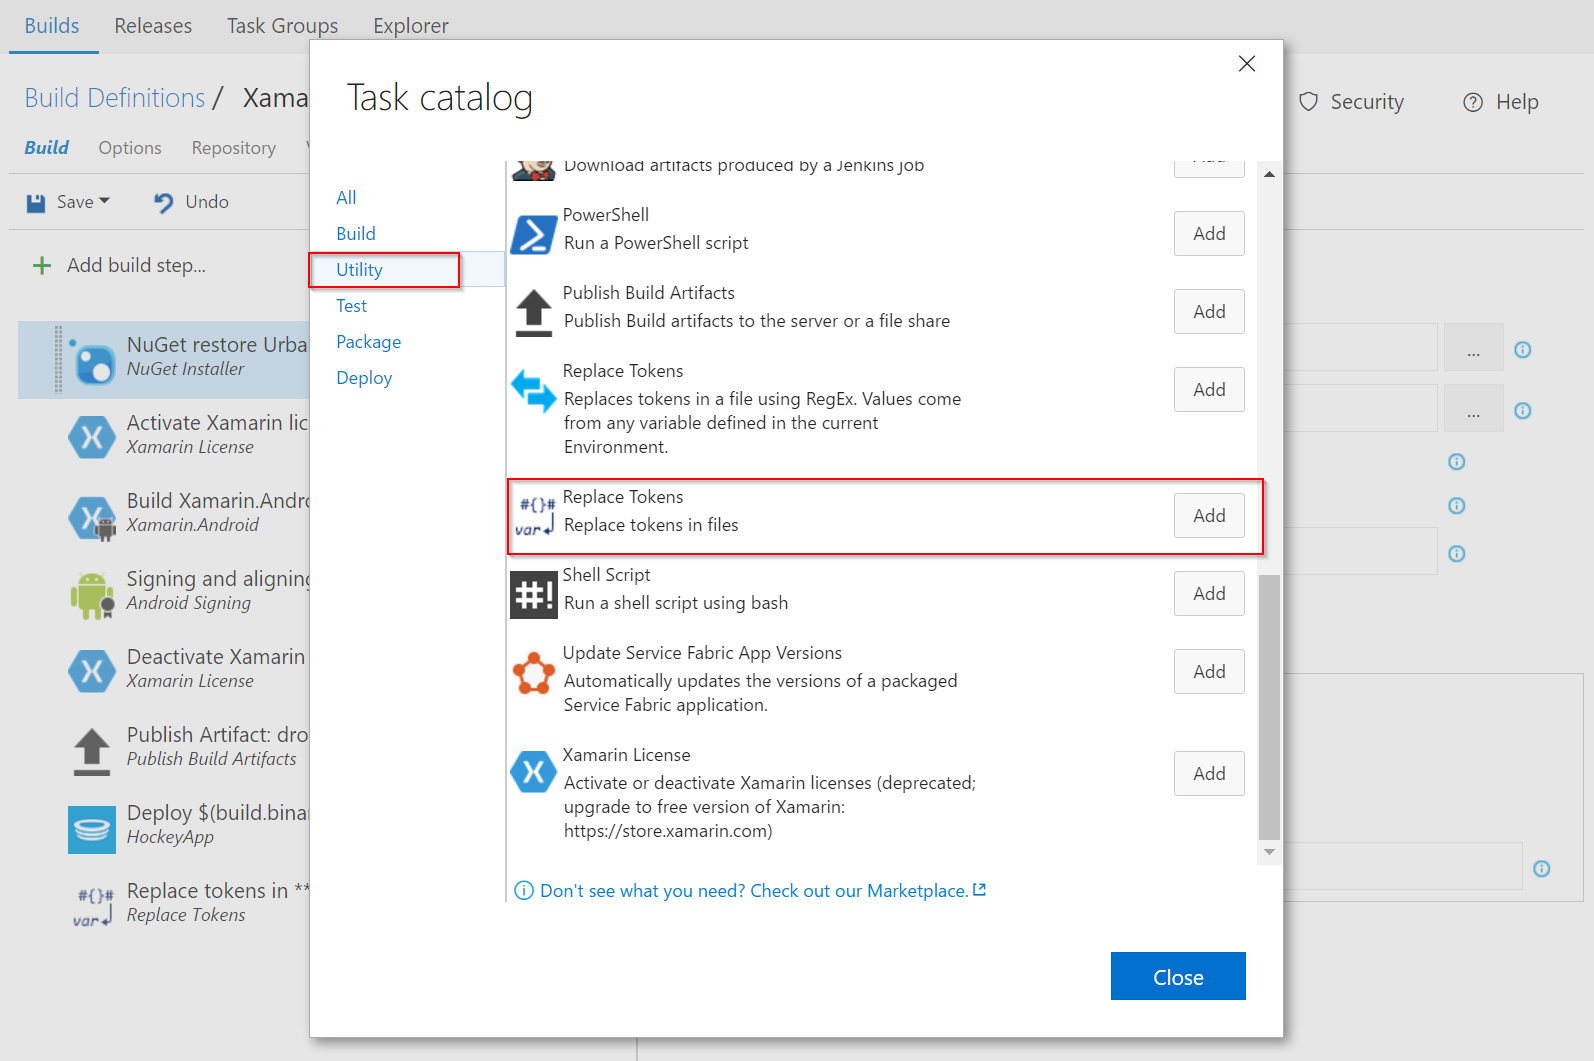
When the dialog opens, under the Utility tab, click Add on the Replace Tokens task.
Finally re-arrange the task so that it is before it is before the Build.Andriod/iOS step. Since we are modifying the source code that is pulled out of the repository, we need it to be before the build step. In this case I have chosen to put it before the nuget restore so that my build fails quickly if I do not have the replace token task configured properly.
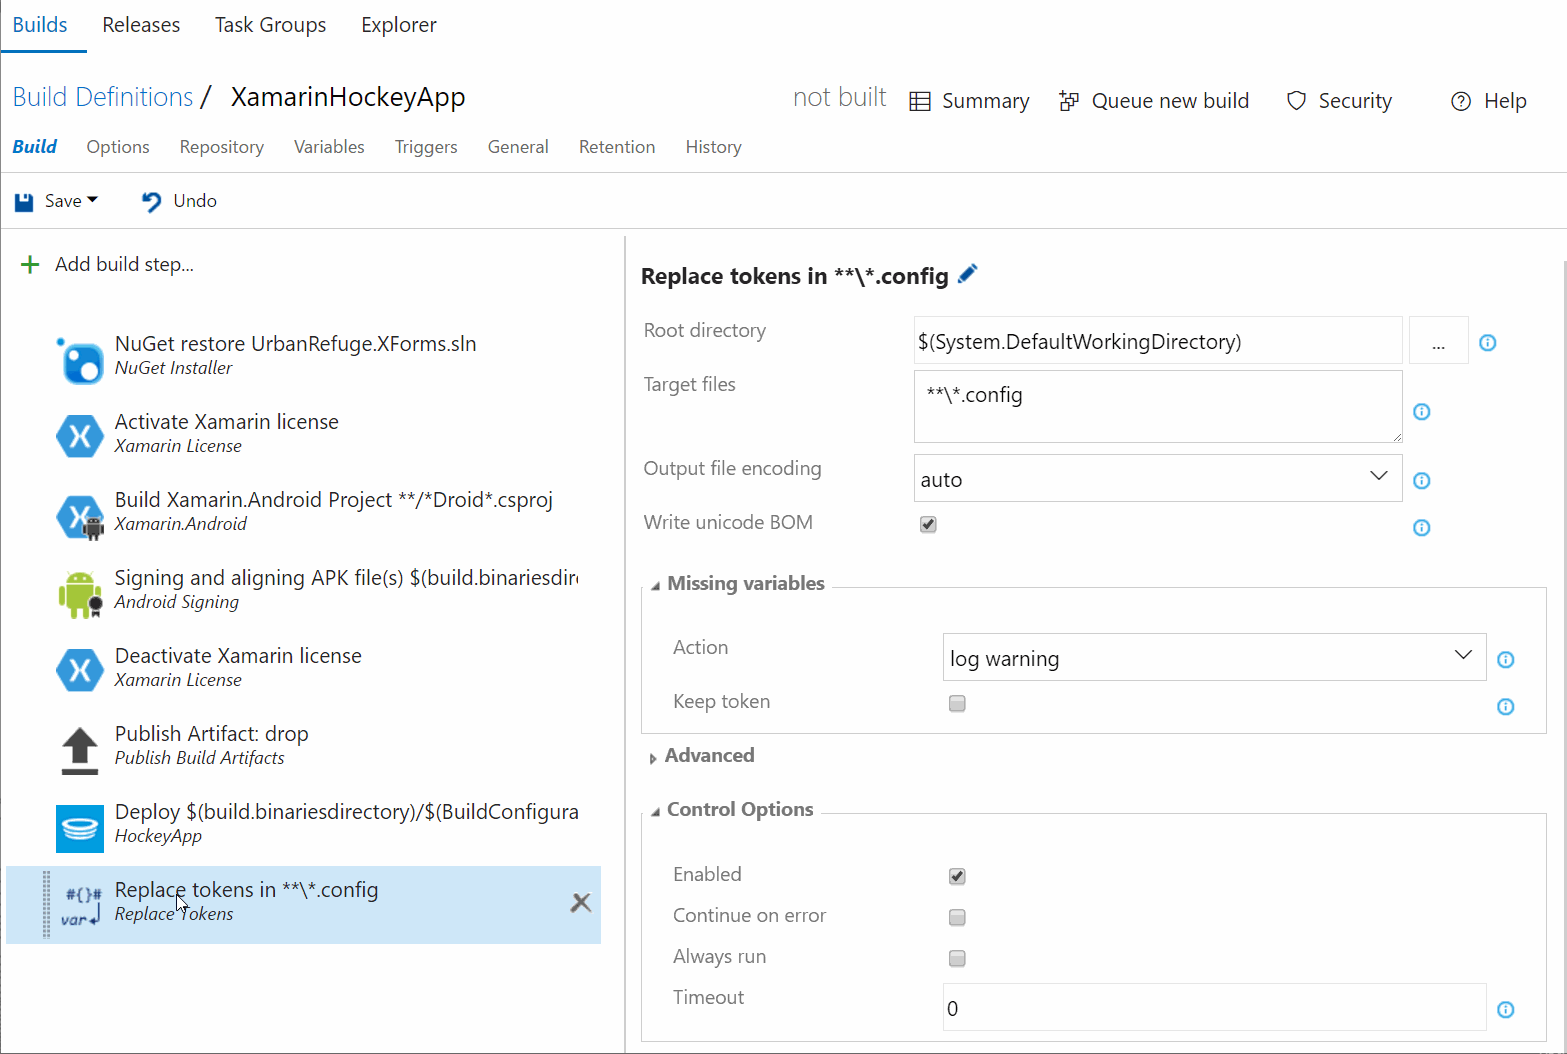
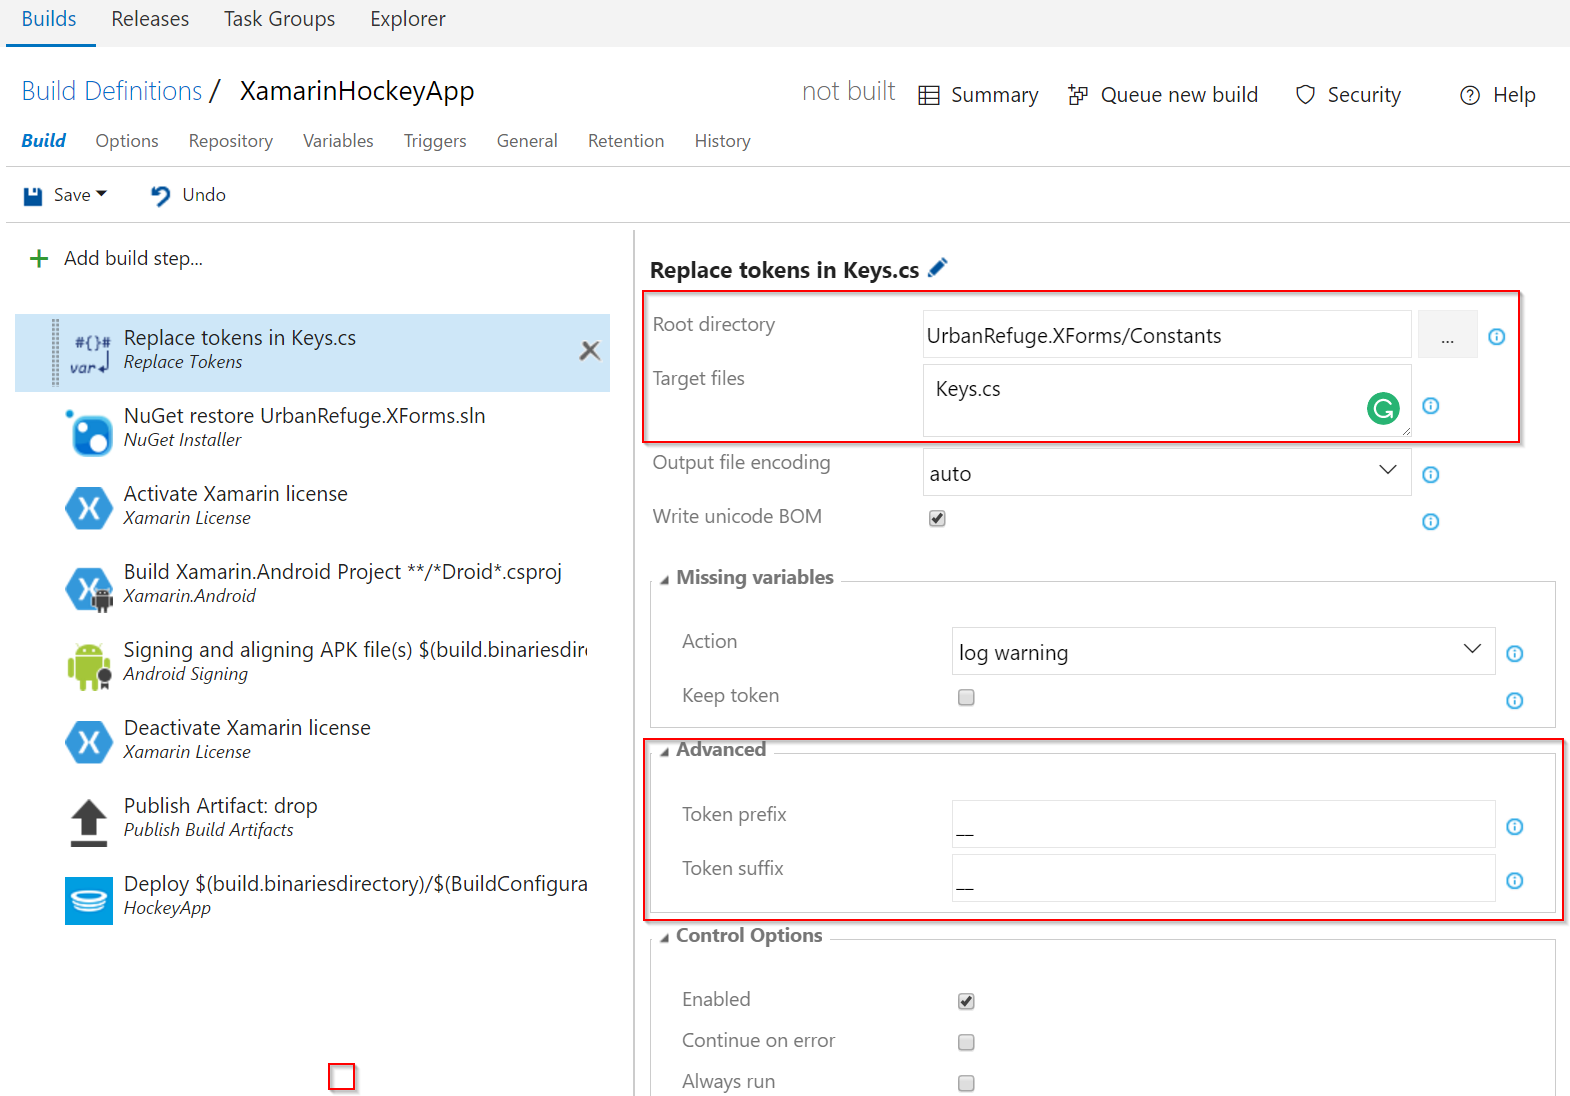
After the task is in the correct place, we need to configure it to read the correct file and set the token prefix/suffix. The Root directory can be configured to to look at the entire solution or a specific folder. I perfer to keep all the configuration varaibles in a single file, so I have scoped the Root directory to a specifc folder called Constants in the UrbanRefuge.XForms project.
In the Target files option I have specified Keys.cs. You can also use wild cards when specifing the Target files option but becuase all the values are in one file I only specify the file ```Keys.cs``. You will see an example of what this file looks like in the next step.
Next up I changed the settings for Token prefix and Token suffix under the Advanced section to use a double underscore (__). This was a personal preference and can be anything you decide.
The configuration is the following:
Note: Make sure you click Save under the build tab to save configuration and the new task.
5. Setup Source Code File
Now that we have VSTS Replace Token task added to our build pipeline inside VSTS, it is time to make sure we have configured the Keys.cs file properly in our source code. This file will hold all of the placeholder tokens that the Replace Token task is going to work with. In this file each setting is a constant and uses the format __VariableName__.
namespace UrbanRefuge.XForms.Constants
{
    public class Keys
    {
        public const string AndriodHockeyAppKey = "__AndriodHockeyAppKey__";

        //Azure B2C
        public static string ClientID = "__AzureB2CClientID__";
        public static string[] Scopes = {ClientID};
        public static string SignUpSignInpolicy = "__AzureB2CSignupPolicy__";
        public static string Authority = "__AzureB2CAuthority__";
        public static string ApiUrl = "__AzureB2CApiUrl__";

        //Certs
        public static string URBAN_PUBLIC_KEY = "__UrbanRefugePublicKey__";
        public static string B2C_PUBLIC_KEY = "__B2CPublicKey__";
    }
}
This is the code that anyone browsing the opensource project on GitHub would see. There is obviously no secrets here but the place holders will be replaced when the Replace Token task runs in VSTS as part of the build and deploy to HockeyApp.
You will also notice that I have items like ApiUrl which enables me to change the URL of my API that I will be calling; Enabling me to have different versions of my app running against my Dev, QA and production environments. So this techinique is not limited to just secrets but also configuration values.
6. Add Variables in VSTS
The final step before kicking off a build is to add all the variables to VSTS. This is pretty straight forward with the option of making the variables secrets inside VSTS. By clicking the lock icon next the varaible, other team members will be able to see the varaible names but not the values. In this case, we are using the variables with the Replace Token task but this is also where you would set environment variables for applications that would need them.
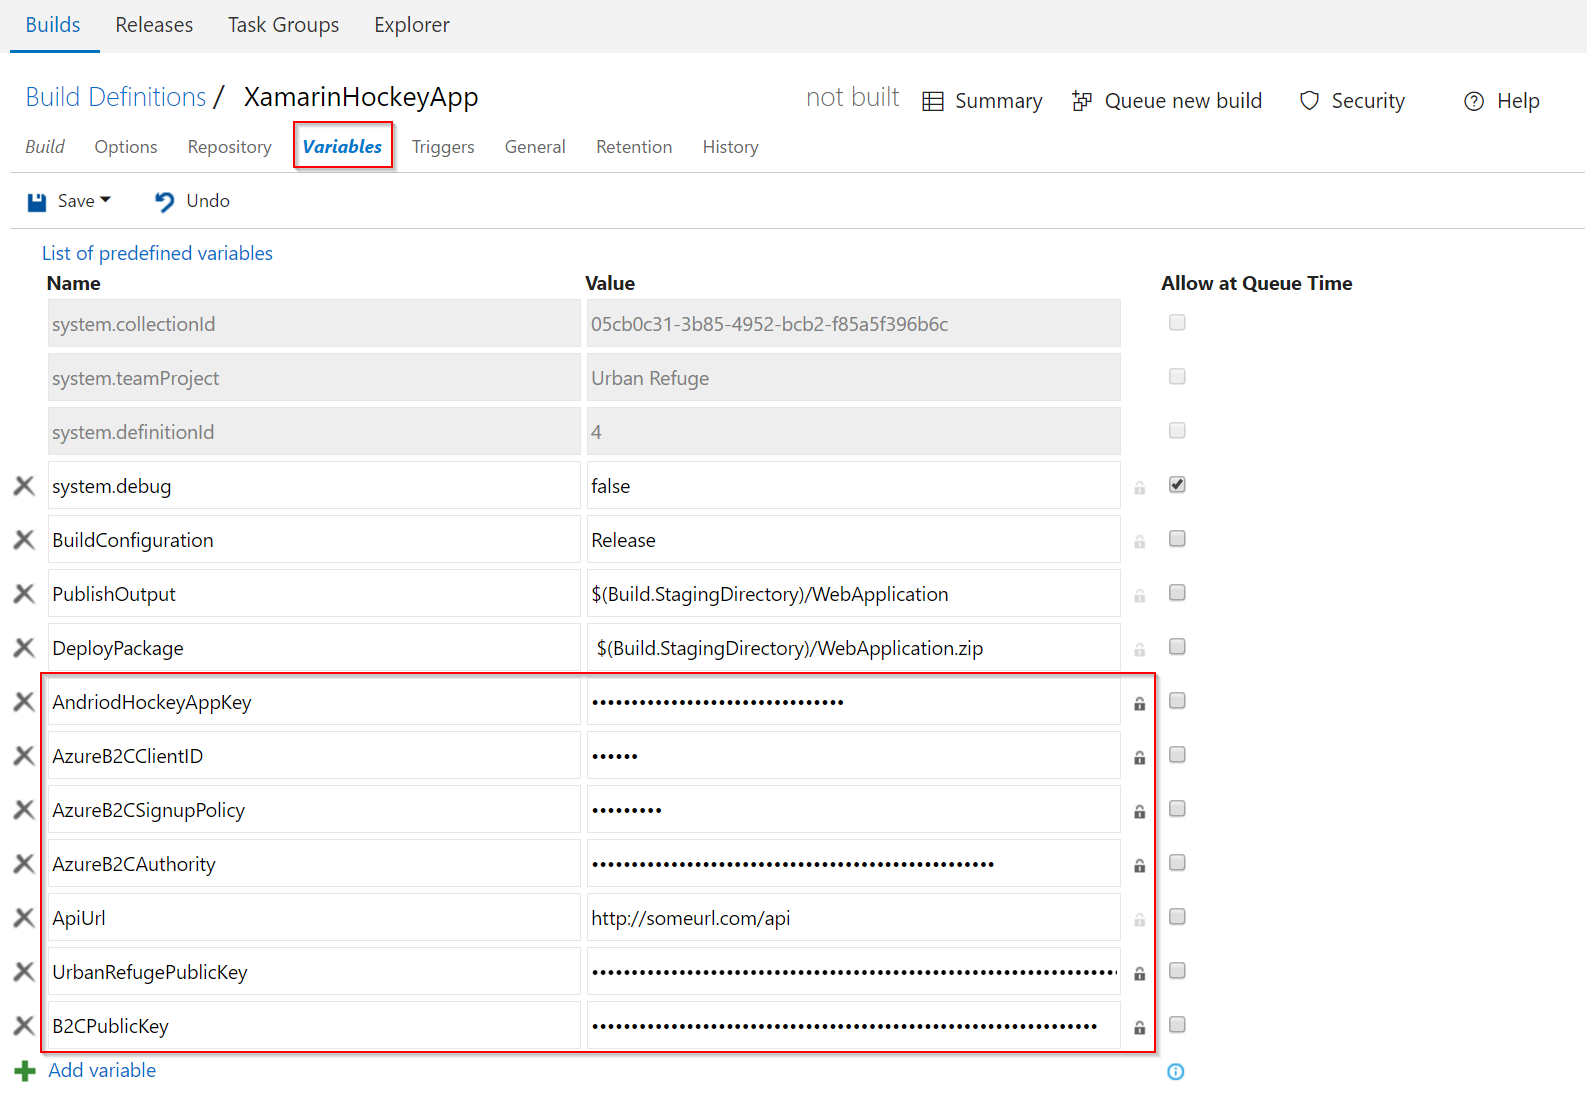
Note: The variable names are names between the double underscores in the source and do not include the double underscrore.
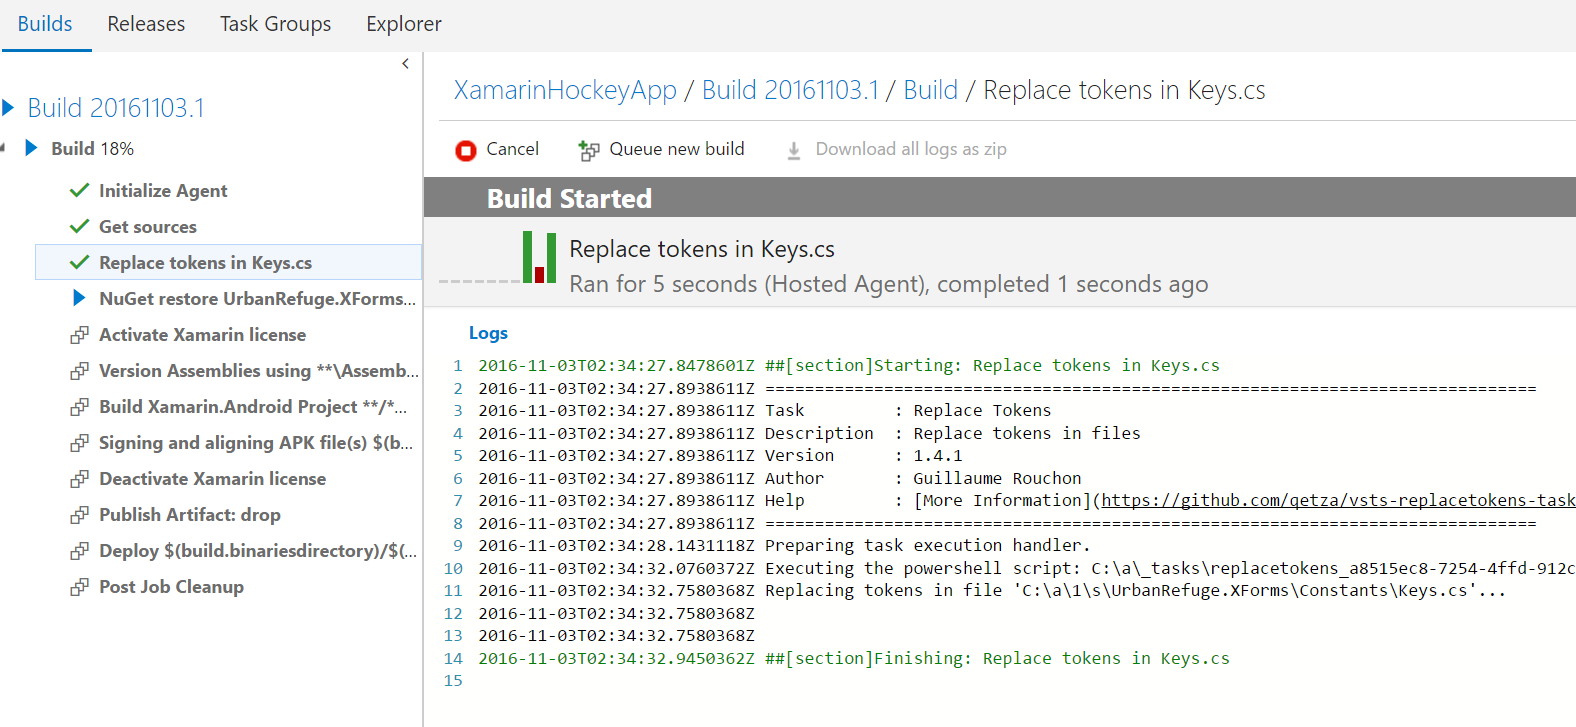
7. Run Build
Finally run the build for your applicaiton and it should build and deploy to HockeyApp as a new version!
Conclusion and Final thoughts
By using the extensible configuration system and a community build task we are now able to have an opensource project with out having to give up on any of the niceities that come along with a Continuous Build and Deployent practices.
Whether we use the Replace Tokens task or the Collins ALM Build and Release Tools depends on which we pefere and if we need any extra build tasks like the Version Assemblies task that Collins ALM Build and Release Tools has. Who knows there may even be other options in the Market Place when do your search.
Note: Here I have only configured the keys for some of my services. In the case of Xamarin crossplatform apps you will likely have configuration settings that are specific to each platform. For instance, for Andriod you might have configuration settings in the AndroidManifest.xml file for Maps API key. Or on iOS you might have specific configuration that needs to be changed in the Info.plist file. In this case you can add another build step and congifure it for that file specifcally using steps 3-7 as guidance (or change configuration in existing Replace Token step).
26 Oct 2016
This past weekend I was able to partcipate in Hack Harvard 2016 as a mentor. Hackathon are always a great time and this year there were some really great hacks ranging from solving social media bullying to auto populating calendars to a portable translator.
I got to work with lots of great teams on lots of problems but there is one that I wanted to make sure got documented. Thanks to Moaaz Elsayed who did a create write up on How to Connect Unity to Cognitive Services and Azure Table Storage.
When using Unity to make exteranl HTTP request, there are a few nuances around how you need format the requests and Moaaz did a great job summarizing a few of the challenges he resolved over the course of the weekend. It covers how to attach an image, add request headers, and adding a json body to a post request. Many other scenarios will either be a combination or derivative of those.
Be sure to check it out at:
https://github.com/moaazelsayed/UnityAzureConnection